Sweetheart Hat Pattern

I wrote a guest blog this week over at Her Exchange about self-care through creativity, especially knitting and crocheting.  If you read the article, you’ll read about how after having kids, I really lost the joy in knitting in crocheting due to real or self-imposed deadlines and closed down my Etsy shop.  I have decided to change the focus of my shop and reopen!  Instead of selling finished products, I’m going to try to start selling my patterns.  And if I’m being truthful, I really enjoy the design aspect of coming up with a new pattern more than I enjoy making that pattern over and over for clients.

Without further ado, here is my first pattern:  the Sweetheart Hat.  I designed this hat for my daughter as a Valentine’s seasonal hat, but hearts are really always in season, so she doesn’t have to put it away after the holiday.  The pattern features my favorite heart cable that I’ve been putting on everything since college.  The hat can be worked in sizes baby through adult, but the cable size does not change so the cable will be more prominent on the baby sizes and less prominent on the adult sizes.

Buy the pattern on Etsy here or on Ravelry here.

Materials:

Go to this link to buy a kit with everything you need to make this hat on Amazon.

  • Worsted weight yarn
  • 2 Size US 8 needles for cable
  • 5 Size US 6 double pointed needles for remainder of hat
  • Cable needle
  • Tapestry needle


Stitches Used:

Please comment below with any questions!


Horizontal Cable Knit Hat

Life got busy around the holidays, and I got behind on posting! One of my recent projects has been a new hat for Zoe. Baby heads grow so fast and none of her hats fit! The little jacket she wears all the time doesn’t have a hood, so she needed something to keep her little downy noggin’ warm. I was in love with some horizontal cabled hats I saw on Pinterest. I often make up my own patterns, but was interested in the construction techniques of this hat, so I bought a pattern I liked at Posh Patterns on Etsy. The pattern was quick, easy, and I love the way it turned out. We’ve already had many comments on it as we are out about town. The pattern can also easily be adjusted to use a different type of cable and now I have new ideas for how to construct a hat!


Superman Koozie

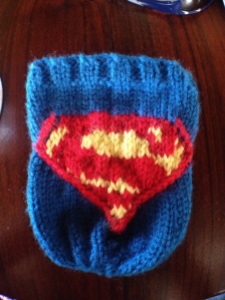
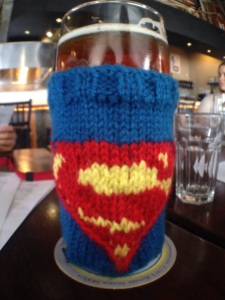
I created a Superman inspired koozie pattern.  The main design is achieved through fair isle stranding.  The crisp, raised border is cabled.  Enjoy!  You can also buy the koozie here.
20140628-090731-32851188.jpg

20140628-090826-32906635.jpg

Disclaimer:  Feel free to make this pattern for your personal use, for your platypus, for charity, or to sell.  The only thing I ask is that you please do not sell it on Etsy.  If you are interested in purchasing a koozie from my Etsy store, you may do so here.

Materials:

  • 5 Size US 4 double pointed needles
  • Vanna’s Choice Yarn in Sapphire (B)
  • Vanna’s Choice Yarn in Scarlett (R)
  • Vanna’s Choice Yarn in Radiant Yellow (Y)
  • Stitch Holder or Extra Needle

Stitches Used:

Gauge:

10 stitches and 15 rows = 2″ Stockinette Stitch

Instructions:

Cast on 48 stitches with B.  Distribute stitches evenly on four of the double pointed needles.

R1:  Knitting in round being careful not to twist the cast on stitches, (kB 2, pB 2) 12 times.

R2-R5:  (kB 2, pB 2) 12 times

R6-R11:  kB 48

R12:  kB 15, kR 18, kB 15

R13:  kB 14, slip next stitch on cable needle and hold in back, kR 1, knit held stitch with R, kR16, slip next stitch on cable needle and hold in front, kR 1, knit held stitch with R, kB 14

R14:  kB 13, slip next stitch on cable needle and hold in back, kR 1, knit held stitch with R, kY 2, kR 12, kY 2, kR 2, slip next stitch on cable needle and hold in front, kR 1, knit held stitch with R, kB 13

R15:  kB 12, slip next stitch on cable needle and hold in back, kR 1, knit held stitch with R, kY 2, kR 5, kY 6, kR 3, kY 1, kR 2, kY 1, slip next stitch on cable needle and hold in front, kR 1, knit held stitch with R, kB 12

R16:  kB 11, slip next stitch on cable needle and hold in back, kR 1, knit held stitch with R, kY 2, kR 4, kY 10, kR 4, kY 2, slip next stitch on cable needle and hold in front, kR 1, knit held stitch with R, kB 11

R17:  kB 10, slip next stitch on cable needle and hold in back, kR 1, knit held stitch with R, kY 2, kR 5, kY 10, kR 4, kY 3, slip next stitch on cable needle and hold in front, kR 1, knit held stitch with R, kB 10

R18:  kB 10, slip next stitch on cable needle and hold in FRONT, kB 1, knit held stitch with R, kR 1, kY 1, kR 7, kY 14, kR 1, slip next stitch on cable needle and hold in BACK, kR 1, knit held stitch with B, kB 10

R19:  kB 11, slip next stitch on cable needle and hold in front, kB 1, knit held stitch with R, kR 17, kY 4, kR 1, slip next stitch on cable needle and hold in back, kR 1, knit held stitch with B, kB 11

R20:  kB 12, slip next stitch on cable needle and hold in front, kB 1, knit held stitch with R, kR 18, kY 1, kR 1, slip next stitch on cable needle and hold in back, kR 1, knit held stitch with B, kB 12

R21:  kB 13, slip next stitch on cable needle and hold in front, kB 1, knit held stitch with R, kR 1, kY 1, kR 16, slip next stitch on cable needle and hold in back, kR 1, knit held stitch with B, kB 13

R22:  kB 14, slip next stitch on cable needle and hold in front, kB 1, knit held stitch with R, kR 1, kY 2, kR 13, slip next stitch on cable needle and hold in back, kR 1, knit held stitch with B, kB 14

R23:  kB 15, slip next stitch on cable needle and hold in front, kB 1, knit held stitch with R, kR 1, kY 7, kR 6, slip next stitch on cable needle and hold in back, kR 1, knit held stitch with B, kB 15

R24:  kB 16, slip next stitch on cable needle and hold in front, kB 1, knit held stitch with R, kR 5, kY 5, kR 2, slip next stitch on cable needle and hold in back, kR 1, knit held stitch with B, kB 16

R25:  kB 17, slip next stitch on cable needle and hold in front, kB 1, knit held stitch with R, kR 10, slip next stitch on cable needle and hold in back, kR 1, knit held stitch with B, kB 17

R26:  kB 18, slip next stitch on cable needle and hold in front, kB 1, knit held stitch with R, kR 8, slip next stitch on cable needle and hold in back, kR 1, knit held stitch with B, kB 18

R27:  kB 19, slip next stitch on cable needle and hold in front, kB 1, knit held stitch with R, kR 1, kY 4, kR 1, slip next stitch on cable needle and hold in back, kR 1, knit held stitch with B, kB 19

R28:  kB 20, slip next stitch on cable needle and hold in front, kB 1, knit held stitch with R, kR 1, kY 2, kR 1, slip next stitch on cable needle and hold in back, kR 1, knit held stitch with B, kB 20

R29:  kB 21, slip next stitch on cable needle and hold in front, kB 1, knit held stitch with R, kR 2, slip next stitch on cable needle and hold in back, kR 1, knit held stitch with B, kB 21

R30:  kB 22, slip next stitch on cable needle and hold in front, kB 1, knit held stitch with R, slip next stitch on cable needle and hold in back, kR 1, knit held stitch with B, kB 22

R32:  kB 22, kfb of next stitch with B, k2tog with R, kB 23

Continue with B only

R33-R36:  k48

R37:  (k2, k2tog) 12 times

R38:  (k2, k2tog) 9 times

R39:  (k1, k2tog) 9 times

R40:  (k2tog) 9 times

Difficulty:  Easy

Time Required:  2 Movies

Overall Experience:  Excellent

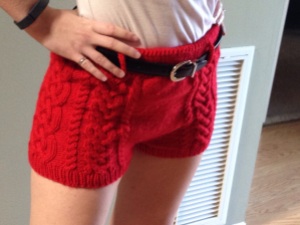
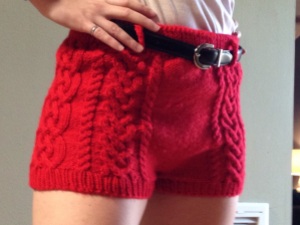
Bombshell Shorts

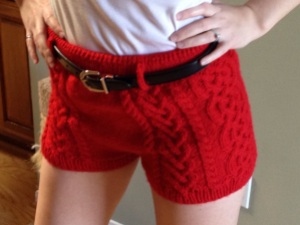
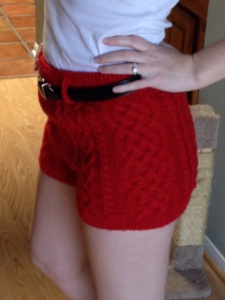
I finally finished my Bombshell Shorts!  It took me a while because I had several other projects in the works at the same time.  They turned out adorable.  I love love love them.  The pattern was very customizable.  My goal here is to share how I customized it and what I would do differently if I made them again.

20140329-164521.jpg

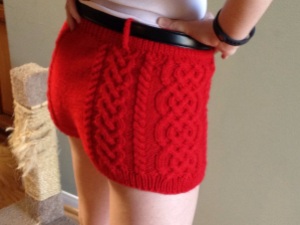
  • The length of the shorts is customizable.  The length that is suggested is longer than I would wear, but a short length suggestion isn’t given.  I knitted the band at the bottom of the shorts and knit the first 8 rows of the first 16 row repeat before joining.  I like the length of the front of the shorts, but my butt requires more material in the back.  They are shorter than I would prefer in the back.  I would knit 12-16 rows of the first 16 row repeat before joining if I were to make them again.  Ideally, the back could be made longer.  At least on me, the difference in length in the front and back is noticeable if you are really looking.  I don’t think there is really any way to do that with this pattern.
  • The pattern suggests that the knitter can decrease for butt shaping if a gap starts to form, but doesn’t give any details on where to decrease.  I didn’t have a noticeable gap until I reached Row 8 of my fourth 16 row repeat.  I made a size medium and decreased as follows:
    • Row 9:  Pearl each stitch until two stitches before the first 4-Stitch Cable, pearl two together, follow established pattern until last 4-Stitch Cable is complete, pearl two together though back loops, pearl until end of row (following rows will have two fewer pear stitches in back panel)
    • Row 10:  Follow pattern until second 4-Stitch Cable is complete, pearl 1, pearl two together, Celtic Cable, pearl two together through back loops, follow pattern until sixth 4-Stitch Cable is complete, pearl 1, pearl two together, Celtic Cable, pearl two together through back loops, follow pattern until end of row (the following rows will have one fewer pearl stitch on each side of Celtic Cable)
    • Row 11:  Pearl each stitch until two stitches before the first 4-Stitch Cable, pearl two together, follow established pattern until last 4-Stitch Cable is complete, pearl two together though back loops, pearl until end of row (following rows will have two fewer pear stitches in back panel)
    • Row 12:  Follow established pattern
    • Row 13:  Pearl each stitch until two stitches before the first 4-Stitch Cable, pearl two together, follow established pattern until last 4-Stitch Cable is complete, pearl two together though back loops, pearl until end of row (following rows will have two fewer pear stitches in back panel)
    • Row 14:  Follow established pattern
    • Row 15:  Pearl each stitch until two stitches before the first 4-Stitch Cable, pearl two together, follow established pattern until last 4-Stitch Cable is complete, pearl two together though back loops, pearl until end of row (following rows will have two fewer pear stitches in back panel)
    • Row 16:  Follow established pattern
  • My shorts bunch a little bit in the front crotch area.  If I were to make these again, I would try to work out some shaping in this area.

Difficulty:  Moderate-Hard

Time Required:  40 Movies

Overall Experience:  Excellent

20140329-164446.jpg

20140329-164720.jpg

20140329-164850.jpg

20140329-165054.jpg

Bombshell Shorts Week 4

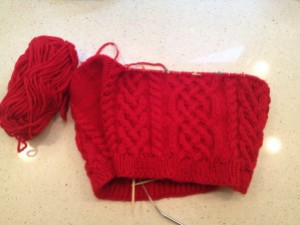
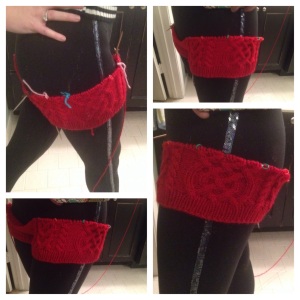
I did not get a lot of knitting accomplished over the last week.  My parents came into town.  Then my husband and I both caught my dad’s illness.  Here’s a progress picture for the Bombshell Shorts.  I’m still loving these cables!

20140303-175502.jpg

Obsessed with Bombshell Shorts

None of my recent projects have featured cables, and I didn’t realize how much I missed them until I cast on Bombshell Shorts!  I’ve been obsessed with these cables this week and basically neglecting my other projects.  I also really like how the shorts are fitting thus far.  Please ignore my spandex-clad booty.

20140216-210956.jpg