This pattern isn’t necessarily Valentine’s related, I just liked it!

Find the pattern here.

crafting. recipes. life.


I love this cozy because instead of hearts, it has lips. The lip pattern can be found here.

I decided to have some fun, so instead of using a plain cozy pattern, I made up one with a little extra texture.
Stitches Used:

Cozy Pattern:
Chain 30 and sl st in first chain being careful not to twist.
R1: Ch 2, hdc in each chain around, sl st to first hdc (30 hdc)
R2: Ch 2, hdc in third loop around, sl st to first hdc (30 hdc)
R3: Repeat R2
R4: Repeat R1
R5: Repeat R2
R6: Repeat R1
R7: Repeat R2
R8: Repeat R2
R9: Repeat R1
R10: Repeat R2
R11: Repeat R1
R12: Repeat R2
R12: Repeat R2
R13: Repeat R1
Break yarn. Sew on applique, and weave in ends.

While I was pregnant with Zoe I found a pattern on Pinterest called Mandala Madness. It looked like so much fun! The pattern created a giant, whimsical circle of crazy crochet techniques and looked like a blast. But what does one do with a giant whimsical circle? I decided to make it and use it as a rug in the nursery.

This project was FUN. It is probably the most fun I have every had crocheting a project. Every row was a different color or texture. I finished all but the last two rows on it before having Zoe. Since her brother moved to a big boy bed last night and she now has a crib in her room, I decided I had better finish the rug so we can finish the nursery. (I’m not finished with her crib blanket, either.) So, eight months later, the rug is finished! I actually didn’t finish the 18 part pattern, I stopped when I got to the rug dimensions that I wanted. I can always add more rows onto it later if I decide to reuse it as a larger circular blanket. Right now it is about 4.5 feet in diameter, which is a great rug but a small blanket.


My daughter Zoe is going to be Zoe from Sesame Street for Halloween. I made her a Zoe inspired knit/crochet hat to be worn with a ballerina outfit since Zoe from Sesame Street loves to dance!

Materials:
Stitches Used:
Directions:
Hat:
First, knit your hat in the size desired using my basic hat pattern using gold worsted weight yarn.

Eyes (Make 2):
R1: With black using a magic ring, sc six, on the last stitch switch to white (6 stitches)
R2: Two sc in each sc around (12 stitches)
R3 and R4: Sc in each sc around (12 stitches)
R5: Sc2tog around (6 stitches), stuff eye with fiber fill
R6: Sc2tog around (3 stitches), break yarn and leave end for sewing
R1: With teal using a magic ring, sc eight (8 stitches)
R2: Two sc in each sc around (16 stitches)
R3, R4, R5: Sc in each sc around, on last stitch of R5, switch to brown (16 stitches)
R6: Sc in eash sc around, break yarn and leave end for sewing
Sew eyelids onto eyes using pictures below for placement. Sew the eyes to the hat using pictures for placement. Sew the eyes to each other for stability.


Nose:
R1: Using pink using a magic ring, sc six (6 stitches)
R2: Sc, 2 sc in next stitch, sc twice, 2 sc in next stitch, sc (8 stitches)
R3: Sc in each sc around (8 stitches)
R4: Sc, sc2tog, sc twice, sc2tog, sc (6 stitches), stuff nose with fiber fill
R5: sc2tog three times (3 stitches), break yarn and leave end for sewing
Sew nose to hat between the eyes. Sew to eyes for stability.

Hair:
Cut the “eyelash” yarn into six inch pieces. Follow this tutorial for how to attach the hair to the hat. I placed one “hair” approximately every half inch on the entire back half of the hat.


Bow:
R1: With purple ch 4, sc in second chain from hook and in next two chains (3 stitches)
R2 – R6: Sc in each sc across (3 stitches), break yarn and work in ends.
Cut long piece of purple yarn. Wrap the yarn around the center of your crocheted piece several times tightly to make it look like a bow. Used the remaining yarn to sew it to the hat.

Dragonfly:
R1: With red crochet thread and size 3 hook, ch 5 (foundation chain), sc in second ch from hook, sc, ch 5, sl st in fifth ch from hook, sc in same foundation ch as previous sc, sc in next foundation ch, ch 7, sl st in seventh ch from hook, sc in same foundation ch as previous sc, sc in last foundation ch 3 times, working in back of foundation ch sc in next ch, ch 7, sl st in seventh ch from hook, sc in same foundation ch as previous sc, sc in next foundation ch, ch 5, sl st in fifth ch from hook, sc in same foundation ch as previous sc, two sc in last foundation ch, sl st to first sc
R2: Working in foundation ch, sc over first sc from R1, (sl st, sc, hdc, dc, tr, dc, hdc, sc, sl st) in chain loop, (sl st, sc, hdc, dc, tr 3 times, dc, hdc, sc, sl st) in next chain loop, skipping two foundation ch, sl st in next foundation chain (end chain), sc three times, sl st in same foundation ch, (sl st, sc, hdc, dc, tr 3 times, dc, hdc, sc, sl st) in next chain loop, (sl st, sc, hdc, dc, tr, dc, hdc, sc, sl st) in next chain loop, skipping two foundation ch, sc in next foundation chain, sc in same foundation ch, ch 3, sl st in third chair from hook, sc in same foundation ch, sl st to first sc in R2, break off and leave long piece of yarn for sewing.
Sew dragon fly to head as shown.


Check out the full costume in my Elmo and Zoe Halloween Costumes post!
I decided to knit a Multiplicity purse for my sister since I loved mine so much. (See my posts about Multiplicity 1 and Multiplicity 2 for the others I made.) I chose a royal purple and mustard yellow, a play on her school colors of purple and gold. The only thing I didn’t like about mine is that it didn’t close. I knit button holes into the main pocket this time and loved the product!


Difficulty: Moderate
Time Required: 12 Movies
Overall Experience: Excellent
For my 10-year high school class reunion (Am I really that old?), I was amassing $1 gag gifts to give away as awards. (More on that in a later post.) One gift idea on my wish list was a “There’s no place like home” mug, t-shirt, whatever. Obviously I wasn’t going to find anything Wizard of Oz themed within my budget. I had seen a bunch of cute DIY mugs on Pinterest. One popular design came where people had drawn states with hearts over a city in sharpie on the mug. I decided to do something similar for the reunion. After researching many sites online, these are the steps that I followed to make the mug. I will update this post if the design immediately washes off. I thought it turned out really cute!

Materials:
Instructions:
The mug should be dishwasher safe according to what I have read. I will let you know how it turns out!
Difficulty: Easy
Time Required: 15 minutes of work, about 36 hours of waiting
Overall Experience: Excellent
After carrying my Multiplicity for a couple of days, a friend asked me to make one in purple and off-white. I really love how it turned out!


Difficulty: Moderate
Time Required: 12 Movies
Overall Experience: Excellent
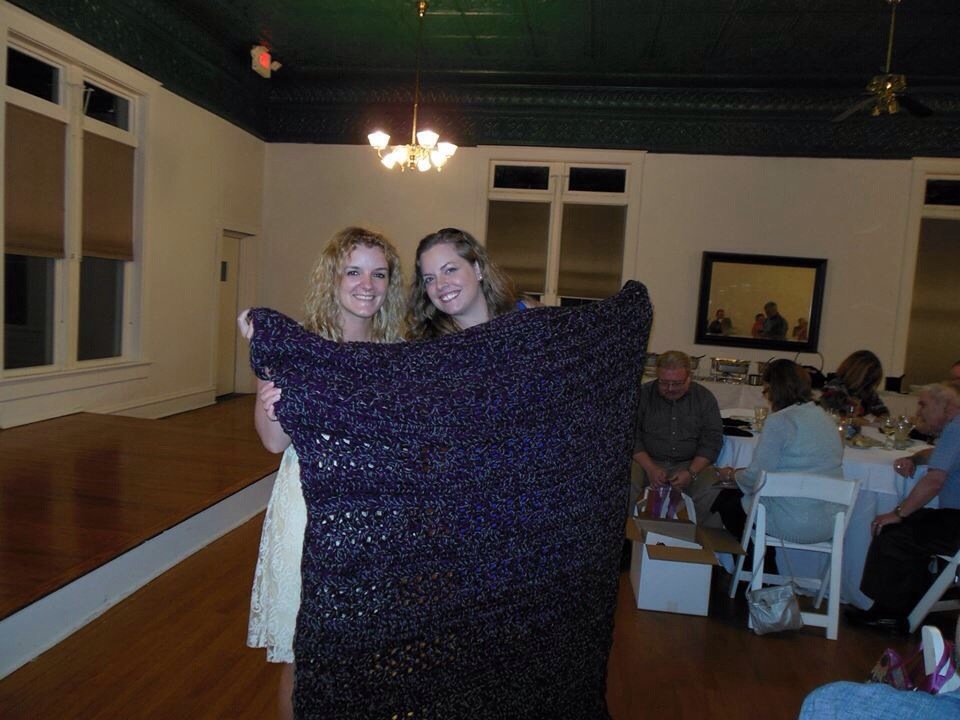
An acquaintance who had been in countless wedding once showed me a crocheted blanket that a bride had made her. She gushed about how that gift was the most meaningful bridesmaid gift she had ever received. Since I crochet, I tucked that little tidbit of information away for later. When I got engaged, I pushed my fiance to help me pick out colors so I could start on the pile of blankets I was planning on making.

I decided to make blankets for our three bridesmaids and both sets of parents. I had to make five blankets, so I needed to find an afghan pattern that I could make fairly quickly. I have made many afghans that took me months to make. I didn’t have that much time. I had an afghan pattern pinned named “Super Quick Throw.” The blanket was crocheted with four strands of yarn held together as one with a giant hook. That’s about as quick as one can hope for. The blankets crocheted beautifully.

I do have a few tips:
Difficulty: Easy
Time Required: About 13 movies per blanket
Overall Experience: Excellent