Egg-straordinary Easter Hat Pattern

One of my goals as I try to get my knitting pattern business off the ground was to create a pattern inspired by every major holiday this year.  When I thought of Easter, my mind initially jumped to bunnies and Easter bonnets, but there are a lot of bunny and bonnet hats out there already.  Next my mind jumped to Easter eggs.  A colorful Easter egg pattern could be really fun to make!  And the idea was born.

Ever since Lion Brand came out with their bonbons yarn, I’ve been wanting to make a project out of them!  I finally did it, and here is that project.  This hat was perfect because I wanted make an Easter egg inspired hat with lots of colors.  The bonbons brights colorway came in a sport weight yarn, perfect for spring weather.

Buy the pattern for $5 on Etsy here or on Ravelry here.

Materials:

Go to this link to buy a kit with everything you need to make this hat on Amazon.


Please comment below with any questions!

Sweetheart Hat Pattern

I wrote a guest blog this week over at Her Exchange about self-care through creativity, especially knitting and crocheting.  If you read the article, you’ll read about how after having kids, I really lost the joy in knitting in crocheting due to real or self-imposed deadlines and closed down my Etsy shop.  I have decided to change the focus of my shop and reopen!  Instead of selling finished products, I’m going to try to start selling my patterns.  And if I’m being truthful, I really enjoy the design aspect of coming up with a new pattern more than I enjoy making that pattern over and over for clients.

Without further ado, here is my first pattern:  the Sweetheart Hat.  I designed this hat for my daughter as a Valentine’s seasonal hat, but hearts are really always in season, so she doesn’t have to put it away after the holiday.  The pattern features my favorite heart cable that I’ve been putting on everything since college.  The hat can be worked in sizes baby through adult, but the cable size does not change so the cable will be more prominent on the baby sizes and less prominent on the adult sizes.

Buy the pattern on Etsy here or on Ravelry here.

Materials:

Go to this link to buy a kit with everything you need to make this hat on Amazon.

  • Worsted weight yarn
  • 2 Size US 8 needles for cable
  • 5 Size US 6 double pointed needles for remainder of hat
  • Cable needle
  • Tapestry needle


Stitches Used:

Please comment below with any questions!


Horizontal Cable Knit Hat

Life got busy around the holidays, and I got behind on posting! One of my recent projects has been a new hat for Zoe. Baby heads grow so fast and none of her hats fit! The little jacket she wears all the time doesn’t have a hood, so she needed something to keep her little downy noggin’ warm. I was in love with some horizontal cabled hats I saw on Pinterest. I often make up my own patterns, but was interested in the construction techniques of this hat, so I bought a pattern I liked at Posh Patterns on Etsy. The pattern was quick, easy, and I love the way it turned out. We’ve already had many comments on it as we are out about town. The pattern can also easily be adjusted to use a different type of cable and now I have new ideas for how to construct a hat!


Elmo Inspired Hat version 2

I made up an Elmo Inspired Hat pattern a few years ago to go with my Oscar Inspired Hat; however, I wanted a hat without a mouth to go with my Zoe Inspired Hat, so here is a no mouth version with a slight variation on the eyes that I like much better.

This is my son wearing the hat as part of his Halloween costume.  He is Elmo-obsessed right now.

Materials:

  • Red yarn (I used Vanna’s Choice in Scarlet)
  • White yarn (I used Vanna’s Choice in White)
  • Black yarn (I used Vanna’s Choice in Black)
  • Orange yarn (I used some Red Heart yarn from my stash.  I’m not sure the exact shade)
  • Tapestry needle
  • Size E crochet hook
  • Knitting needle size needed for my basic hat pattern
  • Fiber fill


Stitches Used:

Directions:

Hat:

First, knit your hat in the size desired using my basic hat pattern using red.  I purposely sized up one size on my son’s hat below so that he can wear it longer.

Here is my daughter wearing a more fitted version of the hat.

Eyes (make 2) (This is different from the original pattern because it is worked in continuous rounds.  It makes the pupil of the eye look more uniform):

R1:  With black use magic ring technique to start round, ch 1, sc 8, on the last stitch switch to white   Cut black yarn and work in ends. (8 stitches)

Continue with white.

R2:  2 sc in first stitch from R1 and in each sc around (16 stitches)

R3:  Sc 3, 2 sc in next stitch around (20 stitches)

R4-R6:  Sc in each stitch around (20 stitches)

R7:  Sc 3, sc2tog around (16 stitches)

R8:  Sc2tog around (8 stitches)

R9:  Sc2tog around (4 stitches)

Cut yarn and leave tail for sewing.


Nose:

R1:  With O use magic ring technique to start round, ch 1, sc 8 (8 stitches)

R2:  2 sc in first stitch from R1 and in each sc around (16 stitches)

R3:  Sc 3, 2 sc in next stitch around (20 stitches)

R4-R10:  Sc in each stitch around (20 stitches)

R11:  Sc 3, sc2tog around (16 stitches)

R12:  Sc2tog around (8 stitches)

R13:  Sc2tog around (4 stitches)

Cut yarn and leave tail for sewing.

Using a picture of Elmo as inspiration, tack the eyes and nose onto the hat using a tapestry needle and yarn.  I would also suggest tacking the eyes and nose to each other.


Zoe Inspired Hat

My daughter Zoe is going to be Zoe from Sesame Street for Halloween. I made her a Zoe inspired knit/crochet hat to be worn with a ballerina outfit since Zoe from Sesame Street loves to dance!

Materials:

  • Gold worsted weight yarn (I used Yarn Bee Soft Secret in Saffron)
  • Gold “eyelash” or “fur” yarn (I used Yarn Bee Haute Fur in Goldenlash)
  • Small amounts of black, white, brown, pink, teal, and purple worsted weight yarn
  • Red crochet thread
  • Knitting needle size needed for my basic hat pattern
  • Size E crochet hook
  • Size 3 crochet hook
  • Tapestry needle
  • Fiber Fill


Stitches Used:

Directions:

Hat:

First, knit your hat in the size desired using my basic hat pattern using gold worsted weight yarn.

Eyes (Make 2):

R1:  With black using a magic ring, sc six, on the last stitch switch to white (6 stitches)

R2:  Two sc in each sc around (12 stitches)

R3 and R4:  Sc in each sc around (12 stitches)

R5:  Sc2tog around (6 stitches), stuff eye with fiber fill

R6:  Sc2tog around (3 stitches), break yarn and leave end for sewing

R1:  With teal using a magic ring, sc eight (8 stitches)

R2:  Two sc in each sc around (16 stitches)

R3, R4, R5:  Sc in each sc around, on last stitch of R5, switch to brown (16 stitches)

R6:  Sc in eash sc around, break yarn and leave end for sewing

Sew eyelids onto eyes using pictures below for placement.  Sew the eyes to the hat using pictures for placement.  Sew the eyes to each other for stability.

Nose:

R1:  Using pink using a magic ring, sc six (6 stitches)

R2:  Sc, 2 sc in next stitch, sc twice, 2 sc in next stitch, sc (8 stitches)

R3:  Sc in each sc around (8 stitches)

R4:  Sc, sc2tog, sc twice, sc2tog, sc (6 stitches), stuff nose with fiber fill

R5:  sc2tog three times (3 stitches), break yarn and leave end for sewing

Sew nose to hat between the eyes.  Sew to eyes for stability.

Hair:

Cut the “eyelash” yarn into six inch pieces.  Follow this tutorial for how to attach the hair to the hat.  I placed one “hair” approximately every half inch on the entire back half of the hat.

Bow:

R1:  With purple ch 4, sc in second chain from hook and in next two chains (3 stitches)

R2 – R6:  Sc in each sc across (3 stitches), break yarn and work in ends.

Cut long piece of purple yarn.  Wrap the yarn around the center of your crocheted piece several times tightly to make it look like a bow.  Used the remaining yarn to sew it to the hat.

Dragonfly:

R1:  With red crochet thread and size 3 hook, ch 5 (foundation chain), sc in second ch from hook, sc, ch 5, sl st in fifth ch from hook, sc in same foundation ch as previous sc, sc in next foundation ch, ch 7, sl st in seventh ch from hook, sc in same foundation ch as previous sc, sc in last foundation ch 3 times, working in back of foundation ch sc in next ch, ch 7, sl st in seventh ch from hook, sc in same foundation ch as previous sc, sc in next foundation ch, ch 5, sl st in fifth ch from hook, sc in same foundation ch as previous sc, two sc in last foundation ch, sl st to first sc

R2:  Working in foundation ch, sc over first sc from R1, (sl st, sc, hdc, dc, tr, dc, hdc, sc, sl st) in chain loop, (sl st, sc, hdc, dc, tr 3 times, dc, hdc, sc, sl st) in next chain loop, skipping two foundation ch, sl st in next foundation chain (end chain), sc three times, sl st in same foundation ch, (sl st, sc, hdc, dc, tr 3 times, dc, hdc, sc, sl st) in next chain loop, (sl st, sc, hdc, dc, tr, dc, hdc, sc, sl st) in next chain loop, skipping two foundation ch, sc in next foundation chain, sc in same foundation ch, ch 3, sl st in third chair from hook, sc in same foundation ch, sl st to first sc in R2, break off and leave long piece of yarn for sewing.

Sew dragon fly to head as shown.

Check out the full costume in my Elmo and Zoe Halloween Costumes post!

Basic Knit Hat

I like to make up patterns for cute character hats, but each of those hats typically begins with a simple base hat.  For examples, see my Baby Turkey Hat, Oscar the Grouch Hat, or Elmo Hat.  Here are instructions for my favorite base hat.  I love this hat because it is very forgiving in respect to size.  It’s very stretchy and the rolled brim allows it to be longer or shorter as needed.

Here is my daughter Zoe  modeling the newborn size hat.  (She is going to be Zoe from Sesame Street for Halloween, and this is the base for her Zoe hat.)

Here is my son Jack wearing the child hat.  He is actually toddler-sized, but I made it larger so he could wear it longer.  (She is going to be Elmo for Halloween, and this is the base for his Elmo hat.)

Materials:

  • 5 US Size 6, 7, or 8 double pointed knitting needles (see table below to determine size)
  • Worsted weight yarn (my favorite is the Vanna’s Choice brand)
  • Tapestry needle


Stitches:

Size Head Circumference (in.) # of Stitches to Cast On Knitting Needle Size Hat Circumference (in) Hat Length Before Decrease (in)
Micro-Preemie 9 36 6 8 3
Preemie 11 48 6 10 3.5
Newborn 13 60 6 12 4
6 months 15 72 6 14 4.5
1 year 17 72 7 16 5
Toddler 18 72 7 16 5.5
Child 20 84 6 19 6
Small Adult 21 84 6 19 6.5
Medium Adult 22 84 7 21 7
Large Adult 23 84 7 21 7.5
XL Adult 24 84 8 23 8

Hat Instructions:

  • With yarn, cast on number of stitches in the table for the size desired and distribute them evenly on four double pointed needles.
  • Join in round (being careful not to twist!) and knit each round until the piece is the length specified in the table.  The brim of the hat will be rolled.  Unroll it to measure your length.

Crown (skip even numbered rounds for micro-preemie and preemie sizes):

R1:  (K4, SSK, K2tog, K4) around

R2:  K all stitiches

R3:  (K3, SSK, K2tog, K3) around

R4:  K all stitiches

R5:  (K2, SSK, K2tog, K2) around

R6:  K all stitiches

R7:  (K1, SSK, K2tog, K1) around

R8:  K all stitiches

R9:  (SSK, K2tog) around

R10:  (K2tog) around

Elmo Inspired Baby Hat

Note:  I have created a second version of this hat with a simpler eyes and nose pattern (that I think looks a little better) and no mouth.  Check it out here.

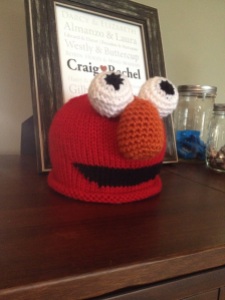
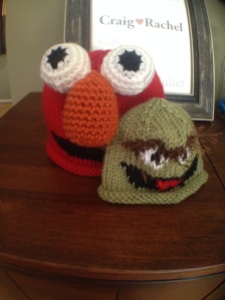
To continue my summer of baby hats (see Chappy Newsboy Caps and Lacey Summer Baby Cap), one of my coworkers had a baby (or rather his wife did).  They also have a toddler at home that loves Elmo.  I decided to rework my Oscar the Grouch hat for a newborn size and make an Elmo hat for their toddler.  I was rewarded with adorable pictures and videos of both babies the next day.  The Elmo hat was a huge hit!  I love that he liked it so much.  Usually when I make things, I don’t know if the item just sits in a drawer (meaning I wasted hours of my life) or is loved by the recipient.  The later makes me happy.  🙂

10600553_10153251051188797_1602740537430154179_n

IMG_2637

IMG_2635

Disclaimer:  Feel free to make this pattern for your personal use, for your platypus, for charity, or to sell.  The only thing I ask is that you please do not sell it on Etsy.  If you are interested in purchasing a hat from my Etsy store, you may do so here.

Gauge:  9 stitches x 13 rows = 2 in Stockinette

This hat was about 16 inches in circumference when finished.  It is quite stretchy and will stretch several inches.

Materials:

  • 5 Size US 7 double pointed needles
  • US Size G Crochet Hook
  • Tapestry needle
  • Vanna’s Choice yarn in Scarlet (R)
  • Vanna’s Choice yarn in Black (B)
  • Vanna’s Choice yarn in White (W)
  • Vanna’s Choice yarn in Terracotta (O)


Stitches Used:

Instructions:

Cast on 72 with R and distribute evenly on four needles

R1-R7:  Knitting in round, KR 72

R8:  KR 28, KB 16, KR 28

R9:  KR 26, KB 20, KR 26

R10:  KR 25, KB 22, KR 25

R11-R12:  KR 24, KB 24, KR 24

R13:  KR 23, KB26, KR 23

Continuing only in R:

R14-R34:  K 72

R35:  (K4, k2tog, ssk, K4) six times

R36:  K60

R37:  (K3, k2tog, ssk, K3) six times

R38:  K48

R39:  (K2, k2tog, ssk, K2) six times

R40:  K36

R41:  (K, k2tog, ssk, K) six times

R42:  K24

R43:  (k2tog, ssk) six times

Cut the yarn with several spare inches.  Thread a tapestry needle and pull yarn through all 12 stitches on needles.  Work in ends.

Note:  For alternative eye and nose pattern that has a more even eye iris, check out this post.

Eyes (make 2):

R1:  With B use magic ring technique to start round, ch 1, sc 8, sl st to first sc.  Cut yarn and work in ends. (8 stitches)

Continue with W

R2:  2 sc in first stitch from R1 and in each sc around, sl st to first sc (16 stitches)

R3:  Ch 1, sc in same stitch as sl st, sc in next stitch * 2 sc in next stitch, 1 sc in next 2 stitches, repeat from * 2 more times, 2 sc in last stitch, sl st to first sc (20 stitches)

R4-R6:  Ch 1, sc in each stitch around, sl st to first sc (20 stitches)

R7:  Ch 1, sc in same stitch as sl st, sc in next stitch * sc2tog, 1 sc in next 2 stitches, repeat from * 2 more times, sc2tog, sl st to first sc (16 stitches)

R8:  Ch 1, sc2tog around, sl st to first sc (8 stitches)

R9:  Ch 1, sc four together by slipping hook under the stitch from the row below, wrapping the yarn, and pulling a loop through, slip hook under next stitch and pull another loop, repeat until you have done this four times and there are five loops on your hook, yarn over and pull loop through all five loops, sc last four stitches together using the same method, sl st to first stitch (2 stitches)

Cut yarn and work in ends.

Nose:

R1:  With O use magic ring technique to start round, ch 1, sc 8, sl st to first sc (8 stitches)

R2:  2 sc in first stitch from R1 and in each sc around, sl st to first sc (16 stitches)

R3:  Ch 1, sc in same stitch as sl st, sc in next stitch * 2 sc in next stitch, 1 sc in next 2 stitches, repeat from * 2 more times, 2 sc in last stitch, sl st to first sc (20 stitches)

R4-R10:  Ch 1, sc in each stitch around, sl st to first sc (20 stitches)

R11:  Ch 1, sc in same stitch as sl st, sc in next stitch * sc2tog, 1 sc in next 2 stitches, repeat from * 2 more times, sc2tog, sl st to first sc (16 stitches)

R12:  Ch 1, sc2tog around, sl st to first sc (8 stitches)

R13:  Ch 1, sc four together by slipping hook under the stitch from the row below, wrapping the yarn, and pulling a loop through, slip hook under next stitch and pull another loop, repeat until you have done this four times and there are five loops on your hook, yarn over and pull loop through all five loops, sc last four stitches together using the same method, sl st to first stitch (2 stitches)

Cut yarn and work in ends.

Using a picture of Elmo as inspiration, tack the eyes and nose onto the hat using a tapestry needle and yarn.  I would also suggest tacking the eyes and nose to each other.

Difficulty:  Moderate

Time Required:  2 Movies

Overall Experience:  Excellent

Lacey Summer Baby Cap

As mentioned in my previous post, I have a lot of friends who have had babies lately.  Next up:  the Halas.  The Halas have an awesome adoption story that I would not do justice.  Check out the story on their blog.  I simply made a hat for their beautiful baby girl, Evie.

I recently purchased a new book, Luxury Yarn One-Skein Wonders, and wanted to make something out of it.  I combined Alpaca and Silk Baby Cap with the flower from Angora Baby Bunny Cap.  I also added some pearl details to the flower.  It turned out so precious!

IMG_2638

IMG_2639

Difficulty:  Moderate

Time Required:  One movie

Overall Experience:  Excellent


Crafternoon Tea Preemie Hats

Some ladies in my Sunday School class are interested in learning to knit and crochet.  We decided to add a missions component to the learning experience and make preemie hats to donate to local NICUs.  We had our first meeting yesterday and it was a blast!  We taught some crochet skills and made some hats.  I wanted to show off some of the hats and give the ladies some digital resources concerning what we learned yesterday.

20140406-153518.jpg

Stitches Learned

Yesterday we taught the basics of crochet to the beginners.  We taught some combination of the following stitches.  If you didn’t learn all of them, no big deal!  You can learn them next time.  If you have any questions, feel free to ask Shanda or me anything you would like.  The links below describe the stitches using words and figures.  The Crochet Crowd also provides a great series of YouTube videos for beginners.  After you learn these basic stitches, you can make any of the hats featured above!

Patterns

I had several patterns printed out yesterday and wanted to make them digitally available to everyone.  I found these patterns on Ravelry, which is a great source for everything knitting/crocheting.  If you join Ravelry, friend me!  My profile is here.  Feel free to be creative with the patterns!

Micro Preemie Hats – Crochet

Both of the hats we made have an added on edging.

20140406-153750.jpg

Wrapped with Love – Crochet

20140406-153532.jpg

Baby Cowboy Hat – Crochet

This turned out looking a little more like a Fedora than a cowboy hat.  I might edit it a little next time I made it.

20140406-153915.jpg

Baby Bear Hat – Knit

I made one edit to this pattern.  The pattern calls to knit until the hat is 6″ long.  That is very long for a preemie hat.  I knit it to 4.5″.  It looks about right.

20140406-154110.jpg

Preemie Football Hat – Knit

20140406-154027.jpg

Enjoy the patterns and feel free to ask me questions!

20140406-153518.jpg

Mad Hatter Crochet Challenge – Cheshire Cat

One of the blogs I follow, The Crochet Crowd, held a Mad Hatter crochet challenge.  The goal of the challenge was to crochet a Mad Hatter hat following a pattern by Red Heart.  The crocheter could use any colors and decorate the hat using an Alice in Wonderland theme however he or she wished.  I made two hats.

I had fun being a little more artistic than usual with these hats.  The first hat was Cheshire Cat themed.  I loved the colors from the Tim Burton movie, so I based the cat off of that Cheshire Cat.  Typically with crochet the main body of a piece is made in a solid color or stripes.  Other pieces are made seperately and sewn on.  For this hat, I imagined the cat appearing out of the side of the hat so I crocheted the color changes into the hat using a similar technique to that used for stranded colorwork in knitting.  His eyes, nose and smile are clear, he then fades into the hat with only three stripes showing.  His tail became the ribbon that goes around the hat.  I added Red Heart Foxy yarn to his tail to make it furry.  Since the contest was sponsored by Red Heart, I bought all Red Heart yarn (and used a little stash yarn) for the final product.  I love how he turned out!  I had the hardest time not posting pictures of him until after the mail-in deadline for the contest (which was yesterday.)

20140402-200107.jpg

20140402-201305.jpg

20140402-201618.jpg