House Spirit Cardigan Pattern

The shower theme for my new nephew was Harry Potter, so naturally I wanted to make him something Harry Potter themed.  I searched for existing Harry Potter patterns, because I knew there were a lot of them, but nothing really stood out to me.  A lot of the fashion from the movies prominently used stripes (in the scarves, in the ties, etc.).  My mind kept coming back to the thought of a cardigan and stripes.  I decided to make a baby cardigan that while not explicitly referencing Harry Potter, nodded at the theme with the color choices.  The pattern features four areas of bi-colored stripes.  I decided to use the color schemes from the four houses from Harry Potter for the four regions. The idea of using the colors also added some symbolism.  Using all four represented wishing the best qualities of each house on the baby:  courage, loyalty, intelligence, and leadership.  I chose to use a variety of buttons to add a little whimsy.  I ended up making a second sweater for my daughter because it was just too cute!

The pattern is available in sizes 3-6 months, 6-12 months, 12-18 months, and 18-24 months.  If you need another size, I can make that happen!

Buy the pattern for $5 on Etsy here or on Ravelry here.

Materials:

Go to this link to buy a kit with everything you need to make this cardigan on Amazon.

  • Worsted weight yarn in two to nine colors (You may choose to use two alternating colors for all of the striping or use different colors for each quadrant and the band, as I did.  I used yarn I already had at my house, but most of it was Lion Brand Vanna’s Choice.  The colors I used where charcoal grey [A] for the bands, scarlet [B], gold [C], green [D], silver [E], blue [F], bronze [G], yellow [H], and black [I])
  • US 8 24” circular needles
  • US 8 double pointed needles
  • Tapestry needle
  • Buttons
  • Needle and thread to sew on buttons


Stitches Used:

Please comment below with any questions!

Sunrise at the Beach Drop-Stitch Scarf Pattern

It’s hot in Houston right now.  Like miserable sweating within two minutes of stepping outside hot.  I decided I wanted to make something I could wear despite the heat, and I have had an idea for a drop-stitch scarf in my head for months.  The airiness of it is perfect for the heat of summer!

The design of this scarf ended up being a humbling experience.  I made a drop-stitch scarf from a pattern a few years ago.  I assumed when I saw the scarf that the look was achieved by knitting a few stitches and then yarning over several times.  However, the look was achieved by creating a large stockinette tube and then ripping out over half of the stitches.  I wanted to cry because I was wasting so much time knitting all these stitches only to rip them out.  I vowed to make another drop-stitch scarf someday with yarn overs.

When I started working on this scarf, I tried using yarn overs from the beginning.  It didn’t work.  I tried setting up a foundation row and then using yarn overs.  It didn’t work, either.  I tried knitting several rows and then using yarn overs.  It still didn’t work.  Guess what?  I ended up knitting a large tube and ripping out the stitches.  At least this pattern is a little more exciting than just stockinette stitch.

Since the pattern is relatively simple, I had a very specific yarn in mind to achieve the look I wanted.  I wanted a lace-weight yarn to make the scarf as light and airy as possible.  I wanted that yarn to be two ply with each ply being a different color.  I also wanted a slow color change so that I would end up with vertical stripes.  I looked for quite a while, and ended up stumbling upon Schoppel-Wolle Edition 6, which was perfect!  I chose the Aunt Emma colorway.

Buy the pattern for $5 on Etsy here or on Ravelry here.

Materials:

Go to this link to buy a kit with everything you need to make this scarf on Amazon.

  • 50 g of a lace weight yarn (I used Schoppel-Wolle Edition 6 in Aunt Emma)
  • US 7 24” circular needles
  • Tapestry needle
  • Beads for fringe (optional)

Stitches Used:

Please comment below with any questions!

Sweetheart Hat Pattern

I wrote a guest blog this week over at Her Exchange about self-care through creativity, especially knitting and crocheting.  If you read the article, you’ll read about how after having kids, I really lost the joy in knitting in crocheting due to real or self-imposed deadlines and closed down my Etsy shop.  I have decided to change the focus of my shop and reopen!  Instead of selling finished products, I’m going to try to start selling my patterns.  And if I’m being truthful, I really enjoy the design aspect of coming up with a new pattern more than I enjoy making that pattern over and over for clients.

Without further ado, here is my first pattern:  the Sweetheart Hat.  I designed this hat for my daughter as a Valentine’s seasonal hat, but hearts are really always in season, so she doesn’t have to put it away after the holiday.  The pattern features my favorite heart cable that I’ve been putting on everything since college.  The hat can be worked in sizes baby through adult, but the cable size does not change so the cable will be more prominent on the baby sizes and less prominent on the adult sizes.

Buy the pattern on Etsy here or on Ravelry here.

Materials:

Go to this link to buy a kit with everything you need to make this hat on Amazon.

  • Worsted weight yarn
  • 2 Size US 8 needles for cable
  • 5 Size US 6 double pointed needles for remainder of hat
  • Cable needle
  • Tapestry needle


Stitches Used:

Please comment below with any questions!


Elmo Inspired Hat version 2

I made up an Elmo Inspired Hat pattern a few years ago to go with my Oscar Inspired Hat; however, I wanted a hat without a mouth to go with my Zoe Inspired Hat, so here is a no mouth version with a slight variation on the eyes that I like much better.

This is my son wearing the hat as part of his Halloween costume.  He is Elmo-obsessed right now.

Materials:

  • Red yarn (I used Vanna’s Choice in Scarlet)
  • White yarn (I used Vanna’s Choice in White)
  • Black yarn (I used Vanna’s Choice in Black)
  • Orange yarn (I used some Red Heart yarn from my stash.  I’m not sure the exact shade)
  • Tapestry needle
  • Size E crochet hook
  • Knitting needle size needed for my basic hat pattern
  • Fiber fill


Stitches Used:

Directions:

Hat:

First, knit your hat in the size desired using my basic hat pattern using red.  I purposely sized up one size on my son’s hat below so that he can wear it longer.

Here is my daughter wearing a more fitted version of the hat.

Eyes (make 2) (This is different from the original pattern because it is worked in continuous rounds.  It makes the pupil of the eye look more uniform):

R1:  With black use magic ring technique to start round, ch 1, sc 8, on the last stitch switch to white   Cut black yarn and work in ends. (8 stitches)

Continue with white.

R2:  2 sc in first stitch from R1 and in each sc around (16 stitches)

R3:  Sc 3, 2 sc in next stitch around (20 stitches)

R4-R6:  Sc in each stitch around (20 stitches)

R7:  Sc 3, sc2tog around (16 stitches)

R8:  Sc2tog around (8 stitches)

R9:  Sc2tog around (4 stitches)

Cut yarn and leave tail for sewing.


Nose:

R1:  With O use magic ring technique to start round, ch 1, sc 8 (8 stitches)

R2:  2 sc in first stitch from R1 and in each sc around (16 stitches)

R3:  Sc 3, 2 sc in next stitch around (20 stitches)

R4-R10:  Sc in each stitch around (20 stitches)

R11:  Sc 3, sc2tog around (16 stitches)

R12:  Sc2tog around (8 stitches)

R13:  Sc2tog around (4 stitches)

Cut yarn and leave tail for sewing.

Using a picture of Elmo as inspiration, tack the eyes and nose onto the hat using a tapestry needle and yarn.  I would also suggest tacking the eyes and nose to each other.


Basic Knit Hat

I like to make up patterns for cute character hats, but each of those hats typically begins with a simple base hat.  For examples, see my Baby Turkey Hat, Oscar the Grouch Hat, or Elmo Hat.  Here are instructions for my favorite base hat.  I love this hat because it is very forgiving in respect to size.  It’s very stretchy and the rolled brim allows it to be longer or shorter as needed.

Here is my daughter Zoe  modeling the newborn size hat.  (She is going to be Zoe from Sesame Street for Halloween, and this is the base for her Zoe hat.)

Here is my son Jack wearing the child hat.  He is actually toddler-sized, but I made it larger so he could wear it longer.  (She is going to be Elmo for Halloween, and this is the base for his Elmo hat.)

Materials:

  • 5 US Size 6, 7, or 8 double pointed knitting needles (see table below to determine size)
  • Worsted weight yarn (my favorite is the Vanna’s Choice brand)
  • Tapestry needle


Stitches:

Size Head Circumference (in.) # of Stitches to Cast On Knitting Needle Size Hat Circumference (in) Hat Length Before Decrease (in)
Micro-Preemie 9 36 6 8 3
Preemie 11 48 6 10 3.5
Newborn 13 60 6 12 4
6 months 15 72 6 14 4.5
1 year 17 72 7 16 5
Toddler 18 72 7 16 5.5
Child 20 84 6 19 6
Small Adult 21 84 6 19 6.5
Medium Adult 22 84 7 21 7
Large Adult 23 84 7 21 7.5
XL Adult 24 84 8 23 8

Hat Instructions:

  • With yarn, cast on number of stitches in the table for the size desired and distribute them evenly on four double pointed needles.
  • Join in round (being careful not to twist!) and knit each round until the piece is the length specified in the table.  The brim of the hat will be rolled.  Unroll it to measure your length.

Crown (skip even numbered rounds for micro-preemie and preemie sizes):

R1:  (K4, SSK, K2tog, K4) around

R2:  K all stitiches

R3:  (K3, SSK, K2tog, K3) around

R4:  K all stitiches

R5:  (K2, SSK, K2tog, K2) around

R6:  K all stitiches

R7:  (K1, SSK, K2tog, K1) around

R8:  K all stitiches

R9:  (SSK, K2tog) around

R10:  (K2tog) around

Where the Wild Things Are Amigurumi

About two months before Jack’s second birthday I started thinking about themes, and Where the Wild Things Are seemed perfect. He is definitely a wild thing!  I had also really been missing crafting. When I stumbled upon a wild thing amigurumi pattern, I knew I had to make it. The main pattern is here; however, I did not want to glue on felt eyes and teeth. This, after all, would eventually be a toy for a rough and tumble two-year-old.  The edits I made to the pattern can be found below. Enjoy!

Materials for Eyes and Teeth:

  • US Size E Crochet Hook (4 mm)
  • Tapestry needle
  • Red Heart Super Saver in Bright Yellow (Y)
  • Red Heart Super Saver in Black (B)
  • Red Heart Super Saver in White (W)


Stitches Used for Eyes and Teeth:

Original Pattern:

Unnamed Monster Pattern

Directions for Eyes and Teeth:

Eyes (make 2):

Row 1:  With B, ch 3, 6 sc in first ch, cut yarn and leave extra for sewing

Row 1:  With Y, ch 4, 6 dc hdc in first ch, cut yarn and leave extra for sewing

Center black semi-circle along flat edge of yellow semi-circle and sew on.

Sew eyes on instead of gluing felt accord to the directions in the original pattern.

Teeth:

Row 1:  With W, sl st to face near cap just below eye as shown in the picture below, p, (sl st, p, sl st) into face curving halfway between nose and beard, the curving back up to just below other eye.  End with final sl st of pattern.

Chevron Pillow

My friend Cassie bought me a knitting pattern book, Knitting 24/7, for my birthday last year.  It is full of fun, modern patterns.  She pointed out that there was a really cool pillow.  I took note and decided she was getting the pillow for her birthday.  While the pillow looks nice, I really hated making it.  I started it at the beginning of October on the car ride back from our wedding and just finished it two weeks ago!

20140530-075842-28722696.jpg

Why I didn’t like the pillow:

  • Construction Type:  I very much like my projects to be seamless if at all possible.  This pillow was the opposite of that.  The front of the pillow was made by knitting in a round with a steek.  A steek is basically an extra stripe in the fabric that you will cut through.  Yes.  You have to cut into your knitted fabric.  Then you have to sew up the edges so it doesn’t unravel.  Scariest thing ever.  You also have to knit a bunch of extra stitches, and I’m lazy.  After the front is made, the knitter must pick up stitches at the top and bottom of the pillow and knit the two back halves.  After all of that, the sides have to be seamed.  It would have been much easier to start at the center of the back, knit to the top, knit the front from the top to bottom, and knit the back from the bottom to the middle.
  • My Own Error:  I started out making the pillow on some very old circular needles my grandma gave me.  They were stiff and I was having a hard time working the project in the round and pulling the front design a little too tight.  I was really frustrated with the needles and was really wishing for new needles.  For Christmas, my husband bought me a new set of circular needles.  He wanted me to try them and I was super frustrated with the ones I was using.  I knew that the tension in the project may change a little if I switched, but I was ready to quit on the project.  I switched needles.  They were wonderful.  It was so easy to keep working the project.  After about an inch of more fabric, I noted that my tension had gotten looser.  I was concerned, but decided the pillow should stretch it out.  As I kept going, I noticed a major difference in the old knitting and new.  I didn’t know if a pillow was going to be able to overcome the problem.  I sat the project down for a couple of months.  I didn’t want to make the back (the pillow was very large) if I couldn’t fix the front.  My husband talked me into finishing it.  Despite the fact that the pillow was knitting too tight horizontally, it turned out wide.  The height was perfect.  Several people complained about this problem on Ravelry, so I wasn’t the only one.  I ended up sewing and stuffing my own pillow to fit it perfectly.  The change in tension isn’t obvious in the overstuffed pillow.

Difficulty:  Easy/Moderate

Time Required:  Many Movies

Overall Experience:  Poor

Crafternoon Tea Preemie Hats

Some ladies in my Sunday School class are interested in learning to knit and crochet.  We decided to add a missions component to the learning experience and make preemie hats to donate to local NICUs.  We had our first meeting yesterday and it was a blast!  We taught some crochet skills and made some hats.  I wanted to show off some of the hats and give the ladies some digital resources concerning what we learned yesterday.

20140406-153518.jpg

Stitches Learned

Yesterday we taught the basics of crochet to the beginners.  We taught some combination of the following stitches.  If you didn’t learn all of them, no big deal!  You can learn them next time.  If you have any questions, feel free to ask Shanda or me anything you would like.  The links below describe the stitches using words and figures.  The Crochet Crowd also provides a great series of YouTube videos for beginners.  After you learn these basic stitches, you can make any of the hats featured above!

Patterns

I had several patterns printed out yesterday and wanted to make them digitally available to everyone.  I found these patterns on Ravelry, which is a great source for everything knitting/crocheting.  If you join Ravelry, friend me!  My profile is here.  Feel free to be creative with the patterns!

Micro Preemie Hats – Crochet

Both of the hats we made have an added on edging.

20140406-153750.jpg

Wrapped with Love – Crochet

20140406-153532.jpg

Baby Cowboy Hat – Crochet

This turned out looking a little more like a Fedora than a cowboy hat.  I might edit it a little next time I made it.

20140406-153915.jpg

Baby Bear Hat – Knit

I made one edit to this pattern.  The pattern calls to knit until the hat is 6″ long.  That is very long for a preemie hat.  I knit it to 4.5″.  It looks about right.

20140406-154110.jpg

Preemie Football Hat – Knit

20140406-154027.jpg

Enjoy the patterns and feel free to ask me questions!

20140406-153518.jpg

Owl Baby Hat

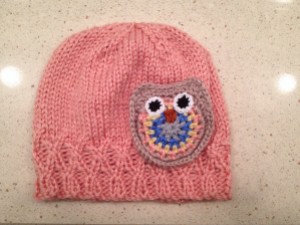
My cousin Amber asked if I could come up with a pattern for a baby owl hat.  I combined the hat from my Hello Kitty Hat with an adorable owl keychain I saw on Ravelry.  The outcome was quite cute.  She wanted the main hat color to be peach.  I usually work in jewel-tones, which aren’t available in baby yarn.  I made this hat in pastel baby yarns.  The yarn is so unbelievably soft!  It was quite a bit less stretchy than what I normally use, so I had to start over with larger needles halfway through the project.  I should actually start recording my gauge and experience with different fibers.

20140310-195753.jpg

20140311-173346.jpg

Disclaimer:  Feel free to make this pattern for your personal use, for your platypus, for charity, or to sell.  The only thing I ask is that you please do not sell it on Etsy.  If you are interested in purchasing a koozie from my Etsy store, you may do so here.

Materials:

  • 5 Size 8 Double Pointed Knitting Needles
  • US Size 0 Crochet Hook
  • US Size 2 Crochet Hook
  • 1 Skein Bernat Softee Baby in Soft Peach (P)
  • Small amounts of crochet thread in black (K) and white (W)
  • Small amount of orange yarn (O)
  • Scraps of various sport weight/baby yarn (I used the following:  Bernat Softee Baby in Flannel (G), Lion Brand Jamie in Little Boy Blue (B), Lion Brand Jamie in Light Yellow (Y), Bernat Softee Baby in Little Mouse (N))

Gauge:

9 stitches =13 rows = 2 inches Stockinette Stitch

The hat is about 14″ in circumference unstretched and stretches to about 19.”

Stitches Used:

Instructions:

Band:

Cast on 72 stitches with P, knit in round being careful not to twist

R1-R4:  (k2, p2) 18 times (72 stitches)

R5:  (tr, p2) 18 times (72 stitches)

R6:  (k2, p2) 17 times, k2, p1 (71 stitches), leave last stitch unworked, this stitch becomes the first stitch of the next row

R7:  (pr, pl) 18 times (72 stitches)

R8:  (k1, p2, k1) 17 times, k1, p2 (71 stitches), leave last stitch unworked, this stitch becomes the first stitch of the next row

R9:  (tl, p2) 18 times (72 stitches)

R10:  (k2, p2) 17 times, k2, p1 (71) stitches), leave last stitch unworked, this stitch becomes the first stitch of the next row

R11:  (tr, tl) 18 times (72 stitches)

R12:  k71, leave last stitch unworked, this stitch becomes the first stitch of the next row (71 stitches)

R13:  (tl, k2) 18 times (72 stitches)

Knit each following row until the hat is 5 inches long.

Crown:

R1:  (K4, K2tog, SSK, K4) 6 times (60 stitches)

R9:  K60

R10:  (K3, K2tog, SSK, K3) 6 times (48 stitches)

R11:  K48

R12:  (K2, K2tog, SSK, K2) 6 times (36 stitches)

R13:  K36

R14:  (K, K2tog, SSK, K) 6 times (24 stitches)

R15:  K24

R16:  (K2tog, SSK) 6 times (12 stitches)

Cut the yarn with several spare inches.  Thread a tapestry needle and pull yarn through all 12 stitches on needles.  Work in ends.

Owl (Adapted from Owl Keychain Pattern):

With G and size 0 hook ch3 and sl st to form ring.

R1:  Ch3, work 7 dc in ring, sl st in third ch of ch3 which acts as first dc (8 dc)

Fasten off G and work in ends.

R2:  With B sl st between any two dc from R1, ch2 (acts as first hdc), hdc in same space, 2 hdc in each space around, sl st in second ch of ch2. (16 hdc)

Fasten off B and work in ends.

R3:  With Y sc between any two hdc from R2, ch1 , (sc, ch 1) in each space around, sl st in top of first sc (16 sc, 16 ch)

Fasten off Y and work in ends.

R4:  With P sc in any ch 1 space from R3, sc in same space, ch 1, (2 sc, ch1) in each ch 1 space around, sl st in top of first sc (32 sc, 16 ch)

Fasten off P and work in ends.

R5:  With N sc in an ch 1 space from R4, 2 sc in same space, ch 1, (3 sc, ch1) in next 10 ch 1 spaces, 3 dc in next ch 1 space, 2 hdc in next ch 1 space, sc in next ch 1 space, 2 hdc in next ch 1 space, 3 dc in last ch 1 space, sl st to first sc (44 stitches)

R6:  Ch 1, turn, skip first stitch, sc, hdc, dc in same stitch, trc (mark stitch with extra yarn or stitch marker), dc in same stitch, sc in next 5 stitches, dc, trc in same stitch (mark stitch with extra yarn or stitch marker), dc, hdc in same stitch, sc, sl st

Do not fasten off.

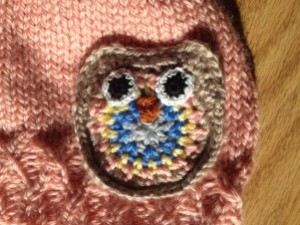
With O, embroider beak as shown in picture.

Eyes (Make 2):

With K and size 2 hook, ch3 and sl st to form ring.

R1:  Ch 1, sc 8 in ring, sl st into first sc (8 sc)

Fasten off and work in ends.

R2:  With W, sc in a sc from R1, sc in same sc, (2 sc in each sc) around, sl st to first sc (16 sc)

Fasten off leaving long tail for sewing.  Sew the eyes onto the owl using the picture for placement.

Owl (continued):

Modified sc (msc):  When you insert your hook under top 2 loops of the stitch below, also insert it under the hat loop directly underneath the stitch on the owl, yarn over, bring loop through hat loop and owl stitch, yarn over and bring loop through both stitches on hook.

R7:  Ch 1, turn, msc in each stitch around, 2 msc in marked stitches, sl st in first msc.

Fasten off and work in ends.

Difficulty:  Moderate

Time Required:  5 Movies

Overall Experience:  Excellent

One of my patterns is practically famous!

I love Ravelry.com for those of you that don’t know, it’s a site for everything knitting and crocheting. I’ve recently started posting some of my original patterns to the site. I just opened the main page to discover my Baby Turkey Hat pattern featured as one of their six Thanksgiving patterns! Someone else made the hat in the picture, but that is still really awesome. I love that someone else made one if my creations. I made four of these hats in the last two weeks!

20131126-220845.jpg