Buffalo Plaid Ankle Sock Pattern

I’ve had it in my head for a while that I wanted to knit some buffalo plaid ankle socks with a black sole, but I was struggling with how to make the stranded colorwork work over the instep portion.  If I carried it, the tension would end up funky and likely too tight.  If I cut the contrasting color every row, that would be a nightmare to work in all of the ends, and I would still probably end up with weird tension.  I also didn’t want to work it in rows and then sew the sock together.  Then an idea came to me.  What if I worked it in rows, but instead of leaving an edge I created a wrap and turn connection similar to what is used in short rows?  I tried it, and it worked beautifully!  The socks are worked all in one piece with a nearly invisible “seam” along the bottom.  I couldn’t love these socks more.

Buy the pattern for $5 on Etsy here or on Ravelry here.

Materials:

Go to this link to buy a kit with everything you need to make these socks on Amazon.

  • Sock yarn in two colors (I used Premier Yarns Wool-Free Sock Yarn in Black (MC) and Red (CC))
  • 5 Size US 1.5 (2.5 mm) double pointed needles
  • Tapestry needle


Stitches and Techniques Used:

Please comment below with any questions!

Buffalo Plaid Earwarmer

Buffalo plaid has been everywhere this winter season.  If you know me, you know I’m not that in to fashion trends.  However, something about buffalo plaid really appeals to me.  Since spring decided to let winter have a big last hurrah (at least I hope it is the last), I decided to design one more winter pattern:  buffalo plaid ear warmers.  The pattern features buffalo plaid stranded colorwork and a turban-like twist in the front.

Buy the pattern for $3 on Etsy here or on Ravelry here.

Materials:

Go to this link to buy a kit with everything you need to make this hat on Amazon.

  • Worsted weight yarn
  • 3 size 6 double pointed needles
  • Tapestry needle


Stitches Used:

Please comment below with any questions!

Valentine’s Cozy Roundup – Day 4

I saw some ideas on Pinterest for cozies with popcorn stitch hearts.  The links to the patterns weren’t good, so I made up a pattern!

Stitches Used:

  • Chain (ch)
  • Single crochet (sc)
  • Slip stitch (sl st)
  • Half double crochet (hdc)
  • Popcorn stitch (pop) – There are a couple of different ways to do this.  My favorite is as follows:
    • Yarn over and insert hook from front to back in to stitch, yarn over and draw yarn through stitch (3 loops on hook), yarn over and draw through two loops (2 loops on hook)
    • Yarn over and insert hook from front to back in to same stitch, yarn over and draw yarn through stitch (4 loops on hook), yarn over and draw through two loops (3 loops on hook)
    • Yarn over and insert hook from front to back in same stitch, yarn over and draw yarn through loops (5 loops on hook), yarn over and draw through two loops (4 loops on hook)
    • Yarn over and insert hook from front to back in same stitch, yarn over and draw yarn through loops (6 loops on hook), yarn over and draw through two loops (5 loops on hook)
    • Yarn over and insert hook from front to back in same stitch, yarn over and draw yarn through loops (7 loops on hook), yarn over and draw through two loops (6 loops on hook)
    • Yarn over and draw through all loops on hook

Cozy Pattern:

Chain 30 and sl st in first chain being careful not to twist.

R1:  Ch 2, 7 hdc, 1 pop, 14 hdc, 1 pop, 7 hdc, sl st to first hdc

R2:  Ch 1,  30 sc, sl st to first sc

R3:  Ch2, 5 hdc, 1 pop, 3 hdc, 1 pop, 10 hdc, 1 pop, 3 hdc, 1 pop, 5 hdc, sl st to first hdc

R4:  Repeat R2

R5:  Ch2, 3 hdc, 1 pop, 7 hdc, 1 pop, 6 hdc, 1 pop, 7 hdc, 1 pop, 3 hdc, sl st to first hdc

R6:  Repeat R2

R7:  Ch2, 1 hdc, 1 pop, 5 hdc, 1 pop, 5 hdc, 1 pop, 2 hdc, 1 pop, 5 hdc, 1 pop, 5 hdc, 1 pop, 1 hdc, sl st to first hdc

R8:  Repeat R2

R9:  Ch2, 1 hdc, 1 pop, 3 hdc, 1 pop, 3 hdc, 1 pop, 3 hdc, 1 pop, 2 hdc, 1 pop, 3 hdc, 1 pop, 3 hdc, 1 pop, 3 hdc, 1 pop, 1 hdc, sl st to first hdc

R10:  Repeat R2

R11:  Ch2, 3 hdc, 1 pop, 7 hdc, 1 pop, 6 hdc, 1 pop, 7 hdc, 1 pop, 3 hdc, sl st to first hdc

R12:  Repeat R2, break yarn and work in ends

Valentine’s Cozy Roundup – Day 1

I had surgery this week and am supposed to be doing nothing at home, so I whipped up six coffee cozies for my kids to give their teachers for Valentine’s Day.  I plan to share one cozy a day until the big event!

Day 1 – The Love Cozy

I saw a pattern I liked on Pinterest for a coffee mug cozy with the word “love” embroidered on it.  I wanted this to by a coffee cup cozy, not a mug cozy, so I followed this simple pattern by Dakotah Knits.

After I finished the cozy, I chain stitched the word “love” on the cozy.  Easy and cute!


Simple Crochet Christmas Ornaments

I love to make homemade gifts for people.  With teacher Christmas gift time approaching, I decided to make some simple crochet ornaments (in addition to contributing to class gift cards).  Gift cards, while appreciated, feel so generic to me.  I like to give at least a little something that is special.  

That being noted, I also bit off a little more than I could chew and didn’t finish six of them before Christmas.  Better late than never, right?  I got a set of three to Zoe’s three teachers before the holidays, but Jack’s teachers just got their today.

I chose a set of three free patterns from 5 Little Monsters that I found on Pinterest.  Didn’t they turn out cute?


Elmo Inspired Hat version 2

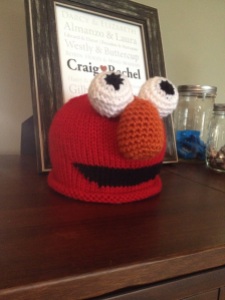
I made up an Elmo Inspired Hat pattern a few years ago to go with my Oscar Inspired Hat; however, I wanted a hat without a mouth to go with my Zoe Inspired Hat, so here is a no mouth version with a slight variation on the eyes that I like much better.

This is my son wearing the hat as part of his Halloween costume.  He is Elmo-obsessed right now.

Materials:

  • Red yarn (I used Vanna’s Choice in Scarlet)
  • White yarn (I used Vanna’s Choice in White)
  • Black yarn (I used Vanna’s Choice in Black)
  • Orange yarn (I used some Red Heart yarn from my stash.  I’m not sure the exact shade)
  • Tapestry needle
  • Size E crochet hook
  • Knitting needle size needed for my basic hat pattern
  • Fiber fill


Stitches Used:

Directions:

Hat:

First, knit your hat in the size desired using my basic hat pattern using red.  I purposely sized up one size on my son’s hat below so that he can wear it longer.

Here is my daughter wearing a more fitted version of the hat.

Eyes (make 2) (This is different from the original pattern because it is worked in continuous rounds.  It makes the pupil of the eye look more uniform):

R1:  With black use magic ring technique to start round, ch 1, sc 8, on the last stitch switch to white   Cut black yarn and work in ends. (8 stitches)

Continue with white.

R2:  2 sc in first stitch from R1 and in each sc around (16 stitches)

R3:  Sc 3, 2 sc in next stitch around (20 stitches)

R4-R6:  Sc in each stitch around (20 stitches)

R7:  Sc 3, sc2tog around (16 stitches)

R8:  Sc2tog around (8 stitches)

R9:  Sc2tog around (4 stitches)

Cut yarn and leave tail for sewing.


Nose:

R1:  With O use magic ring technique to start round, ch 1, sc 8 (8 stitches)

R2:  2 sc in first stitch from R1 and in each sc around (16 stitches)

R3:  Sc 3, 2 sc in next stitch around (20 stitches)

R4-R10:  Sc in each stitch around (20 stitches)

R11:  Sc 3, sc2tog around (16 stitches)

R12:  Sc2tog around (8 stitches)

R13:  Sc2tog around (4 stitches)

Cut yarn and leave tail for sewing.

Using a picture of Elmo as inspiration, tack the eyes and nose onto the hat using a tapestry needle and yarn.  I would also suggest tacking the eyes and nose to each other.


Zoe Inspired Hat

My daughter Zoe is going to be Zoe from Sesame Street for Halloween. I made her a Zoe inspired knit/crochet hat to be worn with a ballerina outfit since Zoe from Sesame Street loves to dance!

Materials:

  • Gold worsted weight yarn (I used Yarn Bee Soft Secret in Saffron)
  • Gold “eyelash” or “fur” yarn (I used Yarn Bee Haute Fur in Goldenlash)
  • Small amounts of black, white, brown, pink, teal, and purple worsted weight yarn
  • Red crochet thread
  • Knitting needle size needed for my basic hat pattern
  • Size E crochet hook
  • Size 3 crochet hook
  • Tapestry needle
  • Fiber Fill


Stitches Used:

Directions:

Hat:

First, knit your hat in the size desired using my basic hat pattern using gold worsted weight yarn.

Eyes (Make 2):

R1:  With black using a magic ring, sc six, on the last stitch switch to white (6 stitches)

R2:  Two sc in each sc around (12 stitches)

R3 and R4:  Sc in each sc around (12 stitches)

R5:  Sc2tog around (6 stitches), stuff eye with fiber fill

R6:  Sc2tog around (3 stitches), break yarn and leave end for sewing

R1:  With teal using a magic ring, sc eight (8 stitches)

R2:  Two sc in each sc around (16 stitches)

R3, R4, R5:  Sc in each sc around, on last stitch of R5, switch to brown (16 stitches)

R6:  Sc in eash sc around, break yarn and leave end for sewing

Sew eyelids onto eyes using pictures below for placement.  Sew the eyes to the hat using pictures for placement.  Sew the eyes to each other for stability.

Nose:

R1:  Using pink using a magic ring, sc six (6 stitches)

R2:  Sc, 2 sc in next stitch, sc twice, 2 sc in next stitch, sc (8 stitches)

R3:  Sc in each sc around (8 stitches)

R4:  Sc, sc2tog, sc twice, sc2tog, sc (6 stitches), stuff nose with fiber fill

R5:  sc2tog three times (3 stitches), break yarn and leave end for sewing

Sew nose to hat between the eyes.  Sew to eyes for stability.

Hair:

Cut the “eyelash” yarn into six inch pieces.  Follow this tutorial for how to attach the hair to the hat.  I placed one “hair” approximately every half inch on the entire back half of the hat.

Bow:

R1:  With purple ch 4, sc in second chain from hook and in next two chains (3 stitches)

R2 – R6:  Sc in each sc across (3 stitches), break yarn and work in ends.

Cut long piece of purple yarn.  Wrap the yarn around the center of your crocheted piece several times tightly to make it look like a bow.  Used the remaining yarn to sew it to the hat.

Dragonfly:

R1:  With red crochet thread and size 3 hook, ch 5 (foundation chain), sc in second ch from hook, sc, ch 5, sl st in fifth ch from hook, sc in same foundation ch as previous sc, sc in next foundation ch, ch 7, sl st in seventh ch from hook, sc in same foundation ch as previous sc, sc in last foundation ch 3 times, working in back of foundation ch sc in next ch, ch 7, sl st in seventh ch from hook, sc in same foundation ch as previous sc, sc in next foundation ch, ch 5, sl st in fifth ch from hook, sc in same foundation ch as previous sc, two sc in last foundation ch, sl st to first sc

R2:  Working in foundation ch, sc over first sc from R1, (sl st, sc, hdc, dc, tr, dc, hdc, sc, sl st) in chain loop, (sl st, sc, hdc, dc, tr 3 times, dc, hdc, sc, sl st) in next chain loop, skipping two foundation ch, sl st in next foundation chain (end chain), sc three times, sl st in same foundation ch, (sl st, sc, hdc, dc, tr 3 times, dc, hdc, sc, sl st) in next chain loop, (sl st, sc, hdc, dc, tr, dc, hdc, sc, sl st) in next chain loop, skipping two foundation ch, sc in next foundation chain, sc in same foundation ch, ch 3, sl st in third chair from hook, sc in same foundation ch, sl st to first sc in R2, break off and leave long piece of yarn for sewing.

Sew dragon fly to head as shown.

Check out the full costume in my Elmo and Zoe Halloween Costumes post!

Baby Baseball Hat

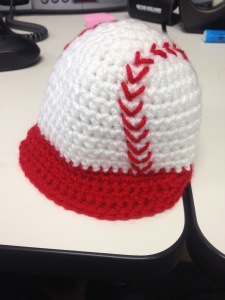
In honor of Craig Biggio being elected for the baseball hall of fame today, I will finish my summer of baby hats (I know…  I’m super behind.  Other hats included:  Chappy Newsboy Cap, Lacey Summer Baby Cap, Elmo Inspired Baby Hat, and Emory Beanie.) with my baby baseball hat.  Some friends of mine are huge Astros fans, so when they had a baby I naturally wanted to make them a baseball hat.  I had seen pictures of hats I liked, but couldn’t find a pattern.  I ended up remaking the Chappy Newsboy Cap with same alterations.  Instead of single crocheting in the front and back loops, I single crocheted in both loops to give a smoother texture.  I crocheted the hat in white with a red brim and embroidered baseball stitching over the white.  It turned out super cute!

IMG_2605

Difficulty:  Easy

Time Required:  2 Movies

Overall Experience:  Good

Elmo Inspired Baby Hat

Note:  I have created a second version of this hat with a simpler eyes and nose pattern (that I think looks a little better) and no mouth.  Check it out here.

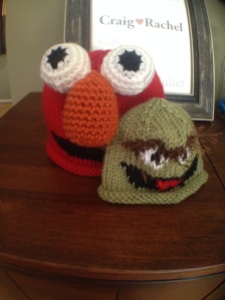
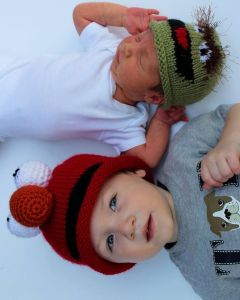
To continue my summer of baby hats (see Chappy Newsboy Caps and Lacey Summer Baby Cap), one of my coworkers had a baby (or rather his wife did).  They also have a toddler at home that loves Elmo.  I decided to rework my Oscar the Grouch hat for a newborn size and make an Elmo hat for their toddler.  I was rewarded with adorable pictures and videos of both babies the next day.  The Elmo hat was a huge hit!  I love that he liked it so much.  Usually when I make things, I don’t know if the item just sits in a drawer (meaning I wasted hours of my life) or is loved by the recipient.  The later makes me happy.  🙂
10600553_10153251051188797_1602740537430154179_n

IMG_2637

IMG_2635

Disclaimer:  Feel free to make this pattern for your personal use, for your platypus, for charity, or to sell.  The only thing I ask is that you please do not sell it on Etsy.  If you are interested in purchasing a hat from my Etsy store, you may do so here.

Gauge:  9 stitches x 13 rows = 2 in Stockinette

This hat was about 16 inches in circumference when finished.  It is quite stretchy and will stretch several inches.

Materials:

  • 5 Size US 7 double pointed needles
  • US Size G Crochet Hook
  • Tapestry needle
  • Vanna’s Choice yarn in Scarlet (R)
  • Vanna’s Choice yarn in Black (B)
  • Vanna’s Choice yarn in White (W)
  • Vanna’s Choice yarn in Terracotta (O)


Stitches Used:

Instructions:

Cast on 72 with R and distribute evenly on four needles

R1-R7:  Knitting in round, KR 72

R8:  KR 28, KB 16, KR 28

R9:  KR 26, KB 20, KR 26

R10:  KR 25, KB 22, KR 25

R11-R12:  KR 24, KB 24, KR 24

R13:  KR 23, KB26, KR 23

Continuing only in R:

R14-R34:  K 72

R35:  (K4, k2tog, ssk, K4) six times

R36:  K60

R37:  (K3, k2tog, ssk, K3) six times

R38:  K48

R39:  (K2, k2tog, ssk, K2) six times

R40:  K36

R41:  (K, k2tog, ssk, K) six times

R42:  K24

R43:  (k2tog, ssk) six times

Cut the yarn with several spare inches.  Thread a tapestry needle and pull yarn through all 12 stitches on needles.  Work in ends.

Note:  For alternative eye and nose pattern that has a more even eye iris, check out this post.

Eyes (make 2):

R1:  With B use magic ring technique to start round, ch 1, sc 8, sl st to first sc.  Cut yarn and work in ends. (8 stitches)

Continue with W

R2:  2 sc in first stitch from R1 and in each sc around, sl st to first sc (16 stitches)

R3:  Ch 1, sc in same stitch as sl st, sc in next stitch * 2 sc in next stitch, 1 sc in next 2 stitches, repeat from * 2 more times, 2 sc in last stitch, sl st to first sc (20 stitches)

R4-R6:  Ch 1, sc in each stitch around, sl st to first sc (20 stitches)

R7:  Ch 1, sc in same stitch as sl st, sc in next stitch * sc2tog, 1 sc in next 2 stitches, repeat from * 2 more times, sc2tog, sl st to first sc (16 stitches)

R8:  Ch 1, sc2tog around, sl st to first sc (8 stitches)

R9:  Ch 1, sc four together by slipping hook under the stitch from the row below, wrapping the yarn, and pulling a loop through, slip hook under next stitch and pull another loop, repeat until you have done this four times and there are five loops on your hook, yarn over and pull loop through all five loops, sc last four stitches together using the same method, sl st to first stitch (2 stitches)

Cut yarn and work in ends.

Nose:

R1:  With O use magic ring technique to start round, ch 1, sc 8, sl st to first sc (8 stitches)

R2:  2 sc in first stitch from R1 and in each sc around, sl st to first sc (16 stitches)

R3:  Ch 1, sc in same stitch as sl st, sc in next stitch * 2 sc in next stitch, 1 sc in next 2 stitches, repeat from * 2 more times, 2 sc in last stitch, sl st to first sc (20 stitches)

R4-R10:  Ch 1, sc in each stitch around, sl st to first sc (20 stitches)

R11:  Ch 1, sc in same stitch as sl st, sc in next stitch * sc2tog, 1 sc in next 2 stitches, repeat from * 2 more times, sc2tog, sl st to first sc (16 stitches)

R12:  Ch 1, sc2tog around, sl st to first sc (8 stitches)

R13:  Ch 1, sc four together by slipping hook under the stitch from the row below, wrapping the yarn, and pulling a loop through, slip hook under next stitch and pull another loop, repeat until you have done this four times and there are five loops on your hook, yarn over and pull loop through all five loops, sc last four stitches together using the same method, sl st to first stitch (2 stitches)

Cut yarn and work in ends.

Using a picture of Elmo as inspiration, tack the eyes and nose onto the hat using a tapestry needle and yarn.  I would also suggest tacking the eyes and nose to each other.

Difficulty:  Moderate

Time Required:  2 Movies

Overall Experience:  Excellent

Gospel Presentation and Cross Bracelets

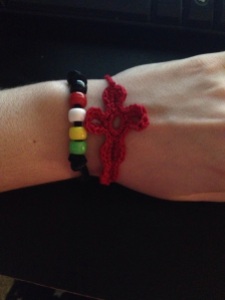
This summer I helped to teach dance at a sports camp sponsored by my church.  I was in charge of the middle and high school girls.  As part of our Bible lesson, we made gospel presentation bracelets consisting of several colored beads.  Each color represents part of the gospel presentation.  In short:  The black bead represents the darkness of sin in each man.  The red bead represents Jesus’ blood and sacrifice.  The white bead represents the washing away of our sin.  The yellow bead represents heaven.  The green bead represents growing in a relationship with God.  Here is a link providing Bible verses for each color and a tutorial on how to make the bracelet.
My girls liked jewelry, so I crocheted cross bracelets to give them if they had their memory verse memorized to sign language.  Many of them didn’t speak English, but they could still participate using sign language.  I used this necklace tutorial and used a simple chain slip stitched to the top and bottom of the cross to make it a bracelet.  The girls were so excited!

IMG_2600