You may purchase the cowl from my Etsy shop here.
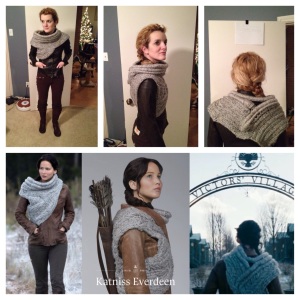
As the Catching Fire promotional material came out a few months ago, a cowl that Katniss was wearing became quite popular in the knitting community. When my mom texted me that my sister was in love with a sweater thing from the new Hunger Games movie, I knew exactly what she was talking about. I found some patterns online, but they were all missing something from the original. I decided to make up my own.
The overall effect of the cowl turned out stunningly well. The cowl, in a size small, was a little smaller and tighter than the original, but very close. I’ve read that the original garment was woven rather than just knitted. The actual knitting is very simple, but the garment construction is difficult.
Sizes
I made the original garment in a size small, fitting it to myself as I went. I’ve received some requests for other sizes, so I have provided some alternate (untested) sizes. The garment is stretchy and forgiving. Let me how it turns out if you make one of the other sizes! They are based off of the following chest measurements:
- Small: 33-34 inches
- Medium: 35-36 inches
- Large: 37-39 inches
- Extra-Large: 40-42 inches
The length/stitch count for the small is shown first outside of parenthesis. The other sizes follow inside of parenthesis, i.e. small (medium, large, extra large). The pattern gets a little long and confusing with the different sizes, so I would suggest printing the pattern and highlighting the size you are making.
Materials
- About 6.5 (6.75, 7.00, 7.25) ft of 3/4 in synthetic rope
- About 3.5 (3.75, 4.00, 4.00) ft of 3/8 in synthetic rope
- 5 skeins of Vanna’s Choice in Grey Marble
- 3 size US 15 knitting needles
- Size G crochet hook
- 5 size US 6 knitting needles (optional: only needed if you choose to knit rather than crochet the caps that go over the ends of the ropes)
- Tapestry needle
- Grey duck tape
- Lighter
Stitches Used
Neck
The neck was definitely the most tedious part of the cowl to make. The method I used looks very much like the real cowl, but it turned out quite stiff. Modified crocheted stitches are used to cover the rope in yarn. The rest of the garment is knitted.
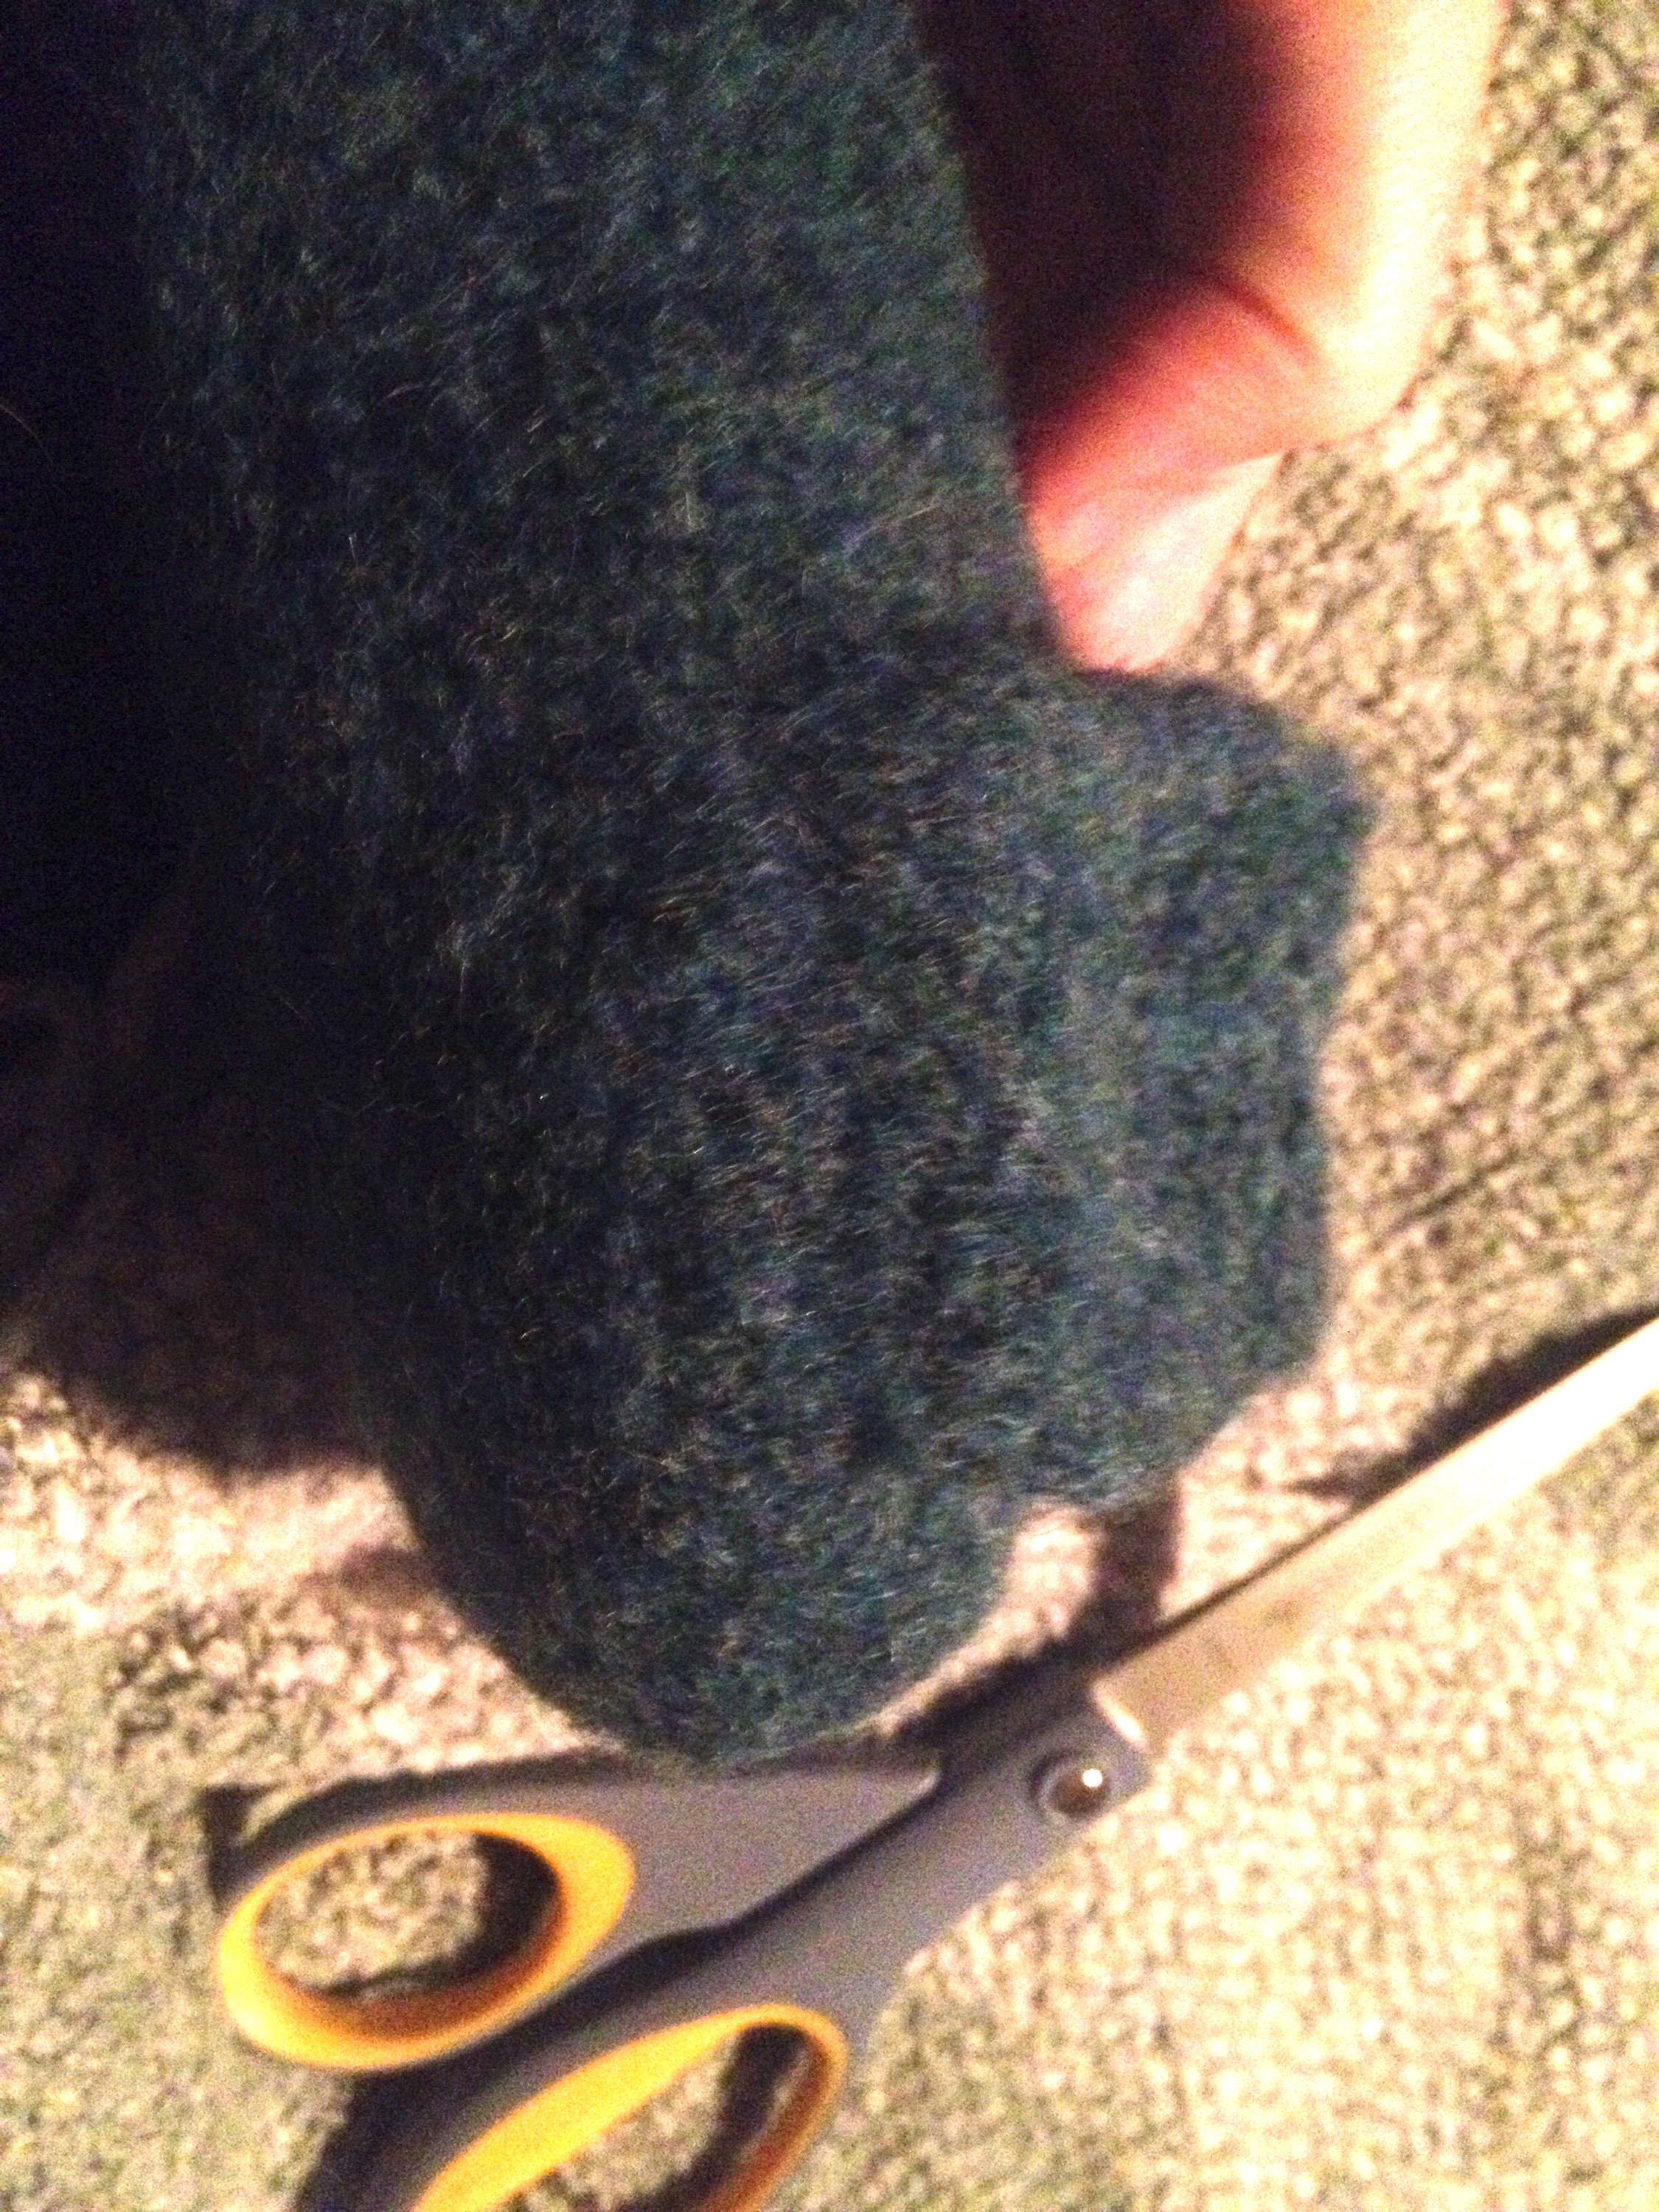
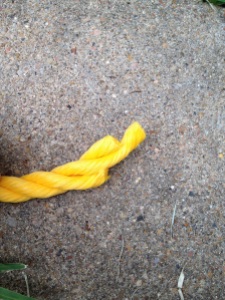
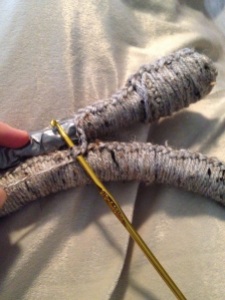
- Cut the 3/4 in rope at 34 (35, 37, 38) inches. The rope will likely have three strands. On each end, cut 1 in from one strand, 1/2 in from the second strand, and leave the third strand alone. The end of your rope should look like this:
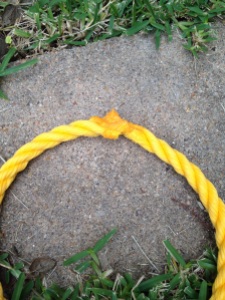
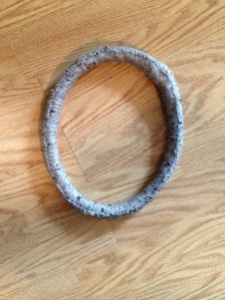
- Find a non-flammable surface outside. Form the piece of rope into a circle and align the ends so that the short piece on one is touching the short piece on the other end. The two mid-sized pieces should be touching. Use the lighter to melt the rope and fuse the piece into a circle. It’s OK if it’s a little lumpy.
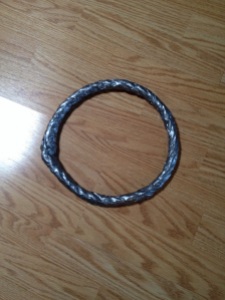
- Wrap the circle in duck tape. This hides whatever neon color your rope is and gives the circle some extra stability.
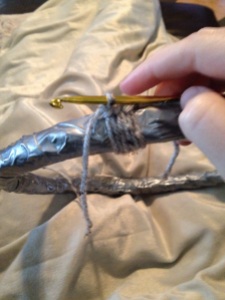
- Tie a knot around your crochet hook. Wrap the yarn around the rope circle and ch. Continue wrapping and chaining until the entire circle is covered in yarn. The chain should be on the bottom of your circle. You may need to periodically push the yarn closer together to make sure no duck tape is showing. Break off and work in ends.
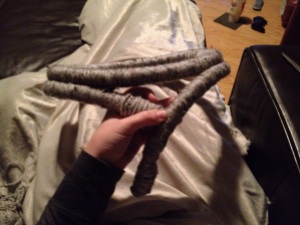
- Cut 39 (40, 42, 43) in sections of both the 3/4 in and 3/8 in rope. Cover both sections in duck tape to hide the neon coloring.
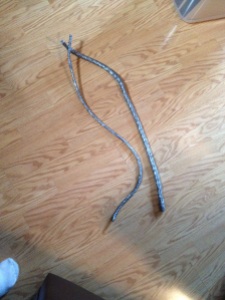
- The next two ropes will not be circular, so an approximately 2 in cap needs to be made for each end of the two ropes. I already had my crochet hook in my hand, so I crocheted them. I included directions for alternative knitted caps, but they are untested. If some tries it, let me know how it works!
Crocheted Large Cap (Make 2)
R1: Ch 3, sl st into first ch to create ring
R2: Sc 6 in ring, sl st in first sc (6 sc)
R3: Ch 1, sc 2 in each sc, sl st in first sc (12 sc)
R4-R8: Ch 1, sc in each sc, sl st in first sc (12 sc)
Break off and work in ends.
Alternative Knitted Large Caps (Make 2)
Cast on 12 stitches using the double pointed needles. Distribute stitches on four needles evenly.
R1-R6: Knitting in round, k12
R7: K2tog six times
Cut yarn and pull end through all six live stitches. Pull tight and work in ends.
Crocheted Small Cap (Make 2)
R1: Ch 3, sl st into first ch to create ring
R2: Ch 1, sc 6 in ring, sl st in first sc (6 sc)
R3-R8: Ch 1, sc in each sc, sl st in first sc (6 sc)
Break off and work in ends.
Alternative Knitted Small Caps (Make 2)
Cast on 6 stitches using the double pointed needles. Distribute stitches on three needles evenly.
R1-R7: Knitting in round, k6
Cut yarn and pull end through all six live stitches. Pull tight and work in ends.
Neck (Continued)
- Place larger caps on the ends of the 3/4 in rope. They should fit snugly. Sl st into cap about 1 in from the end of the rope on “bottom.” Wrap the yarn around the rope and cap and sl st into cap until you reach the end of the cap.
- Wrap the yarn around the rope and ch until 4 in of the rope is covered.
- Ch 5 bringing the chain along the inside of the rope, sl st into a ch on the circular piece of rope.
- Wrap the yarn around the rope and sl st into the next ch on the circular piece of rope. Continue until 3 in of the rope is left uncovered. You may have to wrap the yarn around the rope twice or sl st into the same ch twice to make sure that all of the rope is covered at any time during this process.
- Ch 5 bring the chain along the inside of the rope. Wrap the yarn around the rope and ch until you reach the cap.
- Wrap the yarn around the rope and sl st into the bottom of the cap. Continue until you are about 1 in from the end of the cap. Break off and work in ends.
- Place smaller caps on the ends of the 3/8 in rope. The should fit snugly. Hold the smaller rope directly underneath the 3/4 in non-circular rope. Starting 1 in from the end of the cap, wrap the yarn around the rope and sl st into the larger cap. Continue until you reach the end of the caps.
- Wrap the yarn around the rope and sl st into the ch on the non-circular rope until 4 in of rope is covered.
- Wrap the yarn around the rope and sl st into the yarn wrapping around larger non-circular rope until 3 in of rope is left uncovered.
- Wrap the yarn around the rope and sl st into the ch on the non-circular rope until you are 1 in from the end of the cap. Break off and work in ends.
Torso and Shoulders
The hard part is done. Yay! The torso and shoulder sections are very simply knitted. If you look at the texture of the real garment, it has an effect of being knitted, but each column of stitches is a different size. As mentioned before, the garment was actually woven. Each of the neck sections is likely to come together slightly differently so adjustments may need to be made.
Holding two strands of yarn together as one, cast 20 stitches on your Size US 15 knitting needles. Knit Pattern 1 until your piece measures 3 in.
Pattern 1
R1: K20
R2: (P1, sl 2, p1, sl 1) four times
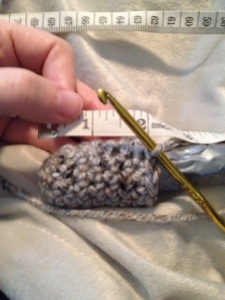
Continue using Pattern 2 until the piece measure about 19 (20, 21.5, 23) inches ending on R2. All measurements starting here should be measured on the edge of the fabric AWAY from the neck section. The fabric will be slightly gathered at the neck section. For the first 12 (12.5, 13.5, 14.5) inches, pick up a stitch every 1/2 in. Pick up a stitch every 1/4 in afterwards. The stitches should be picked up starting at the bottom side of the 4 in free end of the 3/8 in covered rope.
Pattern 2
R1: K20, pick up stitch on bottom of 3/8 in covered rope.
R2: P2tog, (sl 2, p1, sl 1, p1) three times, sl 2, p1, sl 1
Ending on R2, leave the live stitches on one of your three needles. Right side facing, pick up 20 (22, 25, 27) stitches holding two strands together as one on the bottom approximately 6 (6.5, 7.5, 8) six inches on the right side of the section you just knitted. Following Pattern 3, knit 12 inches ending on R1.
Pattern 3
R1 (small): (Sl 1, p1, sl 2, p1) four times
R1 (medium): (Sl 1, p1, sl 2, p1) four times, sl 1, p1
R1 (large): (Sl 1, p1, sl 2, p1) five times
R1 ( extra large): (Sl 1, p1, sl 2, p1) five times, sl 1, p1
R2: Sl 1, k19 (k21, k24, k26)
The next step is to work the stitches that are on both needles together and decrease back down from 40 (42, 45, 47) stitches to 20. Continue picking up stitches about every 1/4 in.
Decrease Pattern
R1: Continuing with needle holding the last row from Pattern 3, Sl 1, k19 (k21, k24, k26), continuing with the needle holding last row from Pattern 2, K20, pick up stitch on bottom of 3/8 in covered rope
R2 (small): P2tog, (sl 2, p1, sl 1, p1) three times, sl 2, p1, p2tog, (p1, sl 2, p1, sl 1) three times, p1, sl 2, p1
R2 (medium): P2tog, (sl 2, p1, sl 1, p1) three times, sl 2, p1, p2tog, (p1, sl 2, p1, sl 1) four times, p1
R2 (large): P2tog, (sl 2, p1, sl 1, p1) three times, sl 2, p1, p2tog, (p1, sl 2, p1, sl 1) four times, p1, sl 2, p1
R2 (extra large): P2tog, (sl 2, p1, sl 1, p1) three times, sl 2, p1, p2tog, (p1, sl 2, p1, sl 1) five times, p1
R3: Sl 1, k17 (19, 22, 24), k2tog, k19, pick up stitch
R4 (small): P2tog, (sl 2, p1, sl 1, p1) three times, sl 2, p1, p2tog, sl 1, p1, (sl 1, p1, sl 2, p1) three times
R4 (medium): P2tog, (sl 2, p1, sl 1, p1) three times, sl 2, p1, p2tog, sl 1, p1, (sl 1, p1, sl 2, p1) three times, sl 1, p1
R4 (large): P2tog, (sl 2, p1, sl 1, p1) three times, sl 2, p1, p2tog, sl 1, p1, (sl 1, p1, sl 2, p1) four times
R4 (extra large): P2tog, (sl 2, p1, sl 1, p1) three times, sl 2, p1, p2tog, sl 1, p1, (sl 1, p1, sl 2, p1) four times, sl 1, p1
R5: Sl 1, k15 (17, 20, 22) k2tog, k19, pick up stitch
R6 (small): P2tog, (sl 2, p1, sl 1, p1) three times, sl 2, p1, p2tog, (sl 1, p1, sl 2, p1) three times
R6 (medium): P2tog, (sl 2, p1, sl 1, p1) three times, sl 2, p1, p2tog, (sl 1, p1, sl 2, p1) three times, sl 1, p1
R6 (large): P2tog, (sl 2, p1, sl 1, p1) three times, sl 2, p1, p2tog, (sl 1, p1, sl 2, p1) three times, sl 1, p1
R6 (extra large): P2tog, (sl 2, p1, sl 1, p1) three times, sl 2, p1, p2tog, (sl 1, p1, sl 2, p1) three times, sl 1, p1
R7: Sl 1, k13 (15, 18, 20), k2tog, k19, pick up stitch
R8 (small): P2tog, (sl 2, p1, sl 1, p1) three times, sl 2, p1, p2tog, (sl 2, p1, sl 1, p1) two times, sl 2, p1
R8 (medium): P2tog, (sl 2, p1, sl 1, p1) three times, sl 2, p1, p2tog, (sl 2, p1, sl 1, p1) three times
R8 (large): P2tog, (sl 2, p1, sl 1, p1) three times, sl 2, p1, p2tog, (sl 2, p1, sl 1, p1) three times, sl 2, p1
R8 (extra large): P2tog, (sl 2, p1, sl 1, p1) three times, sl 2, p1, p2tog, (sl 2, p1, sl 1, p1) four times
R9: Sl 1, k11 (13, 16, 18), k2tog, k19, pick up stitch
R10 (small): P2tog, (sl 2, p1, sl 1, p1) three times, sl 2, p1, p2tog, (p1, sl 1, p1, sl 2) two times, p1
R10 (medium): P2tog, (sl 2, p1, sl 1, p1) three times, sl 2, p1, p2tog, (p1, sl 1, p1, sl 2) two times, p1, sl 1, p1
R10 (large): P2tog, (sl 2, p1, sl 1, p1) three times, sl 2, p1, p2tog, (p1, sl 1, p1, sl 2) three times, p1
R10 (extra large): P2tog, (sl 2, p1, sl 1, p1) three times, sl 2, p1, p2tog, (p1, sl 1, p1, sl 2) three times, p1, sl 1, p1
R11: Sl 1, k9 (11, 14, 16), k2tog, k19, pick up stitch
R12 (small): P2tog, (sl 2, p1, sl 1, p1) three times, sl 2, p1, p2tog, p1, sl 2, p1, sl 1, p1, sl 2, p1
R12 (medium): P2tog, (sl 2, p1, sl 1, p1) three times, sl 2, p1, p2tog, (p1, sl 2, p1, sl 1) two times, p1
R12 (large): P2tog, (sl 2, p1, sl 1, p1) three times, sl 2, p1, p2tog, (p1, sl 2, p1, sl 1) two times, p1, sl 2, p1
R12 (extra large): P2tog, (sl 2, p1, sl 1, p1) three times, sl 2, p1, p2tog, (p1, sl 2, p1, sl 1) three times, p1
R13: Sl 1, k7 (9, 12, 14), k2tog, k19, pick up stitch
R14 (small): P2tog, (sl 2, p1, sl 1, p1) three times, sl 2, p1, p2tog, sl 1, p1, sl 1, p1, sl 2, p1
R14 (medium): P2tog, (sl 2, p1, sl 1, p1) three times, sl 2, p1, p2tog, sl 1, p1, sl 1, p1, sl 2, p1, sl 1, p1
R14 (large): P2tog, (sl 2, p1, sl 1, p1) three times, sl 2, p1, p2tog, sl 1, p1, (sl 1, p1, sl 2, p1) two times
R14 (extra large): P2tog, (sl 2, p1, sl 1, p1) three times, sl 2, p1, p2tog, sl 1, p1, (sl 1, p1, sl 2, p1) two times, sl 1, p1
R15: Sl 1, k5 (7, 10, 12), k2tog, k19, pick up stitch
R16 (small): P2tog, (sl 2, p1, sl 1, p1) three times, sl 2, p1, p2tog, sl 1, p1, sl 2, p1
R16 (medium): P2tog, (sl 2, p1, sl 1, p1) three times, sl 2, p1, p2tog, sl 1, p1, sl 2, p1, sl 1, p1
R16 (large): P2tog, (sl 2, p1, sl 1, p1) three times, sl 2, p1, p2tog, (sl 1, p1, sl 2, p1) two times
R16 (extra large): P2tog, (sl 2, p1, sl 1, p1) three times, sl 2, p1, p2tog, (sl 1, p1, sl 2, p1) two times, sl 1, p1
R17: Sl 1, k3 (5, 8, 10), k2tog, k19, pick up stitch
R18 (small): P2tog, (sl 2, p1, sl 1, p1) three times, sl 2, p1, p2tog, sl 2, p1
R18 (medium): P2tog, (sl 2, p1, sl 1, p1) three times, sl 2, p1, p2tog, sl 2, p1, sl 1, p1
R18 (large): P2tog, (sl 2, p1, sl 1, p1) three times, sl 2, p1, p2tog, sl 2, p1, sl 1, p1, sl 2, p1
R18 (extra large): P2tog, (sl 2, p1, sl 1, p1) three times, sl 2, p1, p2tog, (sl 2, p1, sl 1, p1) two times
R19: Sl 1, k1 (3, 6, 8), k2tog, k19, pick up stitch
R20 (small): P2tog, (sl 2, p1, sl 1, p1) three times, sl 2, p1, p2tog, p1
R20 (medium): P2tog, (sl 2, p1, sl 1, p1) three times, sl 2, p1, p2tog, p1, sl 1, p1
R20 (large): P2tog, (sl 2, p1, sl 1, p1) three times, sl 2, p1, p2tog, p1, sl 1, p1, sl 2, p1
R20 (extra large): P2tog, (sl 2, p1, sl 1, p1) three times, sl 2, p1, p2tog, p1, sl 1, p1, sl 2, p1, sl 1, p1
R21: sl 0 (1, 1, 1), k0 (1, 4, 6), k2tog, k19, pick up stitch
R22 (small): Not applicable (NA)
R22 (medium): P2tog, (sl 2, p1, sl 1, p1) three times, sl 2, p1, p2tog, p1
R22 (large): P2tog, (sl 2, p1, sl 1, p1) three times, sl 2, p1, p2tog, p1, sl 2, p1
R22 (extra large): P2tog, (sl 2, p1, sl 1, p1) three times, sl 2, p1, p2tog, p1, sl 2, p1, sl 1, p1
R23: (small NA) sl (0, 1, 1), k (0, 2, 4), k2tog, k19, pick up stitch
R24 (small): NA
R24 (medium): NA
R24 (large): P2tog, (sl 2, p1, sl 1, p1) three times, sl 2, p1, p2tog, sl 1, p1
R24 (extra large): P2tog, (sl 2, p1, sl 1, p1) three times, sl 2, p1, p2tog, sl 1, p1, sl 1, p1
R25: (small, medium NA) sl (NA, 1, 1), k (NA, 0, 2), k2tog, k19, pick up stitch
R26 (small): NA
R26 (medium): NA
R26 (large): P2tog, (sl 2, p1, sl 1, p1) three times, sl 2, p1, p2tog
R26 (extra large): P2tog, (sl 2, p1, sl 1, p1) three times, sl 2, p1, p2tog, sl 1, p1
R27 (small): NA
R27 (medium): NA
R27 (large): K20, pick up stitch
R27 (extra large): sl 1, k2tog, k19, pick up stitch
R28 (small): NA
R28 (medium): NA
R28 (large): NA
R28 (extra large): P2tog, (sl 2, p1, sl 1, p1) three times, sl 2, p1, p2tog
R29 (small): NA
R29 (medium): NA
R29 (large): NA
R29 (extra large): K20, pick up stitch
Continue using Pattern 4 for 6 (6.5, 7.25, 8) more inches ending on R1.
Pattern 4
R1: P2tog, (sl 2, p1, sl 1, p1) three times, sl 2, p1, sl 1
R2: K20, pick up stitch
Some additional shaping is required for the left shoulder. Knit the Shoulder Repeat Pattern three times.
Shoulder Increase Pattern
R1: K17
R2: Sl 2, (p1, sl 2, p1, sl 1) three times
R3: K15
R4: Sl 3, p1, sl 1, (p1, sl2, p1, sl 1) two times
R5: K12
R6: Sl 2, (p1, sl 2, p1, sl 1) two times
R7: K10
R8: Sl 3, p1, sl 1, p1, sl 2, p1, sl 1
R9: K7
R10: Sl 2, p1, sl 2, p1, sl 1
R11: K5
R12: Sl 3, p1, sl1
R13: K2
R14: Sl 2
R15: K20, pick up a stitch
R16: P2tog, sl 2, p1, sl 1, (p1, sl 2, p1, sl 1) three times
R17: K20, pick up a stitch
R18: P2tog, sl 2, p1, sl 1, (p1, sl 2, p1, sl 1) three times
After repeating the Shoulder Increase Pattern three times, continue using Pattern 4 until you reach the end of the rope ending on a R2. You may have to bind off differently to make everything fit together right. I bound off 12 of the stitches. I then followed Pattern 5 for three more inches and bound off the remaining stitches.
Pattern 5
R1: Sl 1, p1, sl 1, p1, sl 2, p1, sl 1
R2: K8
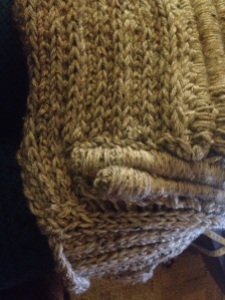
Whip stitch the bound off stitches to the left side of where you started knitting along four inch free end of the rope sections as shown below.
Front Triangular Section
The last step is to add a triangular section near where you began decreasing from 40 (42, 45, 47) to 20 stitches. Holding two strands of yarn together as one, pick up 12 stitches pearl-wise along the bottom of the top section starting at the corner where the two sections come together. See the picture below. Follow the triangle pattern below.
Triangle Pattern
R1: K12
R2: P1, sl 2, p1, sl 1, p1, sl 2, p1, sl 1, p1, sl 1
R3: K10, k2tog
R4: Sl2, p1, sl 1, p1, sl 2, p1, sl 1, p1, sl 1
R5: K9 k2tog
R6: Sl 1, p1, sl 1, p1, sl 2, p1, sl 1, p1, sl 1
R7: K8, k2tog
R8: P1, sl 1, p1, sl 2, p1, sl 1, p1, sl 1
R9: K7, k2tog
R10: Sl 1, p1, sl 2, p1, sl 1, p1, sl 1
R11: K6, k2tog
R12: P1, sl 2, p1, sl 1, p1, sl 1
R13: K5, k2tog
R14: Sl 2, p1, sl 1, p1, sl 1
R15: K4, k2tog
R16: Sl 1, p1, sl 1, p1, sl 1
R17: K3, k2tog
R18: P1, sl 1, p1, sl 1
R19: K2, k2tog
R20: Sl 1, p1, sl 1
R21: K1, k2tog
R22: p1, sl 1
R23: K2 tog
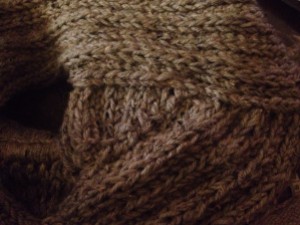
Bind off. Whip stitch the bottom of the triangular section to the portion below it as shown in the picture.
00