Sweet As Honey Cardigan Pattern

It’s been a while since I’ve written a post.  Honestly, it’s been because life has just been hard the last two months.  My husband has been away for a work a lot.  I’ve been juggling a full-time career and two toddlers.  The baby has been going through an extremely difficult phase.  She’s been fussy, clingy, and not sleeping.  As in getting up four times a night not sleeping.  For almost two months.  It’s been some combination of teething, a possible dairy issue, and most recently a cold.  On top of all that, I’ve had pneumonia.  There has been no time for knitting.  But today, I had a day off and finally typed up the sweater pattern I designed for her birthday.  I love this pattern, so much!

As my daughter’s first birthday was approaching, I decided to make her a bee-themed cardigan to go with her “First Bee-Day” party.  The cardigan was blue to match her beautiful blue eyes, and featured capped sleeves for the warm weather.  All of the edges feature I-cords to give a soft, rolled-edge look.  The sweater is knit as one piece because seaming is my least favorite part of sweater-making.  I hope you enjoy the pattern!

Buy the pattern for $5 on Etsy here or on Ravelry here.

Materials:

Go to this link to buy a kit with everything you need to make this hat on Amazon.

  • Medium sport weight yarn in two colors (I used Lion Brand Babysoft Yarn in Bluebell [MC] and Pastel Yellow [CC])
  • US 8 24” circular needles
  • US 8 double pointed needles
  • Tapestry needle
  • Buttons
  • Needle and thread to sew on buttons


Stitches Used:

Please comment below with any questions!

Zoe Inspired Hat

My daughter Zoe is going to be Zoe from Sesame Street for Halloween. I made her a Zoe inspired knit/crochet hat to be worn with a ballerina outfit since Zoe from Sesame Street loves to dance!

Materials:

  • Gold worsted weight yarn (I used Yarn Bee Soft Secret in Saffron)
  • Gold “eyelash” or “fur” yarn (I used Yarn Bee Haute Fur in Goldenlash)
  • Small amounts of black, white, brown, pink, teal, and purple worsted weight yarn
  • Red crochet thread
  • Knitting needle size needed for my basic hat pattern
  • Size E crochet hook
  • Size 3 crochet hook
  • Tapestry needle
  • Fiber Fill


Stitches Used:

Directions:

Hat:

First, knit your hat in the size desired using my basic hat pattern using gold worsted weight yarn.

Eyes (Make 2):

R1:  With black using a magic ring, sc six, on the last stitch switch to white (6 stitches)

R2:  Two sc in each sc around (12 stitches)

R3 and R4:  Sc in each sc around (12 stitches)

R5:  Sc2tog around (6 stitches), stuff eye with fiber fill

R6:  Sc2tog around (3 stitches), break yarn and leave end for sewing

R1:  With teal using a magic ring, sc eight (8 stitches)

R2:  Two sc in each sc around (16 stitches)

R3, R4, R5:  Sc in each sc around, on last stitch of R5, switch to brown (16 stitches)

R6:  Sc in eash sc around, break yarn and leave end for sewing

Sew eyelids onto eyes using pictures below for placement.  Sew the eyes to the hat using pictures for placement.  Sew the eyes to each other for stability.

Nose:

R1:  Using pink using a magic ring, sc six (6 stitches)

R2:  Sc, 2 sc in next stitch, sc twice, 2 sc in next stitch, sc (8 stitches)

R3:  Sc in each sc around (8 stitches)

R4:  Sc, sc2tog, sc twice, sc2tog, sc (6 stitches), stuff nose with fiber fill

R5:  sc2tog three times (3 stitches), break yarn and leave end for sewing

Sew nose to hat between the eyes.  Sew to eyes for stability.

Hair:

Cut the “eyelash” yarn into six inch pieces.  Follow this tutorial for how to attach the hair to the hat.  I placed one “hair” approximately every half inch on the entire back half of the hat.

Bow:

R1:  With purple ch 4, sc in second chain from hook and in next two chains (3 stitches)

R2 – R6:  Sc in each sc across (3 stitches), break yarn and work in ends.

Cut long piece of purple yarn.  Wrap the yarn around the center of your crocheted piece several times tightly to make it look like a bow.  Used the remaining yarn to sew it to the hat.

Dragonfly:

R1:  With red crochet thread and size 3 hook, ch 5 (foundation chain), sc in second ch from hook, sc, ch 5, sl st in fifth ch from hook, sc in same foundation ch as previous sc, sc in next foundation ch, ch 7, sl st in seventh ch from hook, sc in same foundation ch as previous sc, sc in last foundation ch 3 times, working in back of foundation ch sc in next ch, ch 7, sl st in seventh ch from hook, sc in same foundation ch as previous sc, sc in next foundation ch, ch 5, sl st in fifth ch from hook, sc in same foundation ch as previous sc, two sc in last foundation ch, sl st to first sc

R2:  Working in foundation ch, sc over first sc from R1, (sl st, sc, hdc, dc, tr, dc, hdc, sc, sl st) in chain loop, (sl st, sc, hdc, dc, tr 3 times, dc, hdc, sc, sl st) in next chain loop, skipping two foundation ch, sl st in next foundation chain (end chain), sc three times, sl st in same foundation ch, (sl st, sc, hdc, dc, tr 3 times, dc, hdc, sc, sl st) in next chain loop, (sl st, sc, hdc, dc, tr, dc, hdc, sc, sl st) in next chain loop, skipping two foundation ch, sc in next foundation chain, sc in same foundation ch, ch 3, sl st in third chair from hook, sc in same foundation ch, sl st to first sc in R2, break off and leave long piece of yarn for sewing.

Sew dragon fly to head as shown.

Check out the full costume in my Elmo and Zoe Halloween Costumes post!

Where the Wild Things Are Amigurumi

About two months before Jack’s second birthday I started thinking about themes, and Where the Wild Things Are seemed perfect. He is definitely a wild thing!  I had also really been missing crafting. When I stumbled upon a wild thing amigurumi pattern, I knew I had to make it. The main pattern is here; however, I did not want to glue on felt eyes and teeth. This, after all, would eventually be a toy for a rough and tumble two-year-old.  The edits I made to the pattern can be found below. Enjoy!

Materials for Eyes and Teeth:

  • US Size E Crochet Hook (4 mm)
  • Tapestry needle
  • Red Heart Super Saver in Bright Yellow (Y)
  • Red Heart Super Saver in Black (B)
  • Red Heart Super Saver in White (W)


Stitches Used for Eyes and Teeth:

Original Pattern:

Unnamed Monster Pattern

Directions for Eyes and Teeth:

Eyes (make 2):

Row 1:  With B, ch 3, 6 sc in first ch, cut yarn and leave extra for sewing

Row 1:  With Y, ch 4, 6 dc hdc in first ch, cut yarn and leave extra for sewing

Center black semi-circle along flat edge of yellow semi-circle and sew on.

Sew eyes on instead of gluing felt accord to the directions in the original pattern.

Teeth:

Row 1:  With W, sl st to face near cap just below eye as shown in the picture below, p, (sl st, p, sl st) into face curving halfway between nose and beard, the curving back up to just below other eye.  End with final sl st of pattern.

Purple and Gold Multiplicity

I decided to knit a Multiplicity purse for my sister since I loved mine so much. (See my posts about Multiplicity 1 and Multiplicity 2 for the others I made.) I chose a royal purple and mustard yellow, a play on her school colors of purple and gold. The only thing I didn’t like about mine is that it didn’t close. I knit button holes into the main pocket this time and loved the product!


Difficulty: Moderate

Time Required: 12 Movies

Overall Experience: Excellent

Superman Koozie

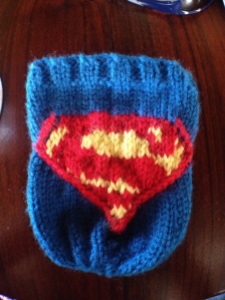
I created a Superman inspired koozie pattern.  The main design is achieved through fair isle stranding.  The crisp, raised border is cabled.  Enjoy!  You can also buy the koozie here.

20140628-090731-32851188.jpg

20140628-090826-32906635.jpg

Disclaimer:  Feel free to make this pattern for your personal use, for your platypus, for charity, or to sell.  The only thing I ask is that you please do not sell it on Etsy.  If you are interested in purchasing a koozie from my Etsy store, you may do so here.

Materials:

  • 5 Size US 4 double pointed needles
  • Vanna’s Choice Yarn in Sapphire (B)
  • Vanna’s Choice Yarn in Scarlett (R)
  • Vanna’s Choice Yarn in Radiant Yellow (Y)
  • Stitch Holder or Extra Needle

Stitches Used:

Gauge:

10 stitches and 15 rows = 2″ Stockinette Stitch

Instructions:

Cast on 48 stitches with B.  Distribute stitches evenly on four of the double pointed needles.

R1:  Knitting in round being careful not to twist the cast on stitches, (kB 2, pB 2) 12 times.

R2-R5:  (kB 2, pB 2) 12 times

R6-R11:  kB 48

R12:  kB 15, kR 18, kB 15

R13:  kB 14, slip next stitch on cable needle and hold in back, kR 1, knit held stitch with R, kR16, slip next stitch on cable needle and hold in front, kR 1, knit held stitch with R, kB 14

R14:  kB 13, slip next stitch on cable needle and hold in back, kR 1, knit held stitch with R, kY 2, kR 12, kY 2, kR 2, slip next stitch on cable needle and hold in front, kR 1, knit held stitch with R, kB 13

R15:  kB 12, slip next stitch on cable needle and hold in back, kR 1, knit held stitch with R, kY 2, kR 5, kY 6, kR 3, kY 1, kR 2, kY 1, slip next stitch on cable needle and hold in front, kR 1, knit held stitch with R, kB 12

R16:  kB 11, slip next stitch on cable needle and hold in back, kR 1, knit held stitch with R, kY 2, kR 4, kY 10, kR 4, kY 2, slip next stitch on cable needle and hold in front, kR 1, knit held stitch with R, kB 11

R17:  kB 10, slip next stitch on cable needle and hold in back, kR 1, knit held stitch with R, kY 2, kR 5, kY 10, kR 4, kY 3, slip next stitch on cable needle and hold in front, kR 1, knit held stitch with R, kB 10

R18:  kB 10, slip next stitch on cable needle and hold in FRONT, kB 1, knit held stitch with R, kR 1, kY 1, kR 7, kY 14, kR 1, slip next stitch on cable needle and hold in BACK, kR 1, knit held stitch with B, kB 10

R19:  kB 11, slip next stitch on cable needle and hold in front, kB 1, knit held stitch with R, kR 17, kY 4, kR 1, slip next stitch on cable needle and hold in back, kR 1, knit held stitch with B, kB 11

R20:  kB 12, slip next stitch on cable needle and hold in front, kB 1, knit held stitch with R, kR 18, kY 1, kR 1, slip next stitch on cable needle and hold in back, kR 1, knit held stitch with B, kB 12

R21:  kB 13, slip next stitch on cable needle and hold in front, kB 1, knit held stitch with R, kR 1, kY 1, kR 16, slip next stitch on cable needle and hold in back, kR 1, knit held stitch with B, kB 13

R22:  kB 14, slip next stitch on cable needle and hold in front, kB 1, knit held stitch with R, kR 1, kY 2, kR 13, slip next stitch on cable needle and hold in back, kR 1, knit held stitch with B, kB 14

R23:  kB 15, slip next stitch on cable needle and hold in front, kB 1, knit held stitch with R, kR 1, kY 7, kR 6, slip next stitch on cable needle and hold in back, kR 1, knit held stitch with B, kB 15

R24:  kB 16, slip next stitch on cable needle and hold in front, kB 1, knit held stitch with R, kR 5, kY 5, kR 2, slip next stitch on cable needle and hold in back, kR 1, knit held stitch with B, kB 16

R25:  kB 17, slip next stitch on cable needle and hold in front, kB 1, knit held stitch with R, kR 10, slip next stitch on cable needle and hold in back, kR 1, knit held stitch with B, kB 17

R26:  kB 18, slip next stitch on cable needle and hold in front, kB 1, knit held stitch with R, kR 8, slip next stitch on cable needle and hold in back, kR 1, knit held stitch with B, kB 18

R27:  kB 19, slip next stitch on cable needle and hold in front, kB 1, knit held stitch with R, kR 1, kY 4, kR 1, slip next stitch on cable needle and hold in back, kR 1, knit held stitch with B, kB 19

R28:  kB 20, slip next stitch on cable needle and hold in front, kB 1, knit held stitch with R, kR 1, kY 2, kR 1, slip next stitch on cable needle and hold in back, kR 1, knit held stitch with B, kB 20

R29:  kB 21, slip next stitch on cable needle and hold in front, kB 1, knit held stitch with R, kR 2, slip next stitch on cable needle and hold in back, kR 1, knit held stitch with B, kB 21

R30:  kB 22, slip next stitch on cable needle and hold in front, kB 1, knit held stitch with R, slip next stitch on cable needle and hold in back, kR 1, knit held stitch with B, kB 22

R32:  kB 22, kfb of next stitch with B, k2tog with R, kB 23

Continue with B only

R33-R36:  k48

R37:  (k2, k2tog) 12 times

R38:  (k2, k2tog) 9 times

R39:  (k1, k2tog) 9 times

R40:  (k2tog) 9 times

Difficulty:  Easy

Time Required:  2 Movies

Overall Experience:  Excellent

Multiplicity

I finished my Multiplicity purse this afternoon, and I love it!  The purse is knit using double knit, which I had been wanting to learn for some time.  The technique is interesting because one creates a double sided fabric by knitting one stitch from one side then one stitch from the other.  The stitches from both sides are alternating on one set of needles.  In the case of this purse, the fabric was grey with yellow details on one side and yellow with grey details on the other.  The purse features a large main pocket that folds over a smaller pocket.  I purchased the leather strap from Homestead Heirlooms.

20140417-122223.jpg

20140417-122304.jpg

20140417-122340.jpg

Difficulty:  Moderate

Time Required:  12 Movies

Overall Experience:  Excellent