Wedding Chalkboard Signs

20140102-201104.jpg

I posted the first half of the instructions on how to make our wedding chalkboard signs a few months ago. Here’s the second half.

The first half can be found here.

My husband actually made the frames for the signs while I did the lettering. He didn’t take any in-progress pictures, but here are the instructions.

Materials:

  • Wooden trim
  • Spray paint
  • Wood glue
  • Sandpaper
  • Saw
  • Pencil
  • Instructions:

  • Lay the trim on one edge of your sign. Make sure that the trim is overlapping the edge of the sign at least one inch. Mark the trim where it should be cut.
  • Cut the trim at 45 degrees on both sides.
  • Repeat marking and cutting around the parameter of the sign.
  • Spray paint the pieces of trim.
  • Using the sandpaper, lightly sand the exposed edges to weather the frame.
  • Glue the pieces of frame together two pieces at a time. Allow the glue to dry overnight before adding another piece.
  • When all four pieces are glued together, glue the frame to the sign. Allow to dry overnight, and your sign is complete!
  • Here are some of the signs we made for our wedding.

    20140102-201526.jpg

    20140102-201540.jpg

    20140102-201556.jpg

    20140102-201634.jpg

    20140102-201646.jpg

    20140102-201654.jpg

    DIY Wedding Belt

    I spent months looking for the right wedding belt.  I ended up making my own.

    DSC_9570v3

    DSC_9570v2

    I absolutely loved the back of my dress…the keyhole back…the button details…everything about it really.  When I was trying it on, I tried on a sparkly sash with it.  I really liked how the sash broke up all of the lace on my dress, but I didn’t like the idea of a giant bow covering up the back details.  I also didn’t like the $300 price tag on most of the sashes.  For months I looked for a small, sparkly belt that WAS NOT a sash and had diamond-looking stones all the way around it.  I couldn’t find anything.  Next I started hitting up my typical craft stores looking for trim to make my own belt.  I struck out there, too.  Finally I found shinetrim.com.  This website has many rhinestone bands for a fraction of the cost of the sashes.  I purchased a yard of rhinestone band (so I had extra in case I messed up) and a rhinestone clasp to go in front.  I simply cut the band to fit my waist and sewed it to the clasp.  It was super easy and gave the exact look that I wanted.

    DSC_8183

    Popping the Question

    When I started posting wedding stuff, I should have started with this.  Immediately after getting engaged, I found this adorable pin and knew that I had to proposed to my bridesmaids.  This doesn’t even really count as a craft.  All you do is get a small box, fill it with tissue paper, a ring pop, and a note “popping” the question.  I only got to give one away in person.  I had to mail the boxes to my other two bridesmaids.

    20131110-123004.jpg

    Wedding Afghans

    An acquaintance who had been in countless wedding once showed me a crocheted blanket that a bride had made her.  She gushed about how that gift was the most meaningful bridesmaid gift she had ever received.  Since I crochet, I tucked that little tidbit of information away for later.  When I got engaged, I pushed my fiance to help me pick out colors so I could start on the pile of blankets I was planning on making.

    20131103-074736.jpg

    I decided to make blankets for our three bridesmaids and both sets of parents.  I had to make five blankets, so I needed to find an afghan pattern that I could make fairly quickly.  I have made many afghans that took me months to make.  I didn’t have that much time.  I had an afghan pattern pinned named “Super Quick Throw.”  The blanket was crocheted with four strands of yarn held together as one with a giant hook.  That’s about as quick as one can hope for.  The blankets crocheted beautifully.

    20131103-074805.jpg

    I do have a few tips:

    • The pattern is available free on the Red Heart website.
    • I bought yarn in bulk in our wedding colors.  I chose acrylic yarn because it holds up well and for the price.  It crocheted into a stiff, scratchy blanket.  However, after washing and drying each blanket once, they were completely transformed.  They became pliable and soft.
    • The pattern calls for a hook size P-16 (11.5 mm).  I couldn’t find a hook this size and ended up with a 10 mm hook.  I adjusted by crocheting to the correct size rather than the correct number of stitches.  The pattern is easy, so it wasn’t hard to do.  The rows that require a certain number of stitches have a three stitch repeat.  There is a two stitch “border” on each side.  This means that your starting row should have a total stitch number that is a multiple of 3 plus 4 stitches.  (As written, the pattern calls for 58 stitches.  This is a multiple of 3 (54/3=18) plus 4.)  I don’t remember how many stitches I used.  I think it was 70.  Whatever gets you to a 48 inch wide blanket.
    • I used the no foundation row starting technique instead of the chain start technique in the pattern.  Here is a good tutorial.  This technique keeps your tension from being off in the first row and is easier to measure your 48 inches.
    • With the same “size verses stitches” philosophy, you should repeat Rows 2-7 until the blanket is the length you want.  The pattern calls for 58 inches.  I wanted my blanket to be at least 60 inches so I repeated until I finished on a Row 7 with a length greater than 60 inches.
    • The edges of the blanket turned out a little jagged.  I finished the blanket off with a border.  I slip stitched in each stitch on the short edges and single crocheted along the long edges.  This cleaned the blankets up nicely.

    Difficulty:  Easy

    Time Required:  About 13 movies per blanket

    Overall Experience:  Excellent

    20131103-074719.jpg20131103-075255.jpg20131103-074736.jpg


    Groom’s Survival Kit

    While searching for wedding things on Pinterest, I found many groom’s survival kits.  Since I knit I really liked the idea of making socks for my groom, so he didn’t get cold feet.  I put my own spin on the rest of items.

    20131101-161058.jpg 20131101-161004.jpg 20131101-160918.jpg 20131101-160849.jpg 20131101-160811.jpg

    The typical groom’s kit list comes with a piece of paper that says something similar to the following:

    Groom’s Day-Of Survival Kit

    • Socks to keep cold feet away
    • Lifesavers to keep you from drowning in emotion
    • Small bottle of alcohol to calm your nerves
    • Mints to ensure a fresh kiss
    • Ring pop in case you forget the essentials

    Looking at the list, there were lots of things I didn’t like about it:

    • Socks–Loved the socks idea
    • Lifesavers–Neither one of us are emotional people.  I’ve been called a robot by several people, and he isn’t any better.  He got me a shirt for my birthday that says:  “Feelings are boring.  Kissing is awesome.”  Lifesavers were off the list.
    • Small bottle of alcohol–I wasn’t sure when I would give this to him, and we got fined if we got caught with outside alcohol at the ceremony site.  A small bottle of alcohol was off the list.
    • Mints–This implies that he NEEDS a mint.  I didn’t want to imply that he had bad breath.  That seemed in poor taste.
    • Ring pop–Apparently the essentials are that he buys my jewelry and/or candy?  I didn’t like this one either.

    That left me with one item.  Socks.  I decided to replace the items with different items that matched our personalities better.  I wrote a note on a tag on each item.  If you click on the pictures above you can see them.  Otherwise, each note is listed below:

    • Socks–So you don’t get cold feet
    • Lip balm–For the perfect first kiss that tastes like me (I wear Burt’s Bees all the time.)
    • Flask–In case you need courage of the liquid variety (that won’t get us fined…he could fill it at the venue)
    • A bottle opener key chain that says:  “I’LL LOVE YOU UNTIL THE ZOMBIES GET YOU”–So you know exactly how long I’ll love you
    • 52 REASONS CRAIG IS AWESOME–So you remember where we began and why we are doing this

    Each of the items (except the lip balm) was hand made, not necessarily by me:

    • Socks–I made the socks.  See my Don’t Get Cold Feet post.
    • Lip balm–I actually had an unopened lip balm laying around because I buy them in bulk.
    • Flask–The flask came from Scoutmob.com.  Scoutmob is a site that features products by independent makers.  It’s pretty cool.  Check it out.
    • Key Chain–The zombie key chain came from Etsy.  The maker, FleurDesigns, was great to work with.  I got the key chain crazy fast.
    • 52 Reasons Book–I made the book during our first Valentine’s together.  See my 52 Reasons Book post.

    Don’t Get Cold Feet

    Before our wedding, I secretly knitted a pair of socks for my husband.  I gave them to him the morning of the wedding so he wouldn’t get “cold feet.”  I knitted the socks using the Deborah Norville Collection Serenity Garden Yarn in Twilight.  I loved how the color work turned out, and the yarn feels amazing.  I used a free pattern available on Ravelry titled “Basic Ribbed Socks.”  The pattern was easy to follow.  I didn’t make any adjustments to the pattern.  He married me, so I guess he didn’t get cold feet!

    20131029-200938.jpg

    20131029-201028.jpg

    Difficulty:  Easy

    Time Required: About 20 movies

    Overall Experience:  Good.  The only thing I didn’t like is how the socks came together at the toe.  The joining technique caused a slightly pointed toe.

    Wedding Rehearsal Ribbon Bouquet

    I took a hiatus from my blog immediately prior to and following my wedding.  I got crazy busy, as I assume most brides can understand.  Now that all of the wedding craziness is over, I have so many things to post!  I made almost all of my wedding decorations and gifts.  I’m still waiting on my mom to send me my sister’s pictures (she was instructed to take pictures of everything I made for my blog), but there are a few things I can post in the mean time.  I plan to kind of go in chronological order as things were used during the wedding weekend.  Hopefully I don’t miss anything that way.

    The first homemade item to make an appearance was my rehearsal bow-quet.  It’s been a long-standing tradition that a rehearsal bouquet be created from the ribbons from the wedding shower.  I made one.  I’m a little unhappy that this is going to be the first thing to go on the blog.  I ended up not having a ton of time to work on it and quickly threw it together the night before the rehearsal.  I do think the idea would be really cute if fully implemented.

    Ribbon Bouquet 4 - Copy

    My goal was to make a whole bouquet of ribbon rosettes and wrap any leftover ribbons around the stems.  Since I was short on time, I only made three rosettes and wrapped the rest of the ribbons around.  The rosettes were overwhelmed by the other ribbons.

    Materials:

    Instructions:

    • Make the desired number of rosettes.  (I used the same technique to make the ribbon rosettes that was used to make the burlap rosettes in my Burlap Roses post.  The technique is described in Snug as a Bug Baby’s blog.  I honestly don’t think I can do a better job describing the technique than she does, and since I did it very last minute, I did not take the time to take pictures of every step.  For this project I used a needle and thread instead of hot glue.  The concept is the same, simply stitch each “petal” in place instead of gluing it.  The three rosettes turned out really cute.  I just wish that I had time to make more of them.)
    • Wrap the rosettes in any remaining ribbon

    Difficulty:  Easy

    Time Required:  10 minutes per rosette

    Overall Experience:  Good.  I wish that I had time to make more rosettes

    Ribbon Bouquet 4 Ribbon Bouquet 3 Ribbon Bouquet 2 Ribbon Bouquet 1

    Chalkboard Signs Work-in-Progress

    This wedding season, chalkboard signs are all the rage.  However, they are quite expensive.  I decided to make my own.  I bought some 2’x4′ pieces of chalkboard for $10.25 per piece at Home Depot last weekend.  My almost father-in-law cut them for me on his table  saw.  I’ve been working at lettering them this week.  The larger signs will have frames around them eventually, but they are turning out too cute not to share!


    20130901-185615.jpg

    20130901-185549.jpg

    20130901-185738.jpg

    20130901-185643.jpg

    Materials:

    Instructions:

    • Use PowerPoint to design your sign.  PowerPoint has tons of great fonts already.  There are a lot more available at dafont.com.  Erin has some great font suggestions on her blog, How to Nest for Less.  It’s easy to scale the signs to an appropriate size using the program.
    • Print your design and tape it to the board using masking tape.
    • Slide the tracing paper between the design and the chalkboard.
    • Trace the design using a normal ball point pen.  You don’t have to be super exact with the tracing.  I like the design to have some imperfections so it looks like it was handmade rather than printed.
    • Remove the tracing paper and design.  You should see your design faintly in white transferred to the chalkboard.  Using your chalk or paint marker, trace over the design again.

    20130901-185710.jpg

    Difficulty:  Easy

    Time Required:  30 minutes

    Overall Experience:  Excellent

    Crochet Wine Carrier

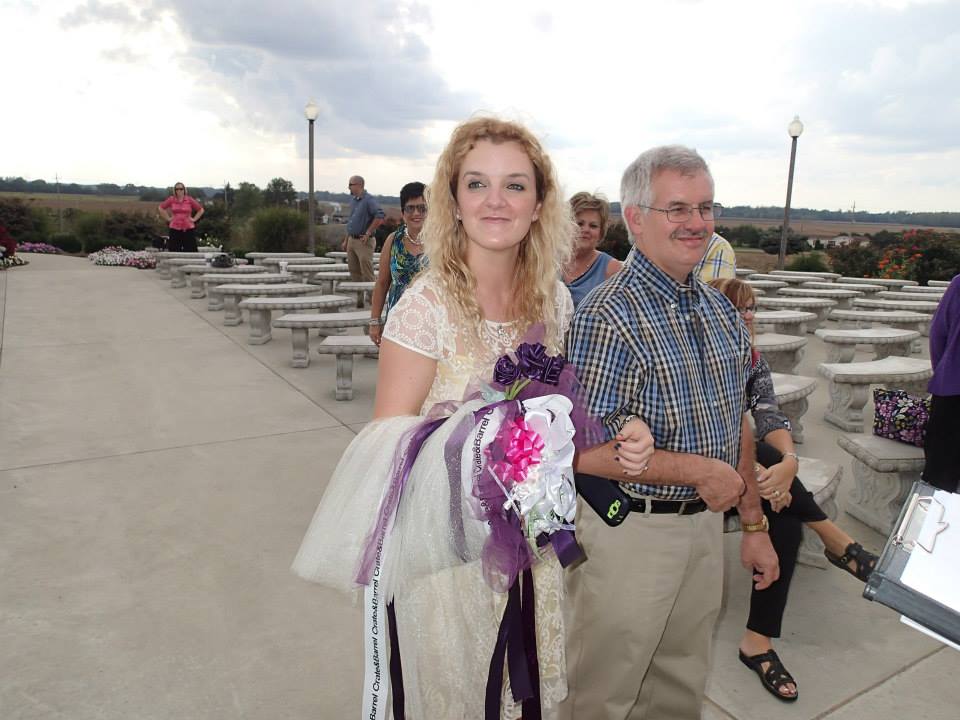
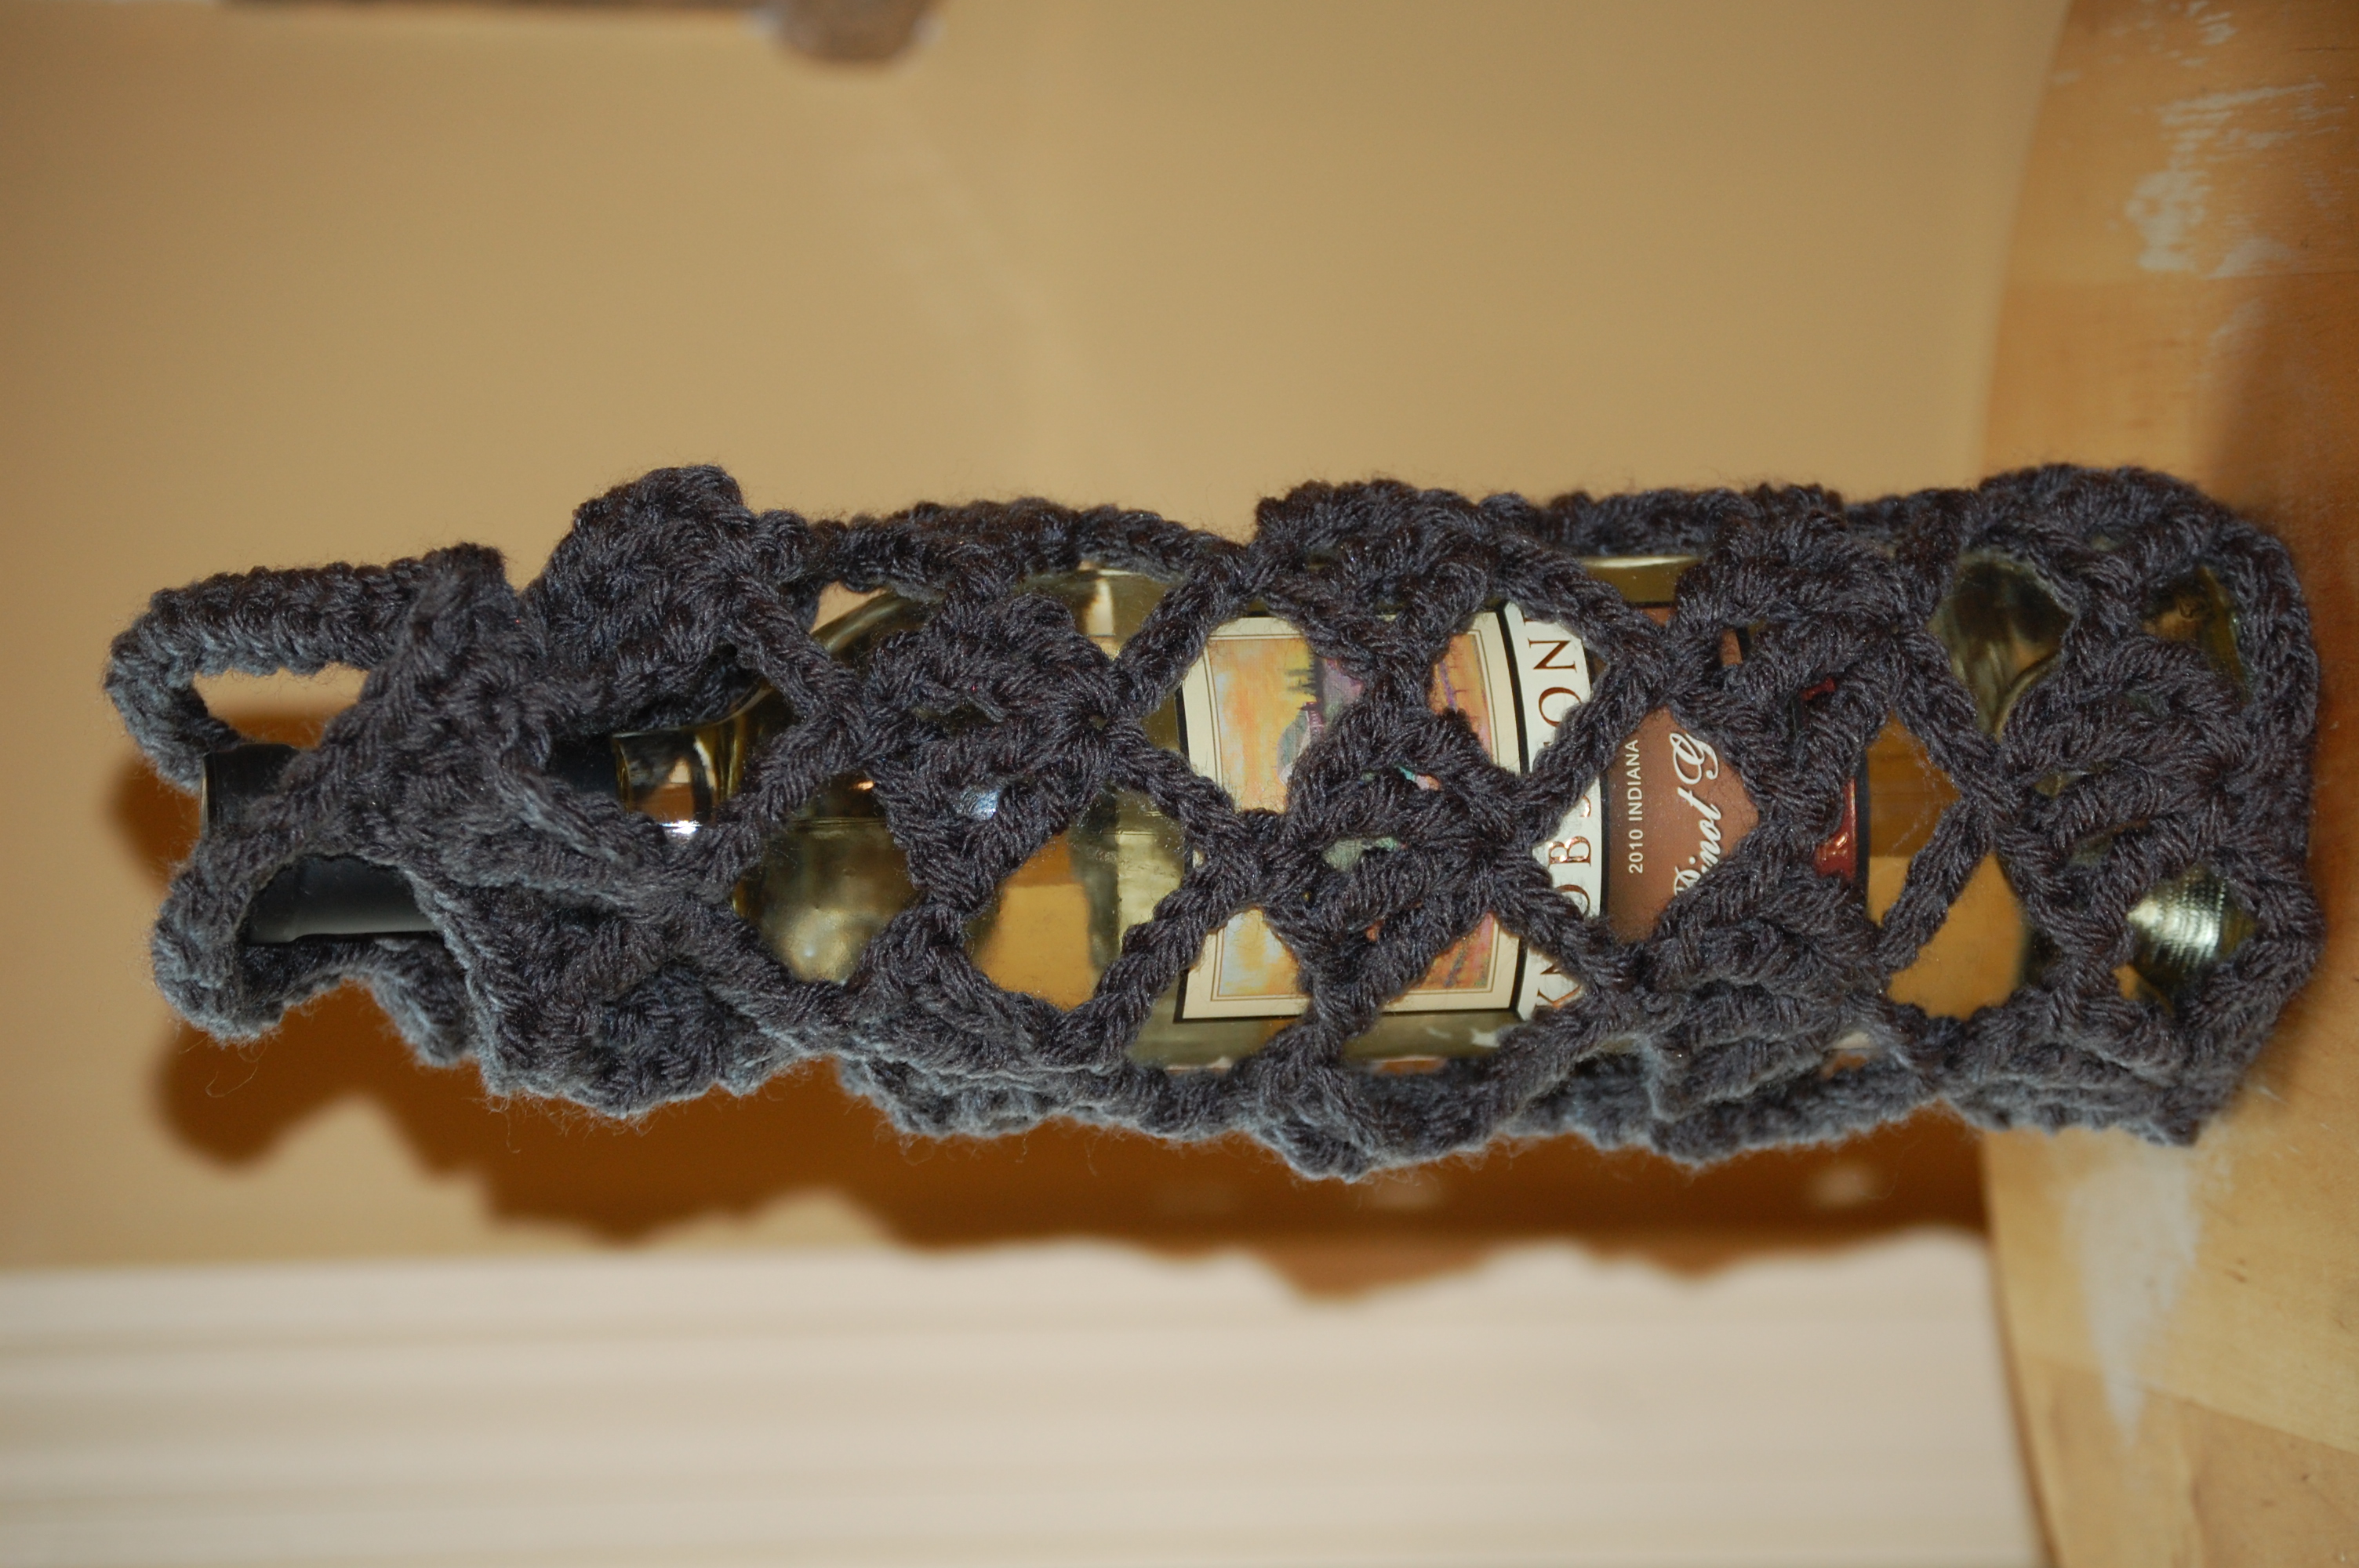
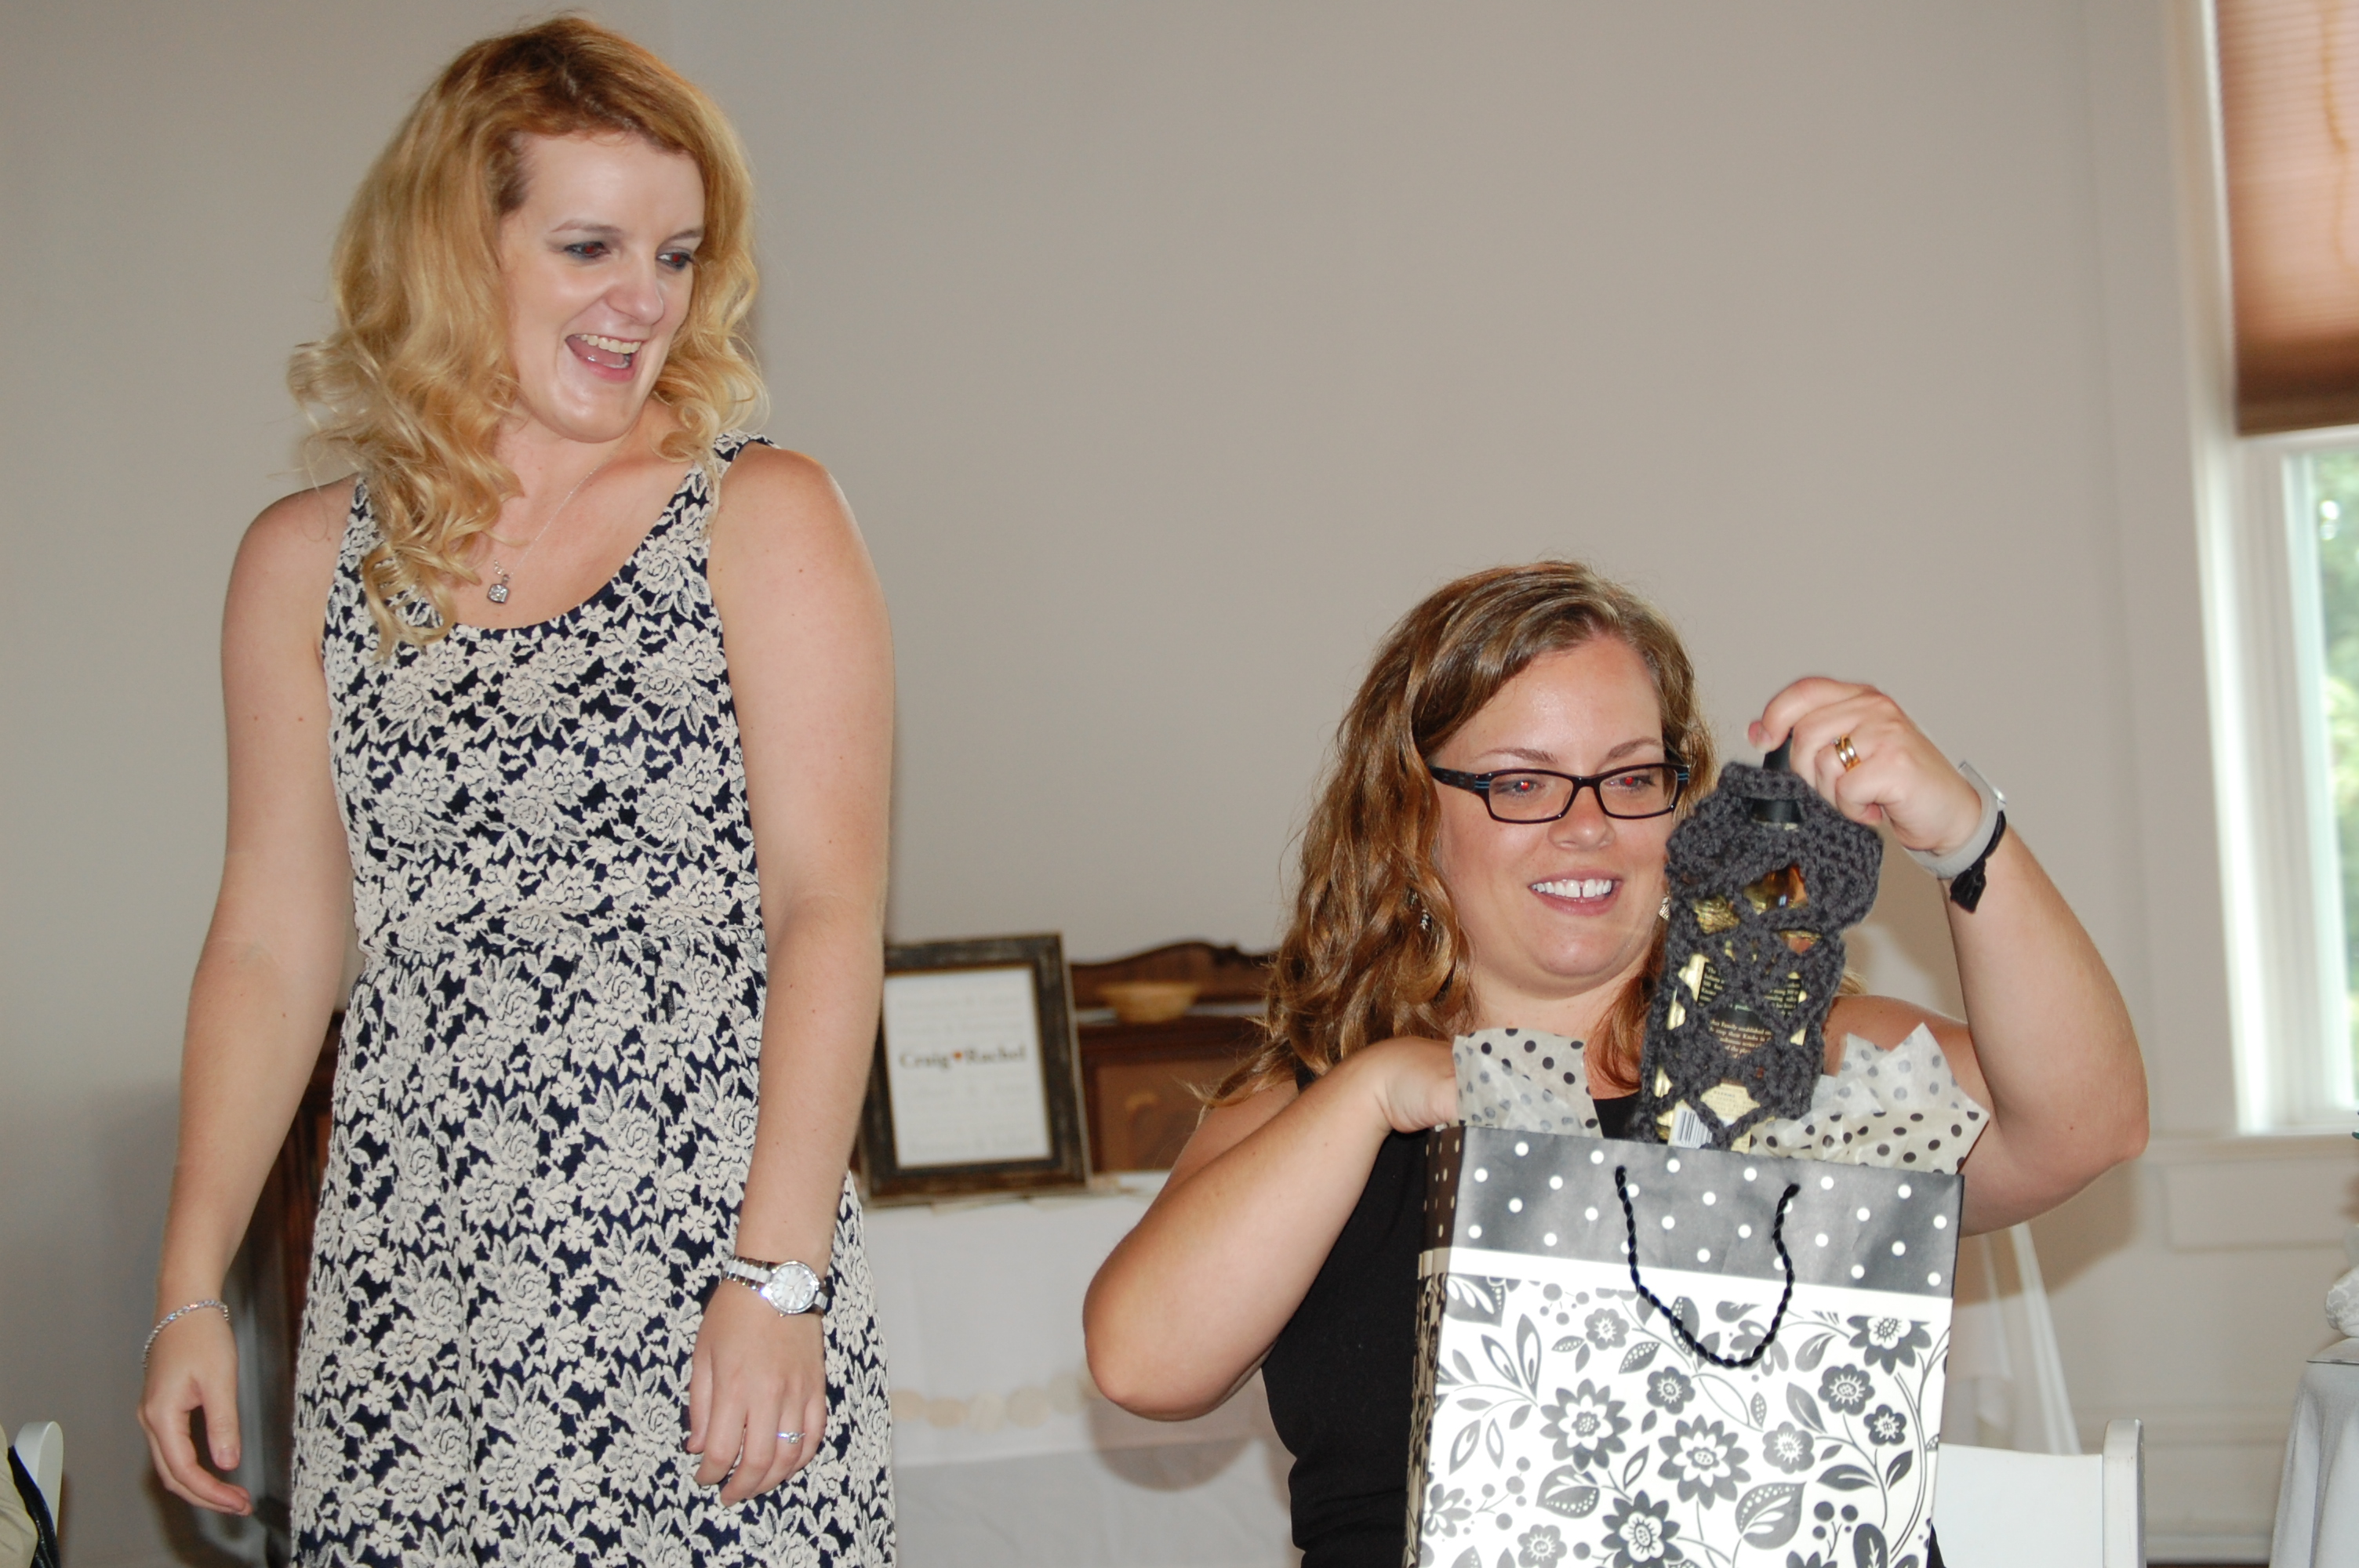
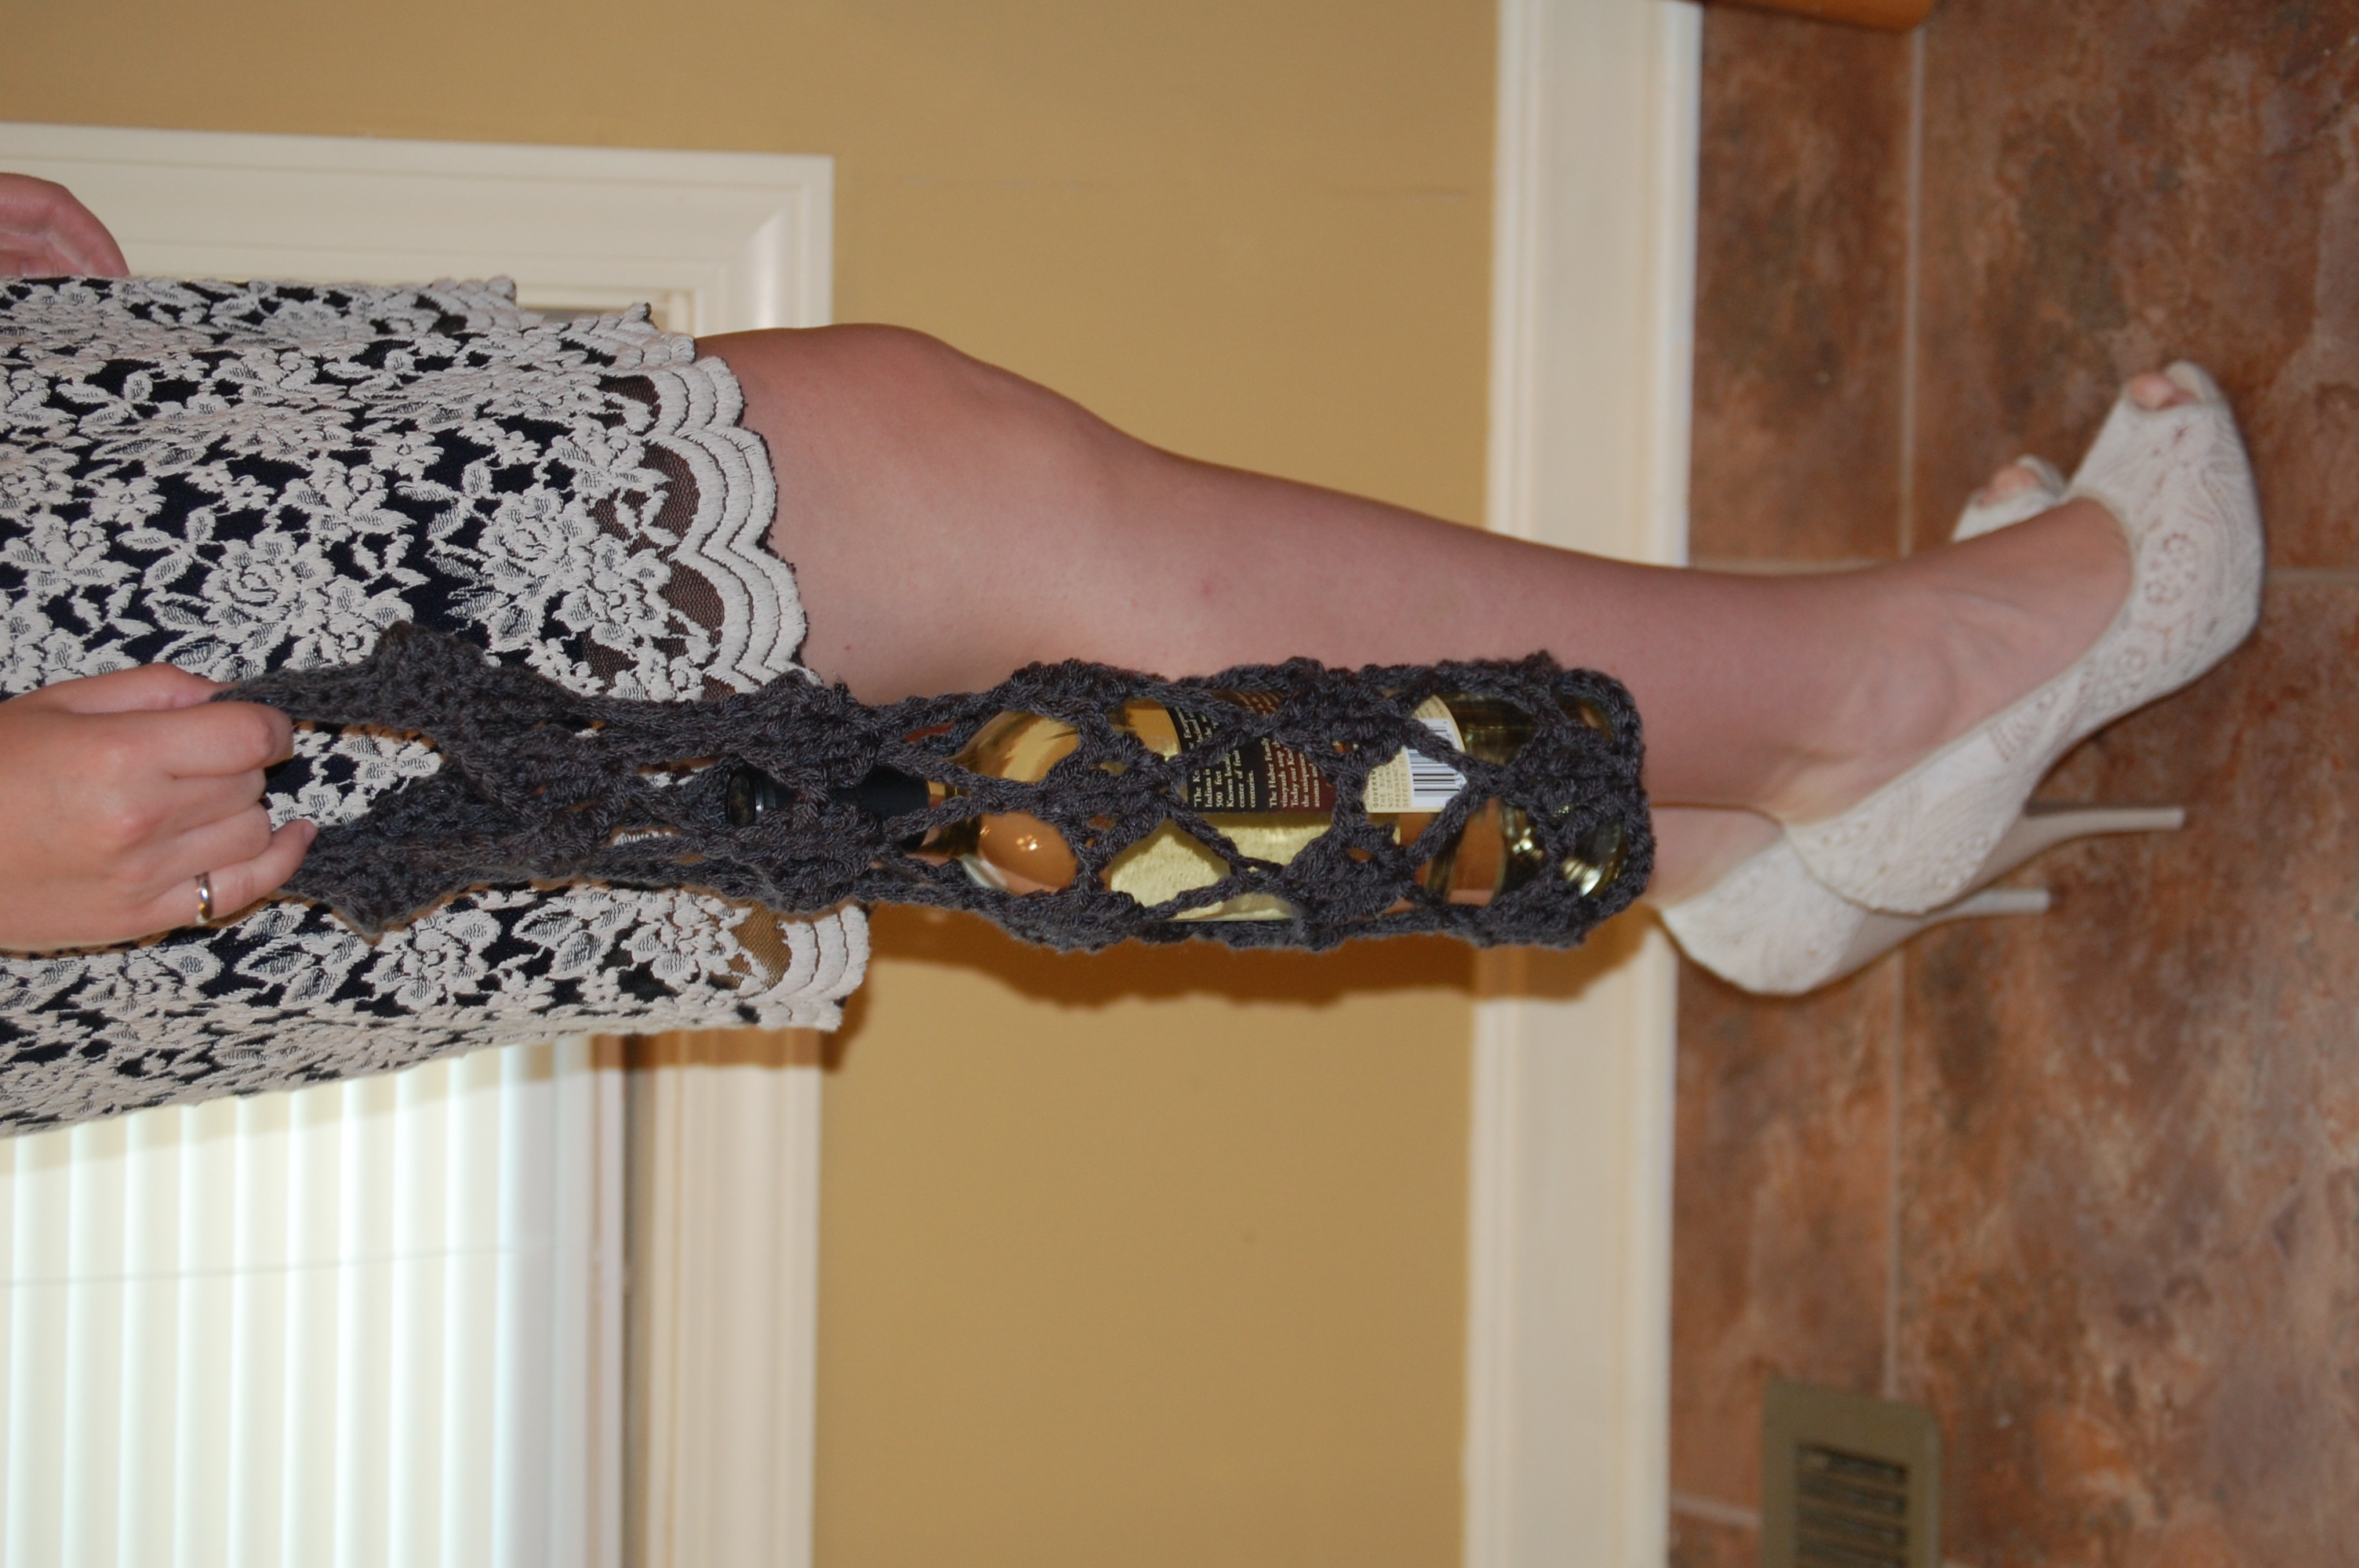
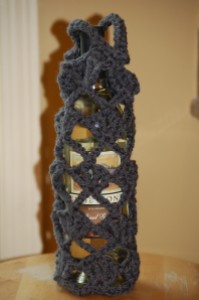
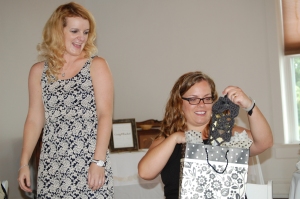
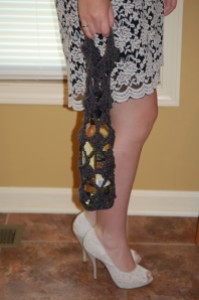
    As I mentioned in my Chevron Koozies post, I also made a wine carrier to thank my cousin Amber for hosting my Indiana bridal shower.  I made up the pattern to give wine carriers to my friends Rachael and Cassie for hosting my Houston bridal shower last month.  I love how they turned out!

    009

    DSC_0092

    011

    Materials:

    • 2 skeins of worsted weight yarn
    • US size K crochet hook

    Stitches Used:

    Instructions:

    Ch 4, sl st in first ch to make ring

    R1:  Ch 1, 8 sc in ring, sl st in first sc (8 sc)

    R2:  Ch 1, 2 sc in same stitch and in each stitch around, sl st in first sc (16 sc)

    R3:  Ch 1, 2 sc in same stitch, 1 sc in next stitch, * 2 sc in next stitch, 1 sc in next stitch, repeat from * around, sl st in first sc (24 sc)

    R4:  Ch 1, 2 sc in same stitch, 1 sc in next two stitches, 2 sc in next stitch, 1 sc in next two stitches, repeat from * around, sl st in first sc (32 sc)

    R5:  Holding 1 strand from each skein of yarn together through the rest of the project, ch 1, 2 sc in same stitch, 1 sc in next three stitches, 2 sc in next stitch, 1 sc in next three stitches, repeat from * around, sl st in first sc (40 sc)

    R6:  Ch 5, trc in same stitch, ch 1, trc in same stitch, ch 1, trc in same stitch, * ch 1, skip next 7 sc, 4 trc with a ch 1 between each trc in next sc, repeat from * four times, sl st in fourth ch of ch 5

    R7:  Sl st in ch space, sl st in trc, sl st in ch space, * ch 9, skip next three ch spaces, sc in next ch space, repeat from * four times, ch 5, tr trc in sl st before first ch 9

    R8:  Ch 5, trc in same stitch, ch 1, trc in same stitch, ch 1, trc in same stitch, * ch 1, 4 trc with a ch 1 between each trc in fifth ch of next ch 9, repeat from * four times, sl st in fourth ch of ch 5

    R9-R14:  Repeat R8 and R9 three times

    R15:  Ch 1, sc in same stitch, sc in each ch space and trc around, sl st in first sc (40 sc)

    R16:  Ch 1, sc in same stitch, sc in next 3 stitches, ch 13, skip next 13 stitches, sc in next 7 stitches, ch 13, skip next 13 stitches, sc in next 3 stitches, sl st in first sc

    R17:  Ch 1, sc in same stitch, sc in each sc and ch around, sl stitch in first sc, fasten off and work in ends (40 sc)

    Difficulty: Medium to Hard (the stitches are somewhat difficult)

    Time Required: 0.5 Movies

    Overall Experience: Excellent

    Wedding Doilies 3.0

    Last week I posted a pattern for an oval doily that I developed for my wedding. It almost looked circular from the outside, so I wasn’t overly happy with it. I edited the pattern, “fudging” the top and bottom stitches so they would be shorter in each round. I’m much happier with the outcome. The pattern would be absolutely ridiculous to write out. It’s quite complicated. Of anyone really, really wants it, leave me a comment and I’ll write it out. I really just wanted to share.  Yay ovals!

    20130814-205056.jpg photo-46 Doily