Egg-straordinary Easter Hat Pattern

One of my goals as I try to get my knitting pattern business off the ground was to create a pattern inspired by every major holiday this year.  When I thought of Easter, my mind initially jumped to bunnies and Easter bonnets, but there are a lot of bunny and bonnet hats out there already.  Next my mind jumped to Easter eggs.  A colorful Easter egg pattern could be really fun to make!  And the idea was born.

Ever since Lion Brand came out with their bonbons yarn, I’ve been wanting to make a project out of them!  I finally did it, and here is that project.  This hat was perfect because I wanted make an Easter egg inspired hat with lots of colors.  The bonbons brights colorway came in a sport weight yarn, perfect for spring weather.

Buy the pattern for $5 on Etsy here or on Ravelry here.

Materials:

Go to this link to buy a kit with everything you need to make this hat on Amazon.


Please comment below with any questions!

Buffalo Plaid Earwarmer

Buffalo plaid has been everywhere this winter season.  If you know me, you know I’m not that in to fashion trends.  However, something about buffalo plaid really appeals to me.  Since spring decided to let winter have a big last hurrah (at least I hope it is the last), I decided to design one more winter pattern:  buffalo plaid ear warmers.  The pattern features buffalo plaid stranded colorwork and a turban-like twist in the front.

Buy the pattern for $3 on Etsy here or on Ravelry here.

Materials:

Go to this link to buy a kit with everything you need to make this hat on Amazon.

  • Worsted weight yarn
  • 3 size 6 double pointed needles
  • Tapestry needle


Stitches Used:

Please comment below with any questions!

Appalachian Trail Koozie

We played Secret Santa at work this year. I drew a colleague who had recently taken off six months to hike the Appalachian Trail. (2200 miles!) For one of his gifts, I designed a koozie with the Appalachian Trail symbol. 


Difficulty: Easy

Time Required: 2 Movies

Overall Experience: Excellent

Chevron Pillow

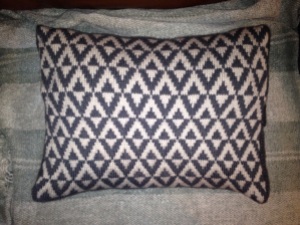
My friend Cassie bought me a knitting pattern book, Knitting 24/7, for my birthday last year.  It is full of fun, modern patterns.  She pointed out that there was a really cool pillow.  I took note and decided she was getting the pillow for her birthday.  While the pillow looks nice, I really hated making it.  I started it at the beginning of October on the car ride back from our wedding and just finished it two weeks ago!

20140530-075842-28722696.jpg

Why I didn’t like the pillow:

  • Construction Type:  I very much like my projects to be seamless if at all possible.  This pillow was the opposite of that.  The front of the pillow was made by knitting in a round with a steek.  A steek is basically an extra stripe in the fabric that you will cut through.  Yes.  You have to cut into your knitted fabric.  Then you have to sew up the edges so it doesn’t unravel.  Scariest thing ever.  You also have to knit a bunch of extra stitches, and I’m lazy.  After the front is made, the knitter must pick up stitches at the top and bottom of the pillow and knit the two back halves.  After all of that, the sides have to be seamed.  It would have been much easier to start at the center of the back, knit to the top, knit the front from the top to bottom, and knit the back from the bottom to the middle.
  • My Own Error:  I started out making the pillow on some very old circular needles my grandma gave me.  They were stiff and I was having a hard time working the project in the round and pulling the front design a little too tight.  I was really frustrated with the needles and was really wishing for new needles.  For Christmas, my husband bought me a new set of circular needles.  He wanted me to try them and I was super frustrated with the ones I was using.  I knew that the tension in the project may change a little if I switched, but I was ready to quit on the project.  I switched needles.  They were wonderful.  It was so easy to keep working the project.  After about an inch of more fabric, I noted that my tension had gotten looser.  I was concerned, but decided the pillow should stretch it out.  As I kept going, I noticed a major difference in the old knitting and new.  I didn’t know if a pillow was going to be able to overcome the problem.  I sat the project down for a couple of months.  I didn’t want to make the back (the pillow was very large) if I couldn’t fix the front.  My husband talked me into finishing it.  Despite the fact that the pillow was knitting too tight horizontally, it turned out wide.  The height was perfect.  Several people complained about this problem on Ravelry, so I wasn’t the only one.  I ended up sewing and stuffing my own pillow to fit it perfectly.  The change in tension isn’t obvious in the overstuffed pillow.

Difficulty:  Easy/Moderate

Time Required:  Many Movies

Overall Experience:  Poor

Mad Hatter Crochet Challenge – Cheshire Cat

One of the blogs I follow, The Crochet Crowd, held a Mad Hatter crochet challenge.  The goal of the challenge was to crochet a Mad Hatter hat following a pattern by Red Heart.  The crocheter could use any colors and decorate the hat using an Alice in Wonderland theme however he or she wished.  I made two hats.

I had fun being a little more artistic than usual with these hats.  The first hat was Cheshire Cat themed.  I loved the colors from the Tim Burton movie, so I based the cat off of that Cheshire Cat.  Typically with crochet the main body of a piece is made in a solid color or stripes.  Other pieces are made seperately and sewn on.  For this hat, I imagined the cat appearing out of the side of the hat so I crocheted the color changes into the hat using a similar technique to that used for stranded colorwork in knitting.  His eyes, nose and smile are clear, he then fades into the hat with only three stripes showing.  His tail became the ribbon that goes around the hat.  I added Red Heart Foxy yarn to his tail to make it furry.  Since the contest was sponsored by Red Heart, I bought all Red Heart yarn (and used a little stash yarn) for the final product.  I love how he turned out!  I had the hardest time not posting pictures of him until after the mail-in deadline for the contest (which was yesterday.)

20140402-200107.jpg

20140402-201305.jpg

20140402-201618.jpg