Wedding Afghans

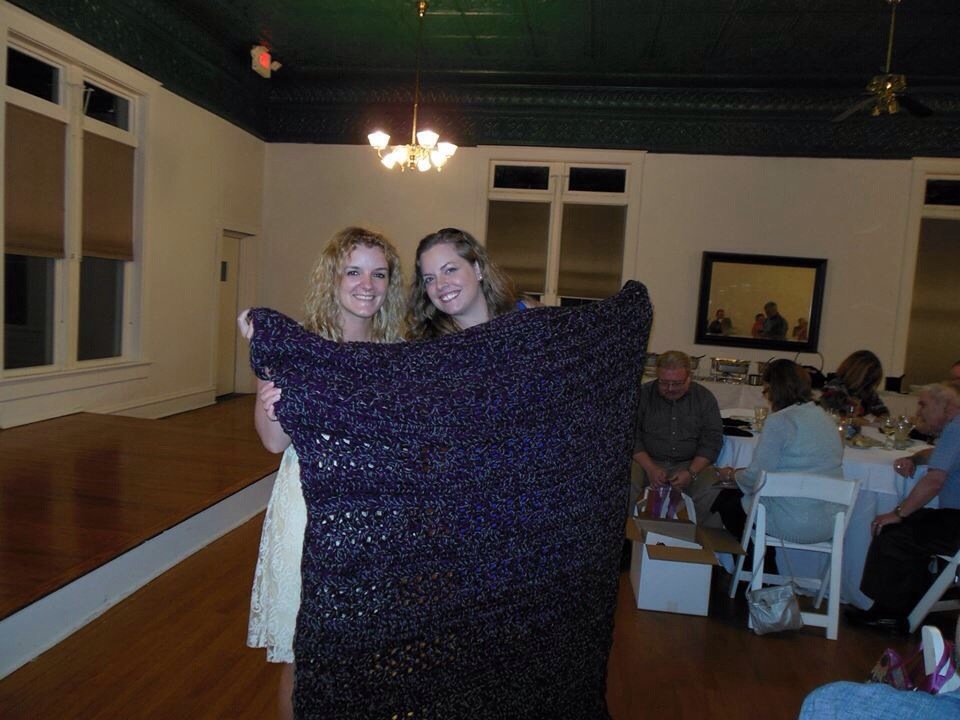
An acquaintance who had been in countless wedding once showed me a crocheted blanket that a bride had made her.  She gushed about how that gift was the most meaningful bridesmaid gift she had ever received.  Since I crochet, I tucked that little tidbit of information away for later.  When I got engaged, I pushed my fiance to help me pick out colors so I could start on the pile of blankets I was planning on making.

20131103-074736.jpg

I decided to make blankets for our three bridesmaids and both sets of parents.  I had to make five blankets, so I needed to find an afghan pattern that I could make fairly quickly.  I have made many afghans that took me months to make.  I didn’t have that much time.  I had an afghan pattern pinned named “Super Quick Throw.”  The blanket was crocheted with four strands of yarn held together as one with a giant hook.  That’s about as quick as one can hope for.  The blankets crocheted beautifully.

20131103-074805.jpg

I do have a few tips:

  • The pattern is available free on the Red Heart website.
  • I bought yarn in bulk in our wedding colors.  I chose acrylic yarn because it holds up well and for the price.  It crocheted into a stiff, scratchy blanket.  However, after washing and drying each blanket once, they were completely transformed.  They became pliable and soft.
  • The pattern calls for a hook size P-16 (11.5 mm).  I couldn’t find a hook this size and ended up with a 10 mm hook.  I adjusted by crocheting to the correct size rather than the correct number of stitches.  The pattern is easy, so it wasn’t hard to do.  The rows that require a certain number of stitches have a three stitch repeat.  There is a two stitch “border” on each side.  This means that your starting row should have a total stitch number that is a multiple of 3 plus 4 stitches.  (As written, the pattern calls for 58 stitches.  This is a multiple of 3 (54/3=18) plus 4.)  I don’t remember how many stitches I used.  I think it was 70.  Whatever gets you to a 48 inch wide blanket.
  • I used the no foundation row starting technique instead of the chain start technique in the pattern.  Here is a good tutorial.  This technique keeps your tension from being off in the first row and is easier to measure your 48 inches.
  • With the same “size verses stitches” philosophy, you should repeat Rows 2-7 until the blanket is the length you want.  The pattern calls for 58 inches.  I wanted my blanket to be at least 60 inches so I repeated until I finished on a Row 7 with a length greater than 60 inches.
  • The edges of the blanket turned out a little jagged.  I finished the blanket off with a border.  I slip stitched in each stitch on the short edges and single crocheted along the long edges.  This cleaned the blankets up nicely.

Difficulty:  Easy

Time Required:  About 13 movies per blanket

Overall Experience:  Excellent

20131103-074719.jpg20131103-075255.jpg20131103-074736.jpg


Groom’s Survival Kit

While searching for wedding things on Pinterest, I found many groom’s survival kits.  Since I knit I really liked the idea of making socks for my groom, so he didn’t get cold feet.  I put my own spin on the rest of items.

20131101-161058.jpg 20131101-161004.jpg 20131101-160918.jpg 20131101-160849.jpg 20131101-160811.jpg

The typical groom’s kit list comes with a piece of paper that says something similar to the following:

Groom’s Day-Of Survival Kit

  • Socks to keep cold feet away
  • Lifesavers to keep you from drowning in emotion
  • Small bottle of alcohol to calm your nerves
  • Mints to ensure a fresh kiss
  • Ring pop in case you forget the essentials

Looking at the list, there were lots of things I didn’t like about it:

  • Socks–Loved the socks idea
  • Lifesavers–Neither one of us are emotional people.  I’ve been called a robot by several people, and he isn’t any better.  He got me a shirt for my birthday that says:  “Feelings are boring.  Kissing is awesome.”  Lifesavers were off the list.
  • Small bottle of alcohol–I wasn’t sure when I would give this to him, and we got fined if we got caught with outside alcohol at the ceremony site.  A small bottle of alcohol was off the list.
  • Mints–This implies that he NEEDS a mint.  I didn’t want to imply that he had bad breath.  That seemed in poor taste.
  • Ring pop–Apparently the essentials are that he buys my jewelry and/or candy?  I didn’t like this one either.

That left me with one item.  Socks.  I decided to replace the items with different items that matched our personalities better.  I wrote a note on a tag on each item.  If you click on the pictures above you can see them.  Otherwise, each note is listed below:

  • Socks–So you don’t get cold feet
  • Lip balm–For the perfect first kiss that tastes like me (I wear Burt’s Bees all the time.)
  • Flask–In case you need courage of the liquid variety (that won’t get us fined…he could fill it at the venue)
  • A bottle opener key chain that says:  “I’LL LOVE YOU UNTIL THE ZOMBIES GET YOU”–So you know exactly how long I’ll love you
  • 52 REASONS CRAIG IS AWESOME–So you remember where we began and why we are doing this

Each of the items (except the lip balm) was hand made, not necessarily by me:

  • Socks–I made the socks.  See my Don’t Get Cold Feet post.
  • Lip balm–I actually had an unopened lip balm laying around because I buy them in bulk.
  • Flask–The flask came from Scoutmob.com.  Scoutmob is a site that features products by independent makers.  It’s pretty cool.  Check it out.
  • Key Chain–The zombie key chain came from Etsy.  The maker, FleurDesigns, was great to work with.  I got the key chain crazy fast.
  • 52 Reasons Book–I made the book during our first Valentine’s together.  See my 52 Reasons Book post.

Don’t Get Cold Feet

Before our wedding, I secretly knitted a pair of socks for my husband.  I gave them to him the morning of the wedding so he wouldn’t get “cold feet.”  I knitted the socks using the Deborah Norville Collection Serenity Garden Yarn in Twilight.  I loved how the color work turned out, and the yarn feels amazing.  I used a free pattern available on Ravelry titled “Basic Ribbed Socks.”  The pattern was easy to follow.  I didn’t make any adjustments to the pattern.  He married me, so I guess he didn’t get cold feet!

20131029-200938.jpg

20131029-201028.jpg

Difficulty:  Easy

Time Required: About 20 movies

Overall Experience:  Good.  The only thing I didn’t like is how the socks came together at the toe.  The joining technique caused a slightly pointed toe.

Little Lady Slippers

My friend Parnak’s baby shower is today.  I’m so sad that I’m missing it!  I still have a lot of things to do for my wedding and just didn’t have time to drive to San Antonio, spend a whole day, and drive back.  In addition to the “real” present that I shipped, I sent these sweet little baby booties.  The pattern is available in Booties by the Dozen by Kay Meadors.  This is my go to book for baby booties.  I love these patterns!  I didn’t alter the pattern from what is written.  The pattern is really simply, so I don’t really have any tips either!

20130901-094850.jpg

Difficulty:  Easy

Time Required:  2 Movies

Overall Experience:  Excellent

Crochet Wine Carrier

As I mentioned in my Chevron Koozies post, I also made a wine carrier to thank my cousin Amber for hosting my Indiana bridal shower.  I made up the pattern to give wine carriers to my friends Rachael and Cassie for hosting my Houston bridal shower last month.  I love how they turned out!

009

DSC_0092

011

Materials:

  • 2 skeins of worsted weight yarn
  • US size K crochet hook

Stitches Used:

Instructions:

Ch 4, sl st in first ch to make ring

R1:  Ch 1, 8 sc in ring, sl st in first sc (8 sc)

R2:  Ch 1, 2 sc in same stitch and in each stitch around, sl st in first sc (16 sc)

R3:  Ch 1, 2 sc in same stitch, 1 sc in next stitch, * 2 sc in next stitch, 1 sc in next stitch, repeat from * around, sl st in first sc (24 sc)

R4:  Ch 1, 2 sc in same stitch, 1 sc in next two stitches, 2 sc in next stitch, 1 sc in next two stitches, repeat from * around, sl st in first sc (32 sc)

R5:  Holding 1 strand from each skein of yarn together through the rest of the project, ch 1, 2 sc in same stitch, 1 sc in next three stitches, 2 sc in next stitch, 1 sc in next three stitches, repeat from * around, sl st in first sc (40 sc)

R6:  Ch 5, trc in same stitch, ch 1, trc in same stitch, ch 1, trc in same stitch, * ch 1, skip next 7 sc, 4 trc with a ch 1 between each trc in next sc, repeat from * four times, sl st in fourth ch of ch 5

R7:  Sl st in ch space, sl st in trc, sl st in ch space, * ch 9, skip next three ch spaces, sc in next ch space, repeat from * four times, ch 5, tr trc in sl st before first ch 9

R8:  Ch 5, trc in same stitch, ch 1, trc in same stitch, ch 1, trc in same stitch, * ch 1, 4 trc with a ch 1 between each trc in fifth ch of next ch 9, repeat from * four times, sl st in fourth ch of ch 5

R9-R14:  Repeat R8 and R9 three times

R15:  Ch 1, sc in same stitch, sc in each ch space and trc around, sl st in first sc (40 sc)

R16:  Ch 1, sc in same stitch, sc in next 3 stitches, ch 13, skip next 13 stitches, sc in next 7 stitches, ch 13, skip next 13 stitches, sc in next 3 stitches, sl st in first sc

R17:  Ch 1, sc in same stitch, sc in each sc and ch around, sl stitch in first sc, fasten off and work in ends (40 sc)

Difficulty: Medium to Hard (the stitches are somewhat difficult)

Time Required: 0.5 Movies

Overall Experience: Excellent

Chevron Koozies

My cousin Amber is the matron-of-honor in my wedding.  She planned a beautiful wedding shower for me that happened yesterday.  To thank her, I made her two chevron koozies and a wine carrier, which will be blogged about in a future post.  I really love how the koozies turned out!  I put them on pint glasses that will be given as a favor at our second reception.  Scroll down through all the pictures for the pattern.  Also, thanks to my sister Emily for taking pictures yesterday!  (One of these days I’m going to have to post a bunch of her pictures.  She’s really amazing!)

001

003

015

016

017

026

029

030

094

Disclaimer:  Feel free to make this pattern for your personal use, for your platypus, for charity, or to sell.  The only thing I ask is that you please do not sell it on Etsy.  If you are interested in purchasing a koozie from my Etsy store, you may do so here.

Materials:

  • Small amounts of worsted-weight yarn in contrasting colors (I chose grey (g) and off-white (w))
  • 5 size US 6 double pointed needles

Stitches Used:

Instructions:

For colorwork, use fair isle technique

Cast on 48 stitches using g, distrubute on four double pointed needles, knit in rounds

R1:  Continuing with g, k2 p2 around (48 stitches)

R2-4:  Repeat R1

R5:   With g and w, k1w, k3g, k5w, k3g around

R6:  Repeat R5

R7:  k2w, k3g, k3w, k3g, k1w around

R8:  Repeat R7

R9:  k3w, k3g, k1w, k3g, k2w around

R10:  Repeat R9

R11:  k1g, k3w, k5g, k3w around

R12:  Repeat R11

R13:  k2g, k3w, k3g, k3w, k1g around

R14:  Repeat R13

R15:  k3g, k3w, k1g, k3w, k2g around

R16:  Repeat R15

R17:  k3w, k3g, k1w, k3g, k2w around

R18:  Repeat R16

R19:  k2w, k3g, k3w, k3g, k1w around

R20:  Repeat R19

R21:  k1w, k3g, k5w, k3g around

R22:  Repeat R21

R23:  k3g, k3w, k1g, k3w, k2g around

R24:  Repeat R23

R25:  k2g, k3w, k3g, k3w, k1g around

R26:  Repeat R25

R27:  k1g, k3w, k5g, k3w around

R28:  Repeat R27

R29:  Continuing in g only, k48

R30:  Repeat R29

R31:  k2tog k2 around (36 stitches)

R32:  k2tog k2 around (27 stitches)

R33:  k2tog k1 around (18 stitches)

R34:  k2tog k1 around (12 stitches)

R35:  k2tog (6 stitches)

To finish, pull a loop through all 6 stitches on needle and pull tight.  Work in ends.

Difficulty:  Easy

Time Required:  1.5 Movies

Overall Experience:  Excellent

Saturday Night Purse

In addition to the Celtic Love Knot Scarf, I also made a purse for my friend Jenny’s fundraiser for her mission trip to Kenya.  I found this beautiful purse on cogknition’s site.  The pattern is freely available on the site.

Unfortunately, I did not have time before the auction to try to get the beautiful custom handles and leaves.  Instead, I was forced to purchase plain black bamboo handles from my local JoAnn. For the purse itself, I had a very difficult time achieving the crisp herringbone pattern shown in the picture.  The pattern is achieved by slipping some stitches from the left to right needle while holding the yarn in front of the stitches.  The purse is knit very tightly so that it is quite sturdy; however, I had a tendency to hold the yarn too tightly resulting in a non-existent herringbone pattern.  I ripped out my first attempt and started placing an extra needle under the yarn as I passed it in front of the stitches.  This helped, but the needle wasn’t big enough.  I ended up placing an extremely large (size N, 10mm) crocheting hook under the yarn as I passed the yarn in front of the stitches.  This process slowed me down, but I did achieve a herringbone pattern.  My pattern was still not as crisp as that shown in the picture.  Also, since I didn’t have the fancy leaves to put behind the roses, I didn’t think the knitted roses really looked like roses.  I substituted this Megan Mill’s crocheted rose instead.  Either I didn’t count right while making the rose, or the pattern had a problem.  It wasn’t necessary for the pattern to be exact, so I didn’t go back to see why I didn’t have the correct number of stitches left as I reached the end of Row 3.  I finished off and sewed the rose onto the front of the purse.

The purse turned out beautifully.  It is quite sturdy and both larger and heavier than it appears.  The knitted section of the purse ended up being about 8 in. tall and 10 in. wide.

Saturday Night Purse

Difficulty:  Moderate

The purse was constructed of a modified stockinette stitch, so the stitching wasn’t difficult.  The herringbone pattern was difficult to achieve as noted above.

Time Required:  8 movies

I didn’t like how the pattern was turning out, so I repeatedly knitted and ripped out stitches.  It would have taken less time if I hadn’t ripped out so much.

Overall Experience:  Good

The purse turned out really cute and sturdy.  I would make it again.

Celtic Love Knot Scarf

My friend Jenny is going to Kenya to work in an orphanage as part of a year long mission trip.  She held a silent auction to raise money for the trip and asked me to make a couple of things for the auction.  Since we are in Houston and it is ridiculously hot, I chose to try my hand at a love knot scarf.  I had seen some love knot items floating around Pinterest but didn’t really fall in love with a scarf until I found this free pattern on Ravelry.

I’ve been crocheting since before I can remember, but I had never made love stitches before.  Lucy Croft, who wrote the pattern, really covered all of her basis.  She included pictures with instructions for both left and right handed crocheters with both written instructions and a chart.  The directions were clear and easy to follow.  She used a light-weight yarn in her example that clearly showed loops (for lack of a better term) between the actual knots.  I used a heavier weight yarn (normal four-ply yarn) which resulted in less defined loops.  The final product was still a beautiful, light, summer scarf.

Love Knot Scarf

Difficulty:  Easy

Time Required:  1 Movie

Overall Experience:  Excellent

Knit Your Own Cat

My fiance loves his cat.  I’m not so sure that he doesn’t love her more than he loves me.  A couple of months before his birthday I stumbled upon a book on Amazon, Knit Your Own Cat.  The cat featured on the front cover even resembled his cat, Kittyface.  I purchased the book.  Being an avid knitter, knitting a small cat looked like it would be a quick, easy project that would amuse my fiance.


Kittyface

When the book came, I was disappointed in the pictures of finished cats that I saw inside.  The instructions called for the knitter to knit each piece flat and then sew all of the pieces together.  Not only does this increase the amount of construction time, but it also resulted in unsightly seems along the backs of the legs and down the center of the cat’s back.  I made many alterations as detailed below.  The finished project turned out really cute!

Knit Kitty

Difficulty:  Moderate

The knitting itself was simple.  A stockinette stitch was used for most of the project.  However, the cat was knit extremely tightly on tiny needles, which made the knitting more difficult.  There are many color changes that require a lot of attention.  The construction of the cat is rather time consuming and difficult.

Time Required:  11 Movies

I thought this was going to be a really quick project.  Boy was I wrong!  The construction alone took me three movies to complete.  (I monitor time in the number of movies I watch while crafting.)

Overall Experience:  Good

The product turned out very cute.  I would only make it as a gift for someone I know would really enjoy it.  Someone offered me $20 for the cat.  I wasn’t willing to part with it for that price!

Pattern Tips and Alterations:

The pattern is copyrighted, so if you are interested in creating the cat above, please purchase the pattern and follow the alterations detailed below.  This is for the pattern “Tabby Cat Prowling.”  I do not include pictures of the steps because I decided to start this blog after finishing the cat.

Legs:  Knit the legs in a round rather than flat using double pointed US 2 needles.  To accomplish this, follow the directions as written for each odd row.  For the even numbered rows, knit rather than purling and follow the row backwards.  This removes all seams from the backs of the legs.

Side of Body Pieces:  I made the side of body pieces as they were written in the pattern.  Later during the finishing phase I used a revised Kitchener stitch detailed by Anonyknits.  This resulted in losing some of my body stitches and a slimmer cat.  If I were going to make the cat again, instead of binding off stitches along the top of the body, I would leave the stitches on an extra needle and use the actual Kitchener stitch.

Tummy:  I knitted the entire tummy white to match the coloration of my fiance’s cat.

Finishing:  Since the legs were knitted in rounds, they do not need to be sewn.  The directions tell you to embroider the face after sewing the cat together, but obviously that need to be completed before construction of the cat.  The cat should be sewn along the back as mentioned in the “Side of Body Pieces” section.