Fix Approved Turkey Quinoa Frittata

This dish is great because you can make the frittata “filling” ahead of time and then quickly finish the rest of the frittata later. (This is great for quick morning meals!)


Servings: 6

21 Day Fix Container Equivalents:  1/2 green, 1/2 yellow, 1 red, 1/2 blue, 1/2 teaspoon

Filling Ingrediants:

  • 2 chopped bell peppers
  • 1 tsp olive oil
  • 1/2 chopped onion
  • 2 cloves minced garlic
  • 3/4 lb ground turkey
  • 1/2 tsp chili powder
  • 1/2 tsp ground cumin
  • 1/4 tsp salt
  • 1/4 tsp pepper
  • 1/2 cup organic tomato sauce
  • 1 cup cooked quinoa
  • 1/2 corn kernels
  • 1/2 cup Montery jack cheese

Frittata Ingredients:

  • Frittata filling
  • 6 large eggs
  • 1/4 tsp salt
  • 1/2 cup Parmesan cheese
  • 1 tsp olive oil
  • 1/4 cup Montery jack cheese
  • 1 tbsp Rosemary

Filling Instructions:

  1. Heat oil in skillet over medium heat
  2. Add onions and peppers, stir and cook until onions are translucent
  3. Add garlic and cook for one minute
  4. Add turkey, chili powder, cumin, salt, and pepper; cook until turkey is no longer pink
  5. Add tomato sauce, quinoa, and corn; cook until heated through
  6. Store filling in refrigerator or freezer in airtight container until ready to make frittata

Frittata Instructions:

  1. Preheat oven to broil
  2. Heat oil in cast iron skillet over medium heat
  3. Beat eggs
  4. Add Parmesan cheese, salt, and filling to egg mixture and stir
  5. Pour mixture in skillet
  6. Cook stirring frequently with rubber spatula until egg mixture has begun to set up, about 5 minutes
  7. Sprinkle Montery Jack cheese and rosemary on top of egg mixture
  8. Place skillet in oven and broil for 3-4 minutes or until browned

Nutritional Information: Calories 319, Fat 17.2g, Cholesterol 269 mg, Sodium 554 mg, Potassium 303 mg, Carbs 14.5 g, Protein 25.1 g, Vitamin A 14.3%, Vitamin C 46%, Calcium 15.4%, Iron 14.2%

If you have any questions about 21 Day Fix, I would love to answer them. Feel free to contact me in the comments below. Check out my story here.
One of my patterns is practically famous!

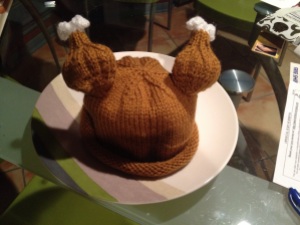
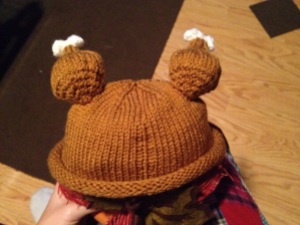
I love Ravelry.com for those of you that don’t know, it’s a site for everything knitting and crocheting. I’ve recently started posting some of my original patterns to the site. I just opened the main page to discover my Baby Turkey Hat pattern featured as one of their six Thanksgiving patterns! Someone else made the hat in the picture, but that is still really awesome. I love that someone else made one if my creations. I made four of these hats in the last two weeks!

20131126-220845.jpg

Baby Turkey Hat

This turned out too cute not to share right away.  A friend sent me a picture of a baby wearing a crocheted turkey hat and asked if I could make something similar.  It was adorable, so I quickly agreed.  I decided to knit the hat instead of crocheting it since the knit hat would be much stretchier.  I didn’t have the baby with me to try the hat on.  I looked online, but none of the patterns I found were quite what I wanted.  Below is the pattern I made up.  It turned out soooooo  cute!

20131112-193559.jpg

Materials:

  • 5 US Size 6 double pointed knitting needles
  • Extra needle or stitch holder
  • Stitch markers
  • Lion Brand Vanna’s Choice Yarn in Honey and White
  • Polyester filling
  • Tapestry needle
  • Crochet hook (optional)


Stitches:

Hat Instructions:

With Honey, cast on 72 stitches and distribute them evenly on four double pointed needles.

Join in round (being careful not to twist!) and knit each round until the piece is 5 inches long.  The brim of the hat will be rolled.  Unroll it to measure your 5 inches.

Crown:

R1:  K21, K and place marker on next stitch, K50 (72 stitches)

R2:  K72

R3:  K48, K and place marker on next stitch, K23 (72 stitches)

R4-7:  K72

R8:  (K4, K2tog, SSK, K4) 6 times (60 stitches)

R9:  K60

R10:  (K3, K2tog, SSK, K3) 6 times (48 stitches)

R11:  K48

R12:  (K2, K2tog, SSK, K2) 6 times (36 stitches)

R13:  K36

R14:  (K, K2tog, SSK, K) 6 times (24 stitches)

R15:  K24

R16:  (K2tog, SSK) 6 times (12 stitches)

Cut the yarn with several spare inches.  Thread a tapestry needle and pull yarn through all 12 stitches on needles.  Work in ends.

Leg Instructions:

20131112-193707.jpg

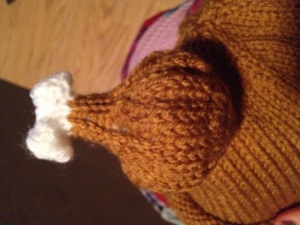
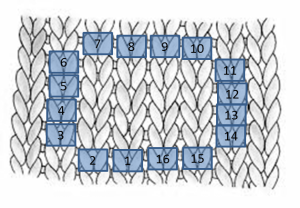
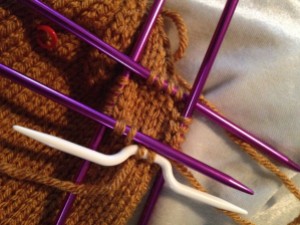
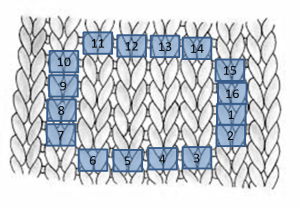
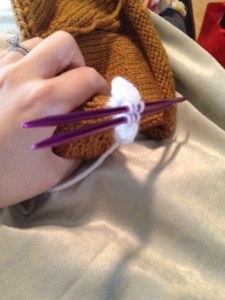
The tricky part of the leg is getting started.  You will need to pick up 16 stitches from the hat.  At the first marker, they should be picked up using Honey as shown in the figure below.  The number 1 corresponds to the first marked stitch on the hat.  Pick up the stitches in numerical order.  I find it easier to pick up the stitches using a crochet hook.  Place stitches 1 and 2 on the first needle, 3-6 on the second needle, 7-10 on the third needle, 11-14 on the forth needle, and 15-16 on an extra needle or stitch holder.  A picture of the stitch placement is also shown below.

Placement120131112-193313.jpg

After completing the first leg (see pattern below), pick up stitches for the second leg using the same method, but starting in a different place.  The number 1 in the figure below corresponds to the second marked stitch.

Placement2

Once the stitches are picked up, you are ready to knit!  The piece is worked back and forth for several rows and then worked in a round.  The pattern is the same for both legs once the stitches are picked up.

R1:  Starting with the marked stitch, K4, turn

R2:  S1, P4, turn

R3:  S1, K1, KFB twice, K2, turn

R4:  S1, P8, turn

R5:  S1, K1, KFB, K, KFB twice, K, KFB, K2, turn

R6:  S1, P14 turn

R7:  S1, K1, (KFB, K1) three times, (K1, KFB) three times, K2, turn

R8:  S1, P22, turn

R9:  S1, K1, (KFB, K) four times, K5, (KFB, K) four times, K3

R10:  Continuing in round, K36

R11-14:  K36

R15:  K6, K2tog, SSK, K4, K2tog, SSK, K2tog, SSK, K4, K2tog, SSK, K6 (28 stitches)

R16:  K5, K2tog, SSK, K2, K2tog, K2, SSK, K2, K2tog, SSK, K5 (22 stitches)

R17:  K4, K2tog, SSK, K2tog, K2, SSK, K2tog, SSK, K4 (16 stitches),

(Place polyester filling in leg)

R18:  (K2tog, SSK) four times (8 stitches)

R19-23:  K8

R24:  Break Honey and start knitting with White, K8

R25:  (K1, K2tog, K1) twice (6 stitches)

R26:  K1, Bobble, K2, Bobble, K1

Place more polyester filling in the leg if you wish.  Bind off.  I used the Kitchener stitch to bind off.

20131112-193419.jpg

20131112-193728.jpg

Difficulty:  Moderate-Difficult

Time Required:  4 Movies

Overall Experience:  Excellent