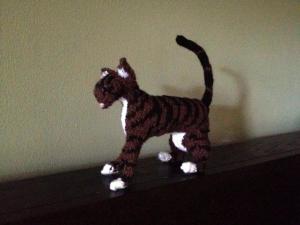
My fiance loves his cat. I’m not so sure that he doesn’t love her more than he loves me. A couple of months before his birthday I stumbled upon a book on Amazon, Knit Your Own Cat. The cat featured on the front cover even resembled his cat, Kittyface. I purchased the book. Being an avid knitter, knitting a small cat looked like it would be a quick, easy project that would amuse my fiance.

When the book came, I was disappointed in the pictures of finished cats that I saw inside. The instructions called for the knitter to knit each piece flat and then sew all of the pieces together. Not only does this increase the amount of construction time, but it also resulted in unsightly seems along the backs of the legs and down the center of the cat’s back. I made many alterations as detailed below. The finished project turned out really cute!
Difficulty: Moderate
The knitting itself was simple. A stockinette stitch was used for most of the project. However, the cat was knit extremely tightly on tiny needles, which made the knitting more difficult. There are many color changes that require a lot of attention. The construction of the cat is rather time consuming and difficult.
Time Required: 11 Movies
I thought this was going to be a really quick project. Boy was I wrong! The construction alone took me three movies to complete. (I monitor time in the number of movies I watch while crafting.)
Overall Experience: Good
The product turned out very cute. I would only make it as a gift for someone I know would really enjoy it. Someone offered me $20 for the cat. I wasn’t willing to part with it for that price!
Pattern Tips and Alterations:
The pattern is copyrighted, so if you are interested in creating the cat above, please purchase the pattern and follow the alterations detailed below. This is for the pattern “Tabby Cat Prowling.” I do not include pictures of the steps because I decided to start this blog after finishing the cat.
Legs: Knit the legs in a round rather than flat using double pointed US 2 needles. To accomplish this, follow the directions as written for each odd row. For the even numbered rows, knit rather than purling and follow the row backwards. This removes all seams from the backs of the legs.
Side of Body Pieces: I made the side of body pieces as they were written in the pattern. Later during the finishing phase I used a revised Kitchener stitch detailed by Anonyknits. This resulted in losing some of my body stitches and a slimmer cat. If I were going to make the cat again, instead of binding off stitches along the top of the body, I would leave the stitches on an extra needle and use the actual Kitchener stitch.
Tummy: I knitted the entire tummy white to match the coloration of my fiance’s cat.
Finishing: Since the legs were knitted in rounds, they do not need to be sewn. The directions tell you to embroider the face after sewing the cat together, but obviously that need to be completed before construction of the cat. The cat should be sewn along the back as mentioned in the “Side of Body Pieces” section.


