Melt in your Mouth Chicken

So…  it turns out that I’m cooking a lot this week.  I found Melt in your Mouth Chicken on Pinterest.  It sounded good, so I made it.  I’m not overly salt sensitive, but I found the chicken to be extremely salty.  It was so salty that I found myself taking a drink after every bite.  I adjusted the recipe.  It now has a great flavor, and I’m not overwhelmed with salt.  It’s also super easy to make.

MeltMouthChicken2

Ingredients:

1/2 cup of Parmesan cheese

1 cup of plain Greek yogurt

1 teaspoon of garlic powder

1/2 teaspoon of seasoning salt

1/2 teaspoon of pepper

2 lbs of chicken tenders


Directions:

  1. Preheat the oven to 375 degrees
  2. Wash chicken tenders, trim any unwanted portions of chicken, place in bottom of baking dish
  3. Mix the remaining ingredients and spread on top of chicken
  4. Bake for 45 minutes

There is one oddity.  When the chicken comes out of the oven, you will find that it is sitting in quite a lot of water.  This has happened every time I have made the dish.  See the picture below.

MeltMouthChicken1


Aunt Gracie’s Peaches and Cream Pie

I made my great-great-aunt’s peaches and cream pie to take in to work tomorrow.  I doubled the recipe and put it in to a 9 in. by 13 in. dish.  This is one of my favorite desserts.  The crust contains vanilla pudding making it moist and flavorful.  The filling consists of cream cheese and peaches, hence the name of the pie.

Peaches and Cream Pie

Ingredients:

3/4 cup flour

1/2 cup of sugar

1/2 teaspoons of salt

3 1/2 oz instant vanilla pudding

1 teaspoon baking powder

1 egg

1/2 cup of milk

15.4 oz can of sliced peaches

1 8 oz package of cream cheese

4 tablespoons of peach juice from can

sugar and cinnamon for topping

Directions:

  1. Preheat the oven at 350 degrees.
  2. Grease the bottom of a 9 inch pie pan.
  3. Beat the flour, salt, instant vanilla pudding, baking powder, egg, and milk in a large bowl for one minute or until well mixed.  The mixture should be a soft, sticky dough.  Spread the mixture into the bottom of the pie pan.
  4. Place the peaches evenly on top of the pudding mixture.
  5. Mix the cream cheese, peach juice, and sugar on medium speed for two minutes or until smooth.  Spread the mixture over the peaches but not all the way to the edge of the pan.
  6. Sprinkle cinnamon and sugar on top.
  7. Bake for 30-35 minutes.

Nachtfalter Summer Knit-a-Long–Week 1 Progress

As I wrote previously, I am participating a summer knit-a-long.  Each Monday during the knit-a-long, Holla Knits will post the weekly goal.  This week’s goal was to cast on and knit half of the bottom ribbing.  The bottom ribbing is simple, but the twists make it interesting.  There is a forum on Ravelry where participants can discuss progress and challenges.  I’m having so much fun knitting with other people!  Below you can see my progress thus far as well as what the finished product should look like.

KAL Week 1

nachtfalterstargreen

(Ratings based on this week’s work only.)

Difficulty:  Easy

Time Required:  3 Movies

Overall Experience:  Good

(I tend to get a little bored on very repetitive patterns.  I’ll enjoy the lace much more once I get there.)

Shrimp Chowder

My purpose for this blog is primarily to discuss crafts, but I will also include some recipes that I want to record in a digital format.  For lunch this afternoon, I made a soup my mom makes that started out as potato soup but has morphed into what I will call a shrimp chowder.

Shrimp Chowder

Yield:  8 servings, serve with cornbread

Ingredients:

For an ease of use standpoint, most of the ingredients are frozen.  Feel free to substitute fresh ingredients.

  • 4 fist sized peeled and chopped potatoes
  • 1 cup frozen chopped onions
  • 1 cup frozen chopped carrots
  • 1 1/2 cups frozen corn
  • 3 tablespoons of flour
  • 11 tablespoons of butter
  • 2 tablespoons of olive oil
  • 6 cups of milk
  • 3 chicken bullion cubes
  • 1 small bag of precooked frozen shrimp without tails
  • Shredded cheddar cheese for topping
  • Bacon for topping

Directions:

  1. Thawing all ingredients before starting will reduce cooking time but is not required
  2. Over medium heat put 3 tablespoons of butter and olive oil in pan
  3. Add onion and carrots and cook until onions are clear
  4. Add flour and cook for 3 minutes, stirring constantly
  5. Reduce heat to Medium-Low, add milk, stir
  6. Add potatoes and bullion cubes, cook until potatoes are done stirring often
  7. Add 8 tablespoons of butter, corn, and shrimp, return heat to medium and bring to boil stirring often
  8. Remove soup from heat
  9. Serve soup with cheddar cheese and bacon sprinkled on top

Hello Kitty Scarf

My 15-year-old sister is OBSESSED with Hello Kitty.  When I stumbled upon a crocheted Hello Kitty scarf on Pinterest, I knew that was going to be part of her Christmas present.  The pattern was written by Made by K.  The pattern is quick, easy, and looks just like Hello Kitty.  The only drawback is that it is very long.  Karin of Made by K included multiple sets of alternate instructions for different parts of the scarf.  I found this fun because I had choices, but others might find this confusing.

The scarf turned out adorable.  Below you can find my alterations from the written pattern (although the written pattern is really made for alterations):

  1. Karin made her scarf for a child and included seven regular granny squares (four white center and three grey center).  Since my scarf was for a very tall (5’10ish) teenager, I made 11 regular granny squares (6 white center and 5 grey center).
  2. There are several methods for joining the granny squares.  I used the join as you go method described in the pattern.
  3. Karin gives easy border and harder border instructions.  The connected squares tend to dip in where they are joined (see picture below from Karin’s blog).  After completing the first row of the harder border, which is supposed to give a smooth border, my project was still dipping in at these locations.  (I wasn’t planning a blog at this point or I would show pictures.)  I accounted for this in Row 2 of the border.  Row 2 asks the crocheter to single crochet all the way around the scarf.  I followed this except I half double crocheted in the double crochet stitches from Row 1 (see picture below).
  4. I added the flower detail to both Hello Kitty squares instead of just one.

IMG_2029

Here is my (almost) fiance (at that time) modeling the scarf.  It really brings out his…something.

Craig Hello Kitty

My sister loved the scarf.  She modeled it with all of her other Hello Kitty Christmas items.

Difficulty:  Easy

The pattern may be a little hard to follow since it is quite long.

Time Required:  2 Movies

Overall Experience:  Excellent

Burlap Roses

Shortly after Craig and I were engaged in December, one of my bridesmaids decided to throw us an engagement party.  The location she chose already had a rustic feel, so she wanted to go with the burlap and mason jar theme so popular on Pinterest.  I had pinned some burlap roses some time ago that I really wanted to try to make.  My original pin didn’t include a tutorial, so I went searching for a tutorial and found a great one on Snug as a Bug Baby’s blog.  The blog entry show step by step instructions for making beautiful burlap roses.  Each step even includes a picture for clarity.  If you choose to make these roses, here are my tips and suggestions:

  1. I didn’t actually know where to buy burlap since this was my first burlap craft project.  (I use it in concrete applications for research projects somewhat often.)  I discovered that you can buy it fairly cheap at Lowe’s or Home Depot.  This is very low quality, bulk burlap.  I ended up using this as the tablecloth at the party.  At JoAnn Fabric, I found all different colors of burlap and even burlap with different designs.  I picked up small amounts of several different types for decorating at the party.
  2. This project makes a huge mess.  You end up with burlap “strings” everywhere.  Be prepared to deal with that when you are finished.  It also smells like burlap.
  3. The tutorial does not explicitly say that you need to hot glue every petal.  It says to glue where needed.  Since hot glue does flow through the petals, I thought I might be able to get by with gluing every other petal.  This was a mistake.  Glue every petal.  Glue liberally.
  4. In the project, the crafter cuts strips of burlap.  Burlap ribbon is a thing (although I’ve never used it).  It might be worth trying the ribbon.  This would result in less mess and cleaner looking flowers.  I for one kind of like the “strings” coming off of the raw edge of the roses.  They add to the rustic feel.

This is once again a project I decided to do before the blog idea came into my head or I would have posted more pictures.  I love the way the flowers turned out.  The were a big hit at the party.  Many people came up to our table at the restaurant and asked where we got them.  The official restaurant photographer even took a picture of them and added it to the restaurant’s Facebook page!  After the party, I put all of the flowers in one mason jar and keep them on the coffee table in my living room.

Difficulty:  Easy

Time Required:  2 Movies

Overall Experience:  Good

Here are a few pictures of the party itself.  I love how the decorations turned out!

Nachtfalter Summer Knit-a-Long

I’m very new to craft blogging.  (As in I started yesterday.)  Another blogger, reWOLLuzza liked my Saturday Night Purse post yesterday, so I decided to check out her (much more established) blog.  On her blog I found many beautiful patterns and was delighted to find that she is working with a couple of other popular blogs (Holla Knits and  Under the Red Umbrella)to complete a summer knit-a-long of her Nachtfalter pattern shown below.  I’ve never knit with other people before.  I am beyond excited.  The idea is that a group of knitters will work on the same project over a six week period.  “Cast On Day” is tomorrow, so I found the project just in time!  I quickly knitted partial swatches to check my gauge.  I’ll post my weekly progress here.

nachtfalterstargreen

Bottom ribbing gauge 1.5″

Gauge1

Butterfly Lace 1″

Gauge2

Batman Koozie

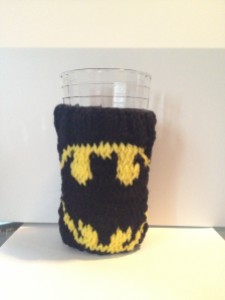
Knit koozies have become quite popular in Houston in the last few months.  After seeing some quite boring koozies at various local hotspots, I decided I should come up with some jazzier varieties.  Since then I’ve made koozies with cables, lace, camo, school logos, and my most popular creation, Batman.  I’ll disperse some of the other patterns in the blog in coming months, but for now, here is Batman.

Batman Koozie

Disclaimer:  Feel free to make this pattern for your personal use, for your platypus, for charity, or to sell.  The only thing I ask is that you please do not sell it on Etsy.  If you are interested in purchasing a koozie from my Etsy store, you may do so here.

Yarn:  Small amounts of four-ply black (B) and yellow (Y)

Needles:  Four US Size 6 double pointed needles (DPN)

Instructions:

Cast on 48 stitches with B and distribute among three DPN

Row 1:  Working in rounds, *Knit B (KB) 2, Pearl B (PB) 2, repeat from (*) until end (48 stitches)

Rows 2-4:  Repeat Row 1

Row 5:  KB 48

Row 6:  KB 48

*Note* After joining the yellow, I twisted the yarn on the wrong side every two or three stitches.  Long sections of yarn inside of the work make it difficult to place a glass inside.

Row 7:  Join Y, KB 17, KY 14, KB 17

Row 8:  KB16, KY 2, KB1, KY3, KB1, KY2, KB1, KY3, KB1, KY2, KB16

Row 9:  KB15, KY 2, KB1, KY4, KB4, KY4, KB1, KY2, KB 15

Row 10:  KB14, KY2, KB2, KY4, KB4, KY4, KB2, KY2, KB14

Row 11:  KB13, KY2, KB3, KY4, KB4, KY4, KB3, KY2, KB13

Row 12:  KB12, KY2, KB5, KY2, KB6, KY2, KB5, KY2, KB12

Row 13:  KB12, KY1, KB22, KY1, KB13

Rows 14-15:  Repeat Row 13

Row 16:  KB12, KY2, KB20, KY2, KB12

Row 17:  KB13, KY2, KB18, KY2, KB13

Row 18:  KB14, KY2, KB16, KY2, KB14

Row 19:  KB15, KY2, KB2, KY1, KB1, KY1, KB4, KY1, KB1, KY1, KB2, KY2, KB15

Row 20:  KB16, KY2, KB1, KY4, KB2, KY4, KB1, KY2, KB16

Row21:  KB17, KY2, KB1, KY3, KB2, KY3, KB1, KY2, KB17

Row22:  KB18, KY12, KB18

Row 23:  KB48

Continue in B

Row 24:  *k2tog, K2, Repeat from (*) 12 times (36 stitches)

Row 25:  *k2tog, K2, Repeat from (*) 9 times (27 stitches)

Row 26:  *k2tog, K1, Repeat from (*) 9 times (18 stitches)

Row 27:  *k2tog, K1, Repeat from (*) 6 times (12 stitches)

Row 28:  *k2tog, Repeat from (*) 6 times (6 stitches)

To finish, pull a loop through all 6 stitches on needle and pull tight.  Work in ends.

Difficulty:  Easy

Time Required:  2 Movies

The knitting is very quick.  Twisting the yarn behind the project is the largest time-suck.

Overall Experience:  Excellent

This is a quick project.  I carry one around in my purse to put on my glass when I go places.  I think someone has asked me about it every time I’ve used it.

Saturday Night Purse

In addition to the Celtic Love Knot Scarf, I also made a purse for my friend Jenny’s fundraiser for her mission trip to Kenya.  I found this beautiful purse on cogknition’s site.  The pattern is freely available on the site.

Unfortunately, I did not have time before the auction to try to get the beautiful custom handles and leaves.  Instead, I was forced to purchase plain black bamboo handles from my local JoAnn. For the purse itself, I had a very difficult time achieving the crisp herringbone pattern shown in the picture.  The pattern is achieved by slipping some stitches from the left to right needle while holding the yarn in front of the stitches.  The purse is knit very tightly so that it is quite sturdy; however, I had a tendency to hold the yarn too tightly resulting in a non-existent herringbone pattern.  I ripped out my first attempt and started placing an extra needle under the yarn as I passed it in front of the stitches.  This helped, but the needle wasn’t big enough.  I ended up placing an extremely large (size N, 10mm) crocheting hook under the yarn as I passed the yarn in front of the stitches.  This process slowed me down, but I did achieve a herringbone pattern.  My pattern was still not as crisp as that shown in the picture.  Also, since I didn’t have the fancy leaves to put behind the roses, I didn’t think the knitted roses really looked like roses.  I substituted this Megan Mill’s crocheted rose instead.  Either I didn’t count right while making the rose, or the pattern had a problem.  It wasn’t necessary for the pattern to be exact, so I didn’t go back to see why I didn’t have the correct number of stitches left as I reached the end of Row 3.  I finished off and sewed the rose onto the front of the purse.

The purse turned out beautifully.  It is quite sturdy and both larger and heavier than it appears.  The knitted section of the purse ended up being about 8 in. tall and 10 in. wide.

Saturday Night Purse

Difficulty:  Moderate

The purse was constructed of a modified stockinette stitch, so the stitching wasn’t difficult.  The herringbone pattern was difficult to achieve as noted above.

Time Required:  8 movies

I didn’t like how the pattern was turning out, so I repeatedly knitted and ripped out stitches.  It would have taken less time if I hadn’t ripped out so much.

Overall Experience:  Good

The purse turned out really cute and sturdy.  I would make it again.